


- 13,303 views, 3 today

108
Hi there!
Over the many years I have been experimenting with Minecraft, I have noticed a trend in the popularity of various projects and texture packs. The submissions with pretty pictures on the front, have, on average, a very significant boost when it comes to views, which of course, results in downloads and diamonds. However creating nice pictures can be an issue for many people. Not everyone has an expensive, wonderfully fast computer that can render high resolution texture packs for nice displaying, and many are not educated when it comes to camera angles and such. There are many wonderful projects I see that nobody looks at, just because it isn't displayed nicely. I hope to educate everyone here on how to increase the popularity of their creations simply by making nice pictures of them.
I use an external rendering program, called Chunky to render minecraft images.It is a program designed for rendering snapshots of your world, and creating real shadows, reflective water, lighting color changes, and large image files.
This can be done in game with various mods, however they only support some graphics cards, (not including mine) and are incredibly difficult to run.Chunky removes the need to have a fast computer for this. Rendering externally means your computer can work hard to make one frame nice, instead of trying to make it render many frames in-game. Keep in mind that the speed of your computer will still affect the process. A slower computer will take longer to render of course, but the advantage is that pretty much any computer can complete the task.
Any texture pack 256x256 and below, can be used for the rendering. A larger one is recommended, but it will, of course, decrease the speed at which your computer renders, which brings me to the speed itself. The major downside to Chunky is that it takes averylong time to render just one image. I have a fast computer, but rendering one image with good quality can still take two hours or so for me, so be prepared to sit back and watch your computer chug. I generally render only one to two images per project because of this, but if you are prepared to wait a while, it is well worth it to render all of your images.
So let's get started then, shall we? This is long so take notes or bookmark the page for future use.
Assuming your creation is all done and ready to go, your first step, will of course be to attain a free copy of Chunkyhere. Chunky works on Windows, OSX, and I believe Linux also.
Open it. Once it has been opened you will be greeted with a window prompting you to pick a world save. Any world save in your "saves" folder in your "Minecraft" folder will show up there. Pick the world with your creation. (If you are displaying a texture pack you have made, pick any world that has nice terrain or structures. If you have none, download some off of the internet.)
After picking, you will see an overview of your world, a region for chunk selection, and tabs for navigating the program options.
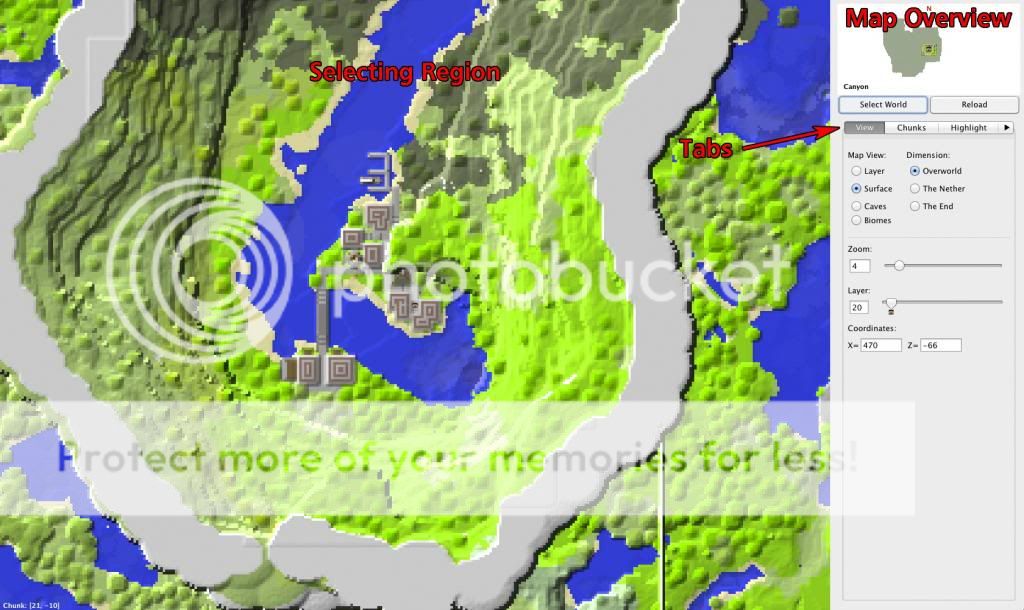
The overview will give you a general idea of your position within your world. The chunk selection area allows you to select the desired chunks for rendering, which I will go over later on. I will go over each tab separately.
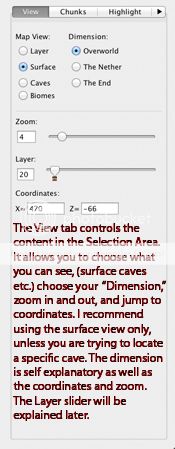
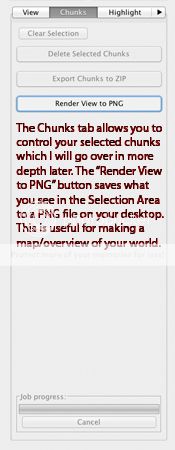
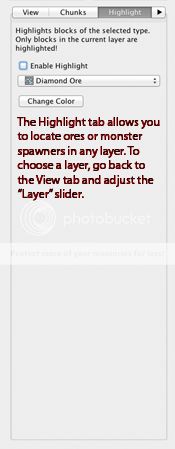
View Tab: Chunks Tab: Highlight Tab:
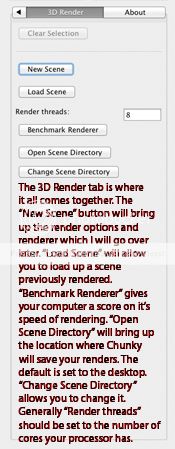
Options Tab: 3D Render Tab:
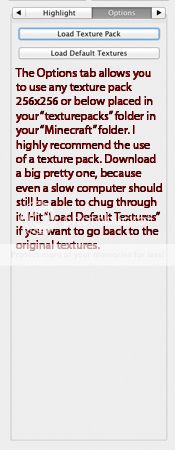
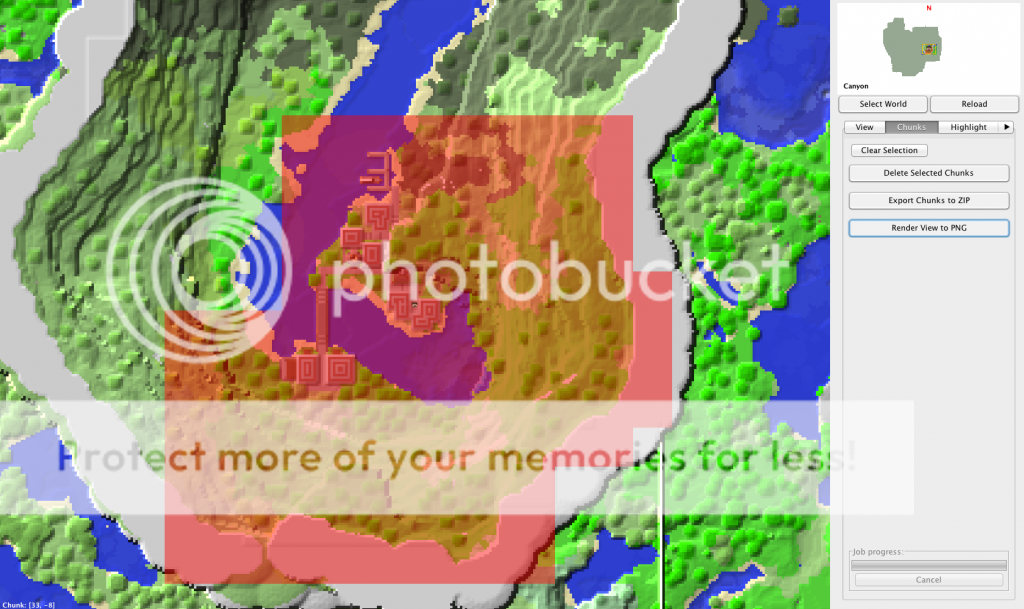
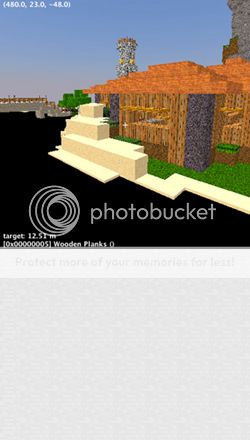
The next step, once you have gotten a texture pack loaded, and your scene planned out, is to select the chunks you want to be rendered. Chunky will render every chunk selected, so do not select more than necessary. Doing so will significantly increase render times. Generally you will want to highlight the entirety of your scene area, and a good amount of the background. In this example, I have a world I created that is a large canyon. I only want to render a part of this canyon; the village you will be able to see in the above image. I will select this part of the world only, as well as the high canyon wall behind so as to provide a background. Selecting is done by holding shift, clicking, and dragging the mouse over the desired area. I selected my desired area here.
Once you have selected your chunks, hit the "New Scene" button under the "3D Render" tab. This will bring up a box allowing you to name your new scene. I will name my example "Canyon Render."
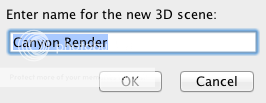
Hit "OK" and you will be greeted by two windows. One controls your render settings, and the other allows you to position your camera.
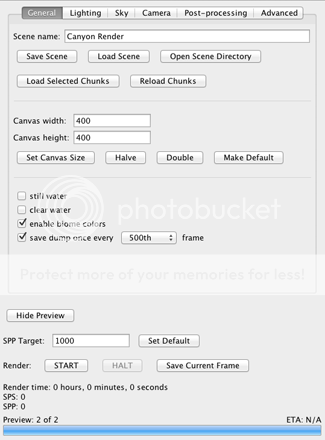
The first tab is your "General" one (look above). In here you can rename your scene, load one, and check the save directory. As for image size, I generally render images in 1920 x 1080, because that is the most common screen size. That has an aspect ratio of 16:9. Before positioning the camera, I recommend setting the "Canvas Size" to 1280 x 720 (default is 400 x 400). This is the same ratio, and I will change it to 1920 x 1080 before the final render, however it is easier to position the camera with a smaller window size due to less lag. If you are rendering images for display on PMC only, then you should probably stick to 1280 x 720 because PMC downsizes the images regardless of size. Hit "Set Canvas Size" or press enter to change the size of the preview window. "Still Water" will make water in your scenes to appear flat and smooth rather than the default choppy look (the last example image at the bottom shows these effects). Turning on "Clear Water" makes individual blocks of water, not part of a sitting body (river, ocean, etc.), clearer. There will still be effects to make the water visible, however blocks of water in space, such as a waterfall, will be clear. I highly recommend turning this on if you have waterfalls or any other floating blocks of water, for your scene will look much nicer. I have not noticed any disadvantages to having it on. I recommend biome colors to be off, as this reduces odd changes in foliage color. This will set all colors to the default, so if you like the biome color of the render area, or have custom color files, leave it on. "Save Render Dump" should be on as well. This will save a copy of your files at the 500th frame, so if your computer crashes, you will be able to load the previous dump. The "SPP Target" commands the overall image quality of the finished picture. 1000 is default and works well, however if you have much artificial lighting, (torches, glowstone, etc.) in your scene, I would turn it up to somewhere from 10,000 to 100,000. Hitting "START" does the obvious, and "Save Current Frame" will save a dump to your hard drive as is if you like how it looks, or just want to be safe.
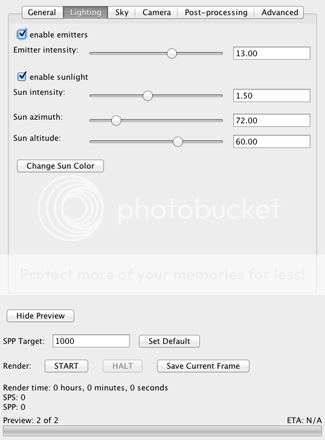
On to the next tab; "Lighting." "Enable Emitters" allows torches, glowstone, and any other lighting devices in your world to give off ambient light in your scene. I recommend this for any scene containing these lighted elements. However, if your scene is outside, and very bright, you may want to turn it off. If the lighting isn't going to show up very much (for instance if only a small area is lit by emitters) you can render much faster without them, and get better image quality in those areas. You can play with the intensity however you want, but I usually leave mine at a value of 1.00. You will, of course, want to enable sunlight unless you are underground, in the nether, or are rendering a cloud or fog covered scene. Again, the intensity is up to you, but 1.00-1.50 will give you a pretty average look. The "Sun Altitude" controls the sun's movement on a vertical axis across the sky. Basically, it controls how high it is. The "Sun Azimuth" is a bit more difficult to grasp. It controls the rotation of the sun around the center of the selected chunks. Basically, it is the direction the sun is coming from (north, south, etc.). You can play with these two sliders by hand, and the lighting in the preview window will give you a sense of what it will look like. I also recommend changing the sun color to a very light yellow or orange. This really just makes it look more cheerful, but you can also add a demonic look, or whatever you want really.
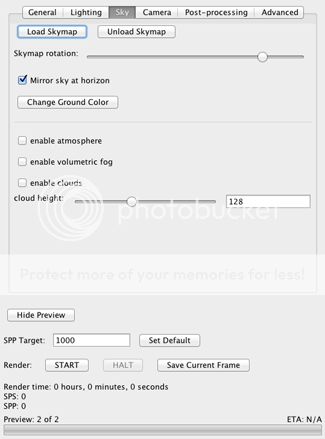
On to the "Sky" tab. You will want to load a skymap if any part of your sky is showing. You can download some great sky maps here.The "Skymap Rotation," well, rotates the skymap image. Mirroring the sky at the horizon is recommended in case any part of the horizon is showing. It can look a bit funny, but it is better than having the image abruptly stop. Changing the "Ground Color" changes the color behind the skymap, if you choose not to use one. "Enabling Atmosphere," will create the fog effect that you get when playing Minecraft and looking long distances. I usually leave it off. "Volumetric Fog" will add "particles" to the air, as to illuminate the sunlight lit parts, (imagine streaks of sunlight coming through windows). I highly recommend turing this on if you plan to take pictures inside a cave or building. Enabling clouds, will add Minecraft's classic clouds. Do not enable this if you are using a skymap. The height I think is self-explanatory.
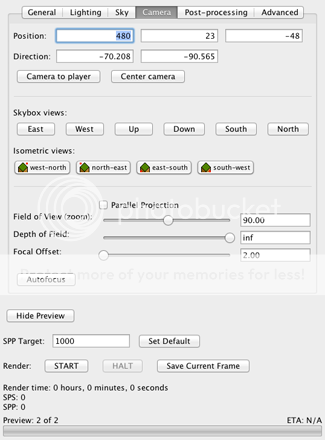
Next tab is "Camera." "Position" allows you to set your camera position based on in-game x,y,z coordinates. Direction sets the direction the camera faces. I don't really recommend using these. I will explain camera positioning later on. "Camera to Player" centers the camera on the player's last position in the map. Centering the camera puts the camera in the best, most centralized position it can based on the selected chunks. The "Skybox Views" will point the camera in various labelled 90 degree directions. Isometric views zoom the camera way out, and view the entire map in one view. The various buttons control the placement of the camera based on cardinal directions. If you get stuck in this odd camera view, turn off parallel projection below to return to normal. The "Field of View" (FOV) is basically a zoom. Somewhere between 60 and 70 is average. "Depth of Field" is a photographic term describing the physical depth of the image that is in focus. Setting this to infinite, will put everything in focus. If you decide you want very close, or far parts of your image to be blurry, you can place the crosshair over the thing you want in focus and hit "Autofocus." Wait until you position the camera in space to do this. Also keep in mind that shallow depths of field (low values) will make everything look miniature. This is a really fun effect, but not necessarily desired.
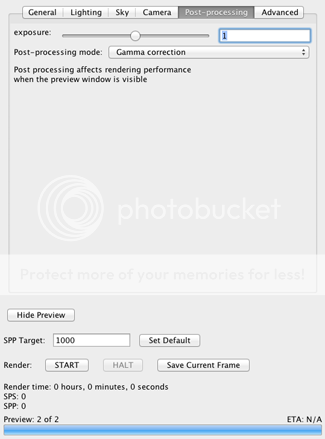
"Post-Processing" This one is simple. "Exposure" controls the relative brightness of your image. The two modes are "Gamma Correction" and "Tonemap OP 1." For brightness, I recommend just using the "Sun Intensity" in the "Lighting" tab, however, If you want an even darkening or lightening across the whole image, (ground and sky) this works better. "Gamma Correction" and "Tonemap OP 1" both work equally well. The main advantage to changing the exposure is one can adjust this slider during rendering, and the render process will not start over. It will merely brighten or darken based upon input values.
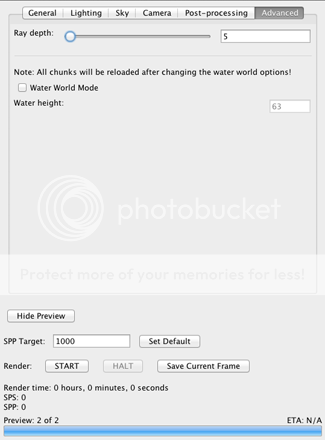
Last, is "Advanced." "Ray Depth" controls how rays (light) pass through translucent objects, reflect, and refract. It generally increases visibility through windows and increases reflections. The default is 5, but a higher value can look nice. This does significantly increase render time however. "Water World Mode" will overlay all chunks with water at the desired height. If you want this, do it before anything else.
Okay, now that I have gone over all the tabs and recommended values, lets talk about camera positioning. In your preview tab, you can use the W,A,S,D keys to move the camera about. R, and F will move the camera up and down. J, and K will move the camera forwards and back at a much quicker rate than W, and D.
I have positioned the camera, and all is ready to go for rendering. I am rendering at an SPP of 1500, at 1920 x 1080, with a depth of field of 24.50 (super shallow), and a ray depth of 8. All other settings remain as shown in the above images. Here is the render preview now.
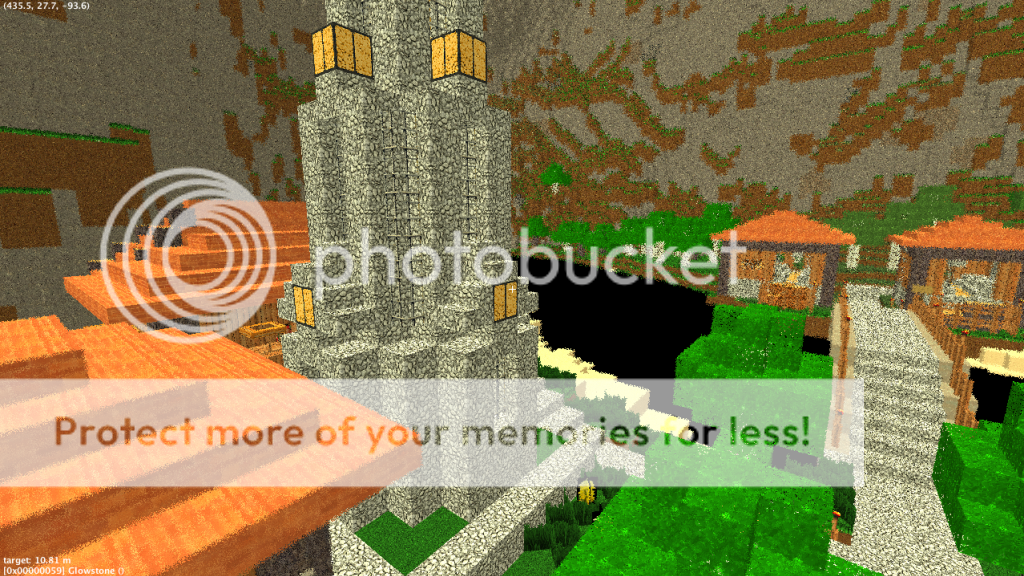
Image Progress:
As you can see, the image quality is really bad in the beginning. As Chunky renders each frame, it gets progressively better. Just wait until it finishes for the best quality. However, if you are satisfied with it you can hit the "Save Render Dump" button and then just quit the program.
And here she is...
That concludes the process of using Chunky to render nice Minecraft images. I will touch on a few more things quickly. If you are displaying a project of yours, make sure you have lotsof pictures. They don't all have to be rendered, but the more images you have the better. Make sure all of your pictures are of different things though. Having a bunch of pictures of the same thing from the same angle may cause people to just start quickly skipping through them. You want to hold the viewer's interest. For showing off a texture pack, pick nice world saves you have made, or ones you have downloaded off the internet. Although you are only showing off textures, having a nice world is really helpful. Also keep in mind that you are promoting your texture pack. Make sure to show the viewer most or all of the blocks. They don't have to be all together, but it is good to be sure to have a nice balance of blocks and different locations.
If you read all the way through this, I congratulate you. I realize this is reallylengthy, but I felt it had to be done. I hope you really benefit from this. I did it for you, this wonderful community, and I hope to see more projects with rendered pictures in the future. If you have any suggestions about how to make this better, please tell me. I welcome any feedback with open arms.

Thanks again for sticking through this. I hope I really helped out some people with the talent for creation, but limited by their computer. Go make beautiful Minecraft creations!
And thanks for this too!
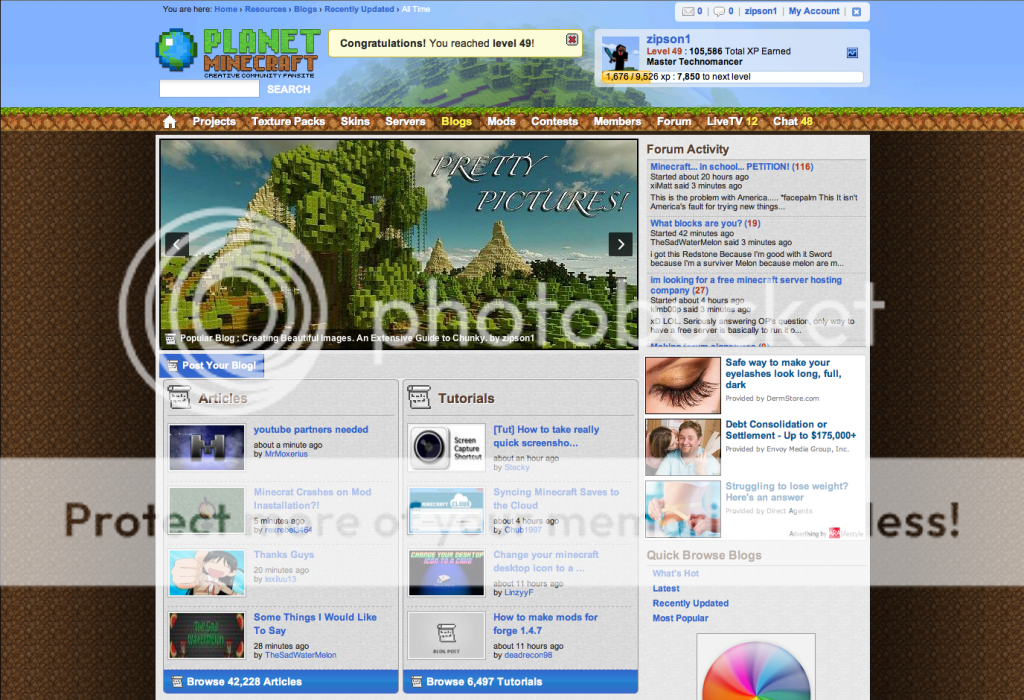
Over the many years I have been experimenting with Minecraft, I have noticed a trend in the popularity of various projects and texture packs. The submissions with pretty pictures on the front, have, on average, a very significant boost when it comes to views, which of course, results in downloads and diamonds. However creating nice pictures can be an issue for many people. Not everyone has an expensive, wonderfully fast computer that can render high resolution texture packs for nice displaying, and many are not educated when it comes to camera angles and such. There are many wonderful projects I see that nobody looks at, just because it isn't displayed nicely. I hope to educate everyone here on how to increase the popularity of their creations simply by making nice pictures of them.
I use an external rendering program, called Chunky to render minecraft images.It is a program designed for rendering snapshots of your world, and creating real shadows, reflective water, lighting color changes, and large image files.
This can be done in game with various mods, however they only support some graphics cards, (not including mine) and are incredibly difficult to run.Chunky removes the need to have a fast computer for this. Rendering externally means your computer can work hard to make one frame nice, instead of trying to make it render many frames in-game. Keep in mind that the speed of your computer will still affect the process. A slower computer will take longer to render of course, but the advantage is that pretty much any computer can complete the task.
Any texture pack 256x256 and below, can be used for the rendering. A larger one is recommended, but it will, of course, decrease the speed at which your computer renders, which brings me to the speed itself. The major downside to Chunky is that it takes averylong time to render just one image. I have a fast computer, but rendering one image with good quality can still take two hours or so for me, so be prepared to sit back and watch your computer chug. I generally render only one to two images per project because of this, but if you are prepared to wait a while, it is well worth it to render all of your images.
So let's get started then, shall we? This is long so take notes or bookmark the page for future use.
Assuming your creation is all done and ready to go, your first step, will of course be to attain a free copy of Chunkyhere. Chunky works on Windows, OSX, and I believe Linux also.
Open it. Once it has been opened you will be greeted with a window prompting you to pick a world save. Any world save in your "saves" folder in your "Minecraft" folder will show up there. Pick the world with your creation. (If you are displaying a texture pack you have made, pick any world that has nice terrain or structures. If you have none, download some off of the internet.)
After picking, you will see an overview of your world, a region for chunk selection, and tabs for navigating the program options.
The overview will give you a general idea of your position within your world. The chunk selection area allows you to select the desired chunks for rendering, which I will go over later on. I will go over each tab separately.
View Tab: Chunks Tab: Highlight Tab:
Options Tab: 3D Render Tab:
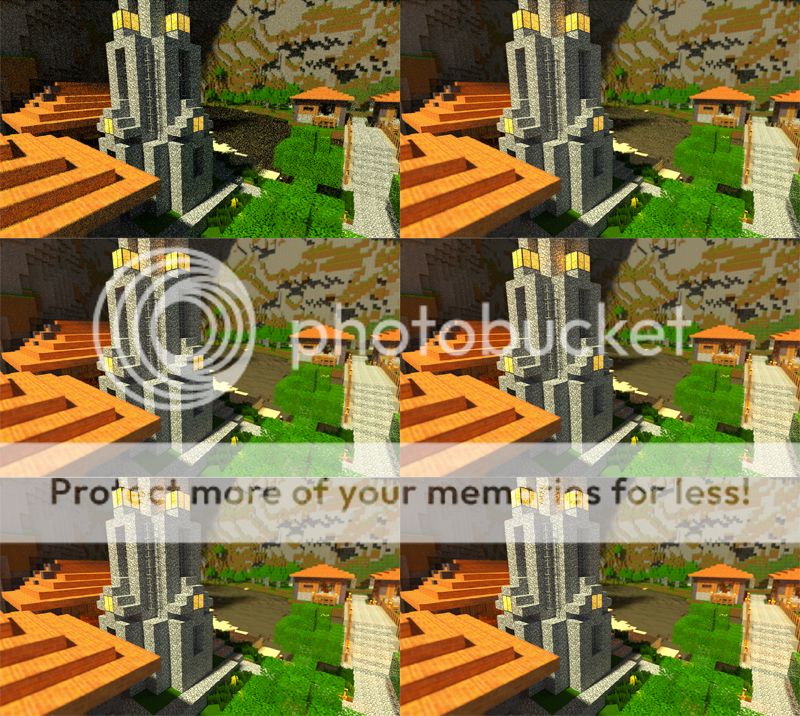
The next step, once you have gotten a texture pack loaded, and your scene planned out, is to select the chunks you want to be rendered. Chunky will render every chunk selected, so do not select more than necessary. Doing so will significantly increase render times. Generally you will want to highlight the entirety of your scene area, and a good amount of the background. In this example, I have a world I created that is a large canyon. I only want to render a part of this canyon; the village you will be able to see in the above image. I will select this part of the world only, as well as the high canyon wall behind so as to provide a background. Selecting is done by holding shift, clicking, and dragging the mouse over the desired area. I selected my desired area here.
Once you have selected your chunks, hit the "New Scene" button under the "3D Render" tab. This will bring up a box allowing you to name your new scene. I will name my example "Canyon Render."
Hit "OK" and you will be greeted by two windows. One controls your render settings, and the other allows you to position your camera.
The first tab is your "General" one (look above). In here you can rename your scene, load one, and check the save directory. As for image size, I generally render images in 1920 x 1080, because that is the most common screen size. That has an aspect ratio of 16:9. Before positioning the camera, I recommend setting the "Canvas Size" to 1280 x 720 (default is 400 x 400). This is the same ratio, and I will change it to 1920 x 1080 before the final render, however it is easier to position the camera with a smaller window size due to less lag. If you are rendering images for display on PMC only, then you should probably stick to 1280 x 720 because PMC downsizes the images regardless of size. Hit "Set Canvas Size" or press enter to change the size of the preview window. "Still Water" will make water in your scenes to appear flat and smooth rather than the default choppy look (the last example image at the bottom shows these effects). Turning on "Clear Water" makes individual blocks of water, not part of a sitting body (river, ocean, etc.), clearer. There will still be effects to make the water visible, however blocks of water in space, such as a waterfall, will be clear. I highly recommend turning this on if you have waterfalls or any other floating blocks of water, for your scene will look much nicer. I have not noticed any disadvantages to having it on. I recommend biome colors to be off, as this reduces odd changes in foliage color. This will set all colors to the default, so if you like the biome color of the render area, or have custom color files, leave it on. "Save Render Dump" should be on as well. This will save a copy of your files at the 500th frame, so if your computer crashes, you will be able to load the previous dump. The "SPP Target" commands the overall image quality of the finished picture. 1000 is default and works well, however if you have much artificial lighting, (torches, glowstone, etc.) in your scene, I would turn it up to somewhere from 10,000 to 100,000. Hitting "START" does the obvious, and "Save Current Frame" will save a dump to your hard drive as is if you like how it looks, or just want to be safe.
On to the next tab; "Lighting." "Enable Emitters" allows torches, glowstone, and any other lighting devices in your world to give off ambient light in your scene. I recommend this for any scene containing these lighted elements. However, if your scene is outside, and very bright, you may want to turn it off. If the lighting isn't going to show up very much (for instance if only a small area is lit by emitters) you can render much faster without them, and get better image quality in those areas. You can play with the intensity however you want, but I usually leave mine at a value of 1.00. You will, of course, want to enable sunlight unless you are underground, in the nether, or are rendering a cloud or fog covered scene. Again, the intensity is up to you, but 1.00-1.50 will give you a pretty average look. The "Sun Altitude" controls the sun's movement on a vertical axis across the sky. Basically, it controls how high it is. The "Sun Azimuth" is a bit more difficult to grasp. It controls the rotation of the sun around the center of the selected chunks. Basically, it is the direction the sun is coming from (north, south, etc.). You can play with these two sliders by hand, and the lighting in the preview window will give you a sense of what it will look like. I also recommend changing the sun color to a very light yellow or orange. This really just makes it look more cheerful, but you can also add a demonic look, or whatever you want really.
On to the "Sky" tab. You will want to load a skymap if any part of your sky is showing. You can download some great sky maps here.The "Skymap Rotation," well, rotates the skymap image. Mirroring the sky at the horizon is recommended in case any part of the horizon is showing. It can look a bit funny, but it is better than having the image abruptly stop. Changing the "Ground Color" changes the color behind the skymap, if you choose not to use one. "Enabling Atmosphere," will create the fog effect that you get when playing Minecraft and looking long distances. I usually leave it off. "Volumetric Fog" will add "particles" to the air, as to illuminate the sunlight lit parts, (imagine streaks of sunlight coming through windows). I highly recommend turing this on if you plan to take pictures inside a cave or building. Enabling clouds, will add Minecraft's classic clouds. Do not enable this if you are using a skymap. The height I think is self-explanatory.
Next tab is "Camera." "Position" allows you to set your camera position based on in-game x,y,z coordinates. Direction sets the direction the camera faces. I don't really recommend using these. I will explain camera positioning later on. "Camera to Player" centers the camera on the player's last position in the map. Centering the camera puts the camera in the best, most centralized position it can based on the selected chunks. The "Skybox Views" will point the camera in various labelled 90 degree directions. Isometric views zoom the camera way out, and view the entire map in one view. The various buttons control the placement of the camera based on cardinal directions. If you get stuck in this odd camera view, turn off parallel projection below to return to normal. The "Field of View" (FOV) is basically a zoom. Somewhere between 60 and 70 is average. "Depth of Field" is a photographic term describing the physical depth of the image that is in focus. Setting this to infinite, will put everything in focus. If you decide you want very close, or far parts of your image to be blurry, you can place the crosshair over the thing you want in focus and hit "Autofocus." Wait until you position the camera in space to do this. Also keep in mind that shallow depths of field (low values) will make everything look miniature. This is a really fun effect, but not necessarily desired.
"Post-Processing" This one is simple. "Exposure" controls the relative brightness of your image. The two modes are "Gamma Correction" and "Tonemap OP 1." For brightness, I recommend just using the "Sun Intensity" in the "Lighting" tab, however, If you want an even darkening or lightening across the whole image, (ground and sky) this works better. "Gamma Correction" and "Tonemap OP 1" both work equally well. The main advantage to changing the exposure is one can adjust this slider during rendering, and the render process will not start over. It will merely brighten or darken based upon input values.
Last, is "Advanced." "Ray Depth" controls how rays (light) pass through translucent objects, reflect, and refract. It generally increases visibility through windows and increases reflections. The default is 5, but a higher value can look nice. This does significantly increase render time however. "Water World Mode" will overlay all chunks with water at the desired height. If you want this, do it before anything else.
Okay, now that I have gone over all the tabs and recommended values, lets talk about camera positioning. In your preview tab, you can use the W,A,S,D keys to move the camera about. R, and F will move the camera up and down. J, and K will move the camera forwards and back at a much quicker rate than W, and D.
I have positioned the camera, and all is ready to go for rendering. I am rendering at an SPP of 1500, at 1920 x 1080, with a depth of field of 24.50 (super shallow), and a ray depth of 8. All other settings remain as shown in the above images. Here is the render preview now.
Image Progress:
As you can see, the image quality is really bad in the beginning. As Chunky renders each frame, it gets progressively better. Just wait until it finishes for the best quality. However, if you are satisfied with it you can hit the "Save Render Dump" button and then just quit the program.
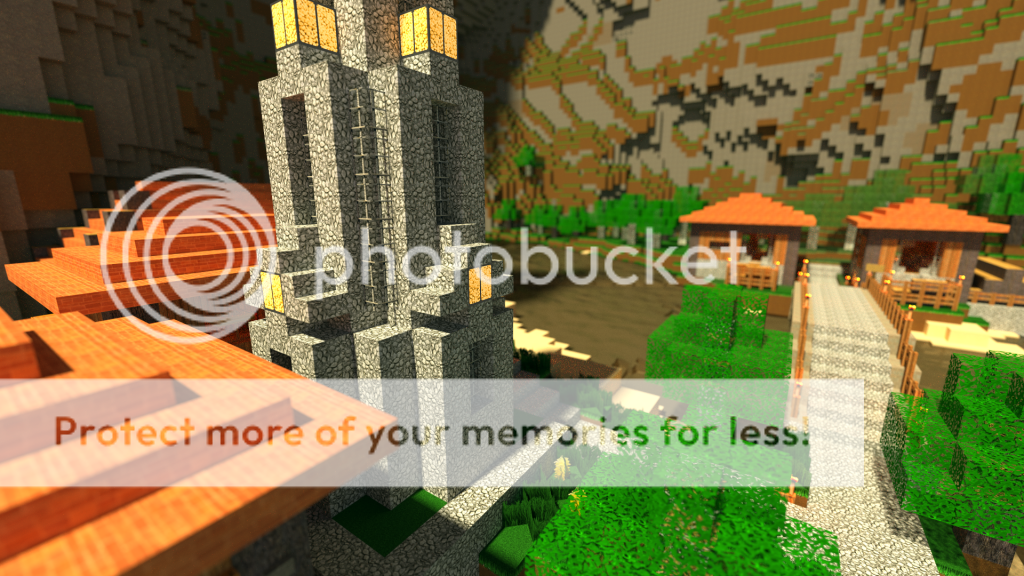
And here she is...
That concludes the process of using Chunky to render nice Minecraft images. I will touch on a few more things quickly. If you are displaying a project of yours, make sure you have lotsof pictures. They don't all have to be rendered, but the more images you have the better. Make sure all of your pictures are of different things though. Having a bunch of pictures of the same thing from the same angle may cause people to just start quickly skipping through them. You want to hold the viewer's interest. For showing off a texture pack, pick nice world saves you have made, or ones you have downloaded off the internet. Although you are only showing off textures, having a nice world is really helpful. Also keep in mind that you are promoting your texture pack. Make sure to show the viewer most or all of the blocks. They don't have to be all together, but it is good to be sure to have a nice balance of blocks and different locations.
If you read all the way through this, I congratulate you. I realize this is reallylengthy, but I felt it had to be done. I hope you really benefit from this. I did it for you, this wonderful community, and I hope to see more projects with rendered pictures in the future. If you have any suggestions about how to make this better, please tell me. I welcome any feedback with open arms.
A few more examples:
Thanks again for sticking through this. I hope I really helped out some people with the talent for creation, but limited by their computer. Go make beautiful Minecraft creations!
And thanks for this too!
| Tags |
11 Update Logs
Update #11 : by zipson1 02/01/2014 4:01:48 pmFeb 1st, 2014
Updated information regarding "Clear Water."
LOAD MORE LOGS
tools/tracking
2028064
6
creating-beautiful-images-to-attract-attention


 deilsouic090
 SubarashI
 TheMountaineer
 CrystalRuby
 SpainOnMinecraft
 JustaFlqmingo
 GoggleD0GG
 DolphinCupcake
 WYHA-Storm
Create an account or sign in to comment.
I've tried to load a zip file, then all my chunks reload but the colour doesnt change, then when I open a new scene it still uses default, anyone has an idea?
But I've been trying to make pics of a build I made in one of my worlds, quite far from the spawn (I started at coordinates 3000, 3000 because it is, like many other builds in that world, very big.
But I can't seem to get that area rendered, any tips?