


- 15,953 views, 4 today

138
Introduction
Hello fellow skinners! (I do suppose you're a skinner, since you're reading this... :) )
A user (Choosler) has recently asked me how I shade my skins (He loved the shading on my last 2) and whether I could teach him. Now, I thought "Sure, but why only him?" and decided to spread my wisdom (lol) around the PMC community, since I keep hearing apprentice skinners moaning about their lack of shading abilities. So here is my skin-making tutorial with a special focus on shading!
Materials:
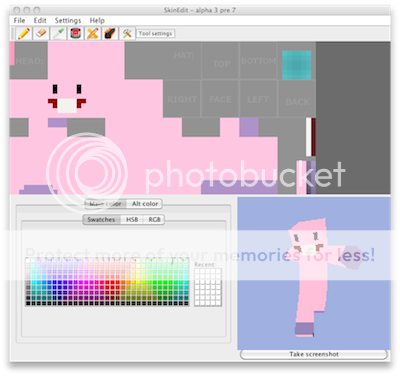
SkinEdit, Gimp and this wonderful picture:

Step 1: Form and color
I always start with filling in the skin with solid color. I then add the clothing if there is any. The details like eyes, mouth, hair and accessories come last. During this whole time I keep comparing with the reference picture.
Now, when the form is finished and I'm sure that it won't change much (if at all), I save the skin and open it up with
Gimp. I also open the reference picture I'm using. Now, with the eyedropper tool I make sure I used the right colors.
(In my case, I missed the color of the claws/paws and made it much lighter and grayer than it actually is.)
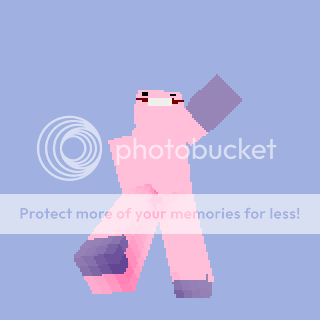
 < At the end of Step 1
Step 2: Simple Shading
Simple shading is the best friend of new skinners, because it doesn't require any knowledge of anything (except maybe knowing how to right-click) and once you become familiar with it, it can do wonders for your skins.
First of all get hold of the dodge/burn tool in SkinEdit (it's that weird, burning, black spoon), click 'tool options' and slide the button a bit to the left. This is also possible with the GIMP counterpart (also looks like a black spoon). Now to get to what I mean by 'simple shading':
-Firstly, right-click a pixel to make it darker (burn it)
-Then click the pixel to the right, the one to the left and the first one again
-Now click 5 pixels in a row with your first one being in the middle
-Rinse and repeat as long as you want
This is also possible in many directions, not only left and right:

Now, you know how to shade! But now you may be asking yourself, "Where do I shade?".
What kind of a horrible person would I be if I didn't answer that question, right?
Well, when I start shading, I usually start with the legs and arms. The center pixels are almost always the two center ones on the top and bottom of the leg's (or arm's) "left" side:
here

here
For the bottoms of the feet, I just take the color of an adjacent pixel and make it a tad darker (burn again):
The exact same is done to the arms (except that they probably have different details), the pattern of the
shading is the same.
Part 2.1
I draw the knees and elbows by burning 2 pixels in the middle of the front part of the leg (or back part of the arm)and then dodging the 2 pixels above that. If I think you can barely see it, I add another
"layer" of shading (burn/dodge first pixels again and the ones next to them).

The only thing left, so that the legs/arms look realistically shaded, is the lighting on the muscles.
I dodge the whole center of the outer (right) part of the limb and then do some more simple lighting (like simple
shading, just that you don't right-click, but rather left-click). Here, I also took the time to highlight parts of the claws in order to make them reflect light.
So the arms are shaded, now it's time for the torso, my favorite part. :D
Part 2.2
I shade the chest by burning 4 pixels in the 4th/5th row, 2 pixels between the pairs. I dodge the area above that and then experiment looking at which version looks the best. Next, I burn the same shading pattern we used on the
legs onto the sides if the body. After that, I either make the whole stomach darker (muscular-skinny) or lighter
(chubby-seriously obese). In both cases, the lightest point is in the middle of the body (upper stomach).

For the back, I usually just make the spine by painting two columns: one dark, the other light. Then I dodge a bit of the upper part of the back.

Part 2.3
I start shading the head by burning the corners. Then, I dodge the top of the head and the central parts of the sides. At the end, I darken the bottom, making sure that it's darker than the sides of the head in all places they make contact. When I have details that would be on top of the skin in reality (in this skin's case the teeth) I burn the pixels just underneath it.
Here, I darkened the pixels under the teeth and the top pixels of the teeth, since the upper lip is "over" it:

Finale
Here's the final version of the skin so you can take another look at where and how I shaded:
 View Rufus the Naked Mole Rat
Here are several examples of skins with my method of shading:
 View Sonny
 View The Reincarnation Demon
Diamonds are highly appreciated! Not for my own good, but for the community's! The more diamonds this blog gets, the more people can see it! :)
Hello fellow skinners! (I do suppose you're a skinner, since you're reading this... :) )
A user (Choosler) has recently asked me how I shade my skins (He loved the shading on my last 2) and whether I could teach him. Now, I thought "Sure, but why only him?" and decided to spread my wisdom (lol) around the PMC community, since I keep hearing apprentice skinners moaning about their lack of shading abilities. So here is my skin-making tutorial with a special focus on shading!
Materials:
SkinEdit, Gimp and this wonderful picture:
Step 1: Form and color
I always start with filling in the skin with solid color. I then add the clothing if there is any. The details like eyes, mouth, hair and accessories come last. During this whole time I keep comparing with the reference picture.
Now, when the form is finished and I'm sure that it won't change much (if at all), I save the skin and open it up with
Gimp. I also open the reference picture I'm using. Now, with the eyedropper tool I make sure I used the right colors.
(In my case, I missed the color of the claws/paws and made it much lighter and grayer than it actually is.)
< At the end of Step 1Step 2: Simple Shading
Simple shading is the best friend of new skinners, because it doesn't require any knowledge of anything (except maybe knowing how to right-click) and once you become familiar with it, it can do wonders for your skins.
First of all get hold of the dodge/burn tool in SkinEdit (it's that weird, burning, black spoon), click 'tool options' and slide the button a bit to the left. This is also possible with the GIMP counterpart (also looks like a black spoon). Now to get to what I mean by 'simple shading':
-Firstly, right-click a pixel to make it darker (burn it)
-Then click the pixel to the right, the one to the left and the first one again
-Now click 5 pixels in a row with your first one being in the middle
-Rinse and repeat as long as you want
This is also possible in many directions, not only left and right:
Now, you know how to shade! But now you may be asking yourself, "Where do I shade?".
What kind of a horrible person would I be if I didn't answer that question, right?
Well, when I start shading, I usually start with the legs and arms. The center pixels are almost always the two center ones on the top and bottom of the leg's (or arm's) "left" side:
here
here
For the bottoms of the feet, I just take the color of an adjacent pixel and make it a tad darker (burn again):
The exact same is done to the arms (except that they probably have different details), the pattern of the
shading is the same.
Part 2.1
I draw the knees and elbows by burning 2 pixels in the middle of the front part of the leg (or back part of the arm)and then dodging the 2 pixels above that. If I think you can barely see it, I add another
"layer" of shading (burn/dodge first pixels again and the ones next to them).
The only thing left, so that the legs/arms look realistically shaded, is the lighting on the muscles.
I dodge the whole center of the outer (right) part of the limb and then do some more simple lighting (like simple
shading, just that you don't right-click, but rather left-click). Here, I also took the time to highlight parts of the claws in order to make them reflect light.
So the arms are shaded, now it's time for the torso, my favorite part. :D
Part 2.2
I shade the chest by burning 4 pixels in the 4th/5th row, 2 pixels between the pairs. I dodge the area above that and then experiment looking at which version looks the best. Next, I burn the same shading pattern we used on the
legs onto the sides if the body. After that, I either make the whole stomach darker (muscular-skinny) or lighter
(chubby-seriously obese). In both cases, the lightest point is in the middle of the body (upper stomach).
For the back, I usually just make the spine by painting two columns: one dark, the other light. Then I dodge a bit of the upper part of the back.
Part 2.3
I start shading the head by burning the corners. Then, I dodge the top of the head and the central parts of the sides. At the end, I darken the bottom, making sure that it's darker than the sides of the head in all places they make contact. When I have details that would be on top of the skin in reality (in this skin's case the teeth) I burn the pixels just underneath it.
Here, I darkened the pixels under the teeth and the top pixels of the teeth, since the upper lip is "over" it:
Finale
Here's the final version of the skin so you can take another look at where and how I shaded:
View Rufus the Naked Mole RatHere are several examples of skins with my method of shading:
View SonnyView The Reincarnation DemonDiamonds are highly appreciated! Not for my own good, but for the community's! The more diamonds this blog gets, the more people can see it! :)
| Tags |
2 Update Logs
Update #2 : by forro34 05/27/2012 12:43:21 pmMay 27th, 2012
Added more content, finished the skin and replaced images with better ones. I am deeply sorry and ashamed that it took me four months to finish what I had started.
LOAD MORE LOGS
tools/tracking
488613
6
shading-skins

![°αshℓєy° My Hair Shading Tutorial! [ 70 Subs Special] [ Popreel Witch Was Found After A Life Of Steves Contest Thing :P ]](https://static.planetminecraft.com/files/resource_media/screenshot/1440/small/yutrytuuuustealdisaskmehfurstbefurudownload8187369_thumb.jpg)


 Annet
Annet Patience
 itsgen_
 DreamCraft Parks
 mincrap stev
 DarkwolfContent

 WYHA-Storm
Create an account or sign in to comment.