


1,138
It has been a year since I made this skin.
I really wanted to make a blog showcasing the process behind this skin like with my Magitek skin.
Thanks for all the support on this specific skin.
Link to the original skin: http://www.planetminecraft.com/skin/muerte/
Skin commission from Wonder . Wonder owns all rights to this skin and can do whatever he pleases with it.
Wonder is a very special and amazing builder, please support his work.
Walk-through:
This is the oldest image I have from when I had started the skin:
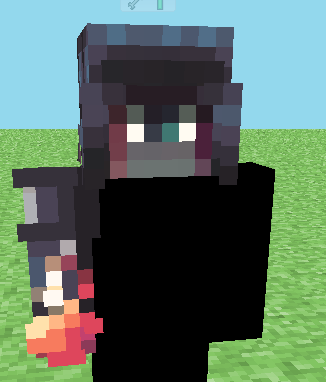
As you can see, concept is similar, just not quite the same. Wonder
originally wanted a cyclops grim-greaper, then he realized it wasn't the
best idea.
As you can see, minimal structuring had been done, and the shading was very simple from that which was. My tips for bases are: work with short palettes. 4 color palettes are really the direction anyone should take with bases. Hue-shifting is crucial, even on bases, with further steps, how broad you hue-shift, it will start blending. The key to this skin and all of my skins is really blending.
Also, I'd like to comment on that eye: It's a pretty good eye, to be honest. So I recommend you pay attention how the light and shadows work. the shadow and light does really look realistic, and eyes on their own make any kind of skin stand out a lot. I want to add this note because I lacked this for many months, a whole year, actually, proper execution on this. Four pixels, and it can completely enhance the skin.
#1
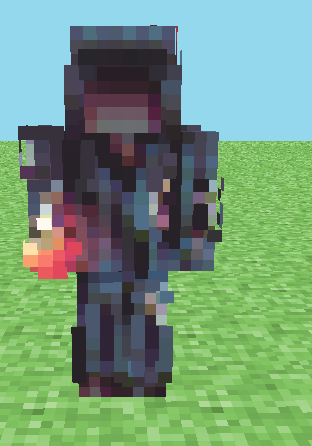
This is when the skin was fully shaded. Did the whole base first, then added noise to it. You can do this manually, if you don't know how to add noise manually, use a noise filter on photoshop, or use noise on your original palette. Once you see how nose is executed with a filter, that it's easier to get a grasp of it and mimic it. When you use a noise filter, do not use monochromatic noise, or B&W noise.
As far as the application, applying noise so it doesn't seems random, that is a whole different tutorial, really. However, here are some skins that follow the same pattern which noise would, so I'd like to show-case some examples for those who want more:
http://www.planetminecraft.com/skin/soap-bubbles/
http://www.planetminecraft.com/skin/scallysche/
What is really noise? Noise is fluctuations. Whether in sound, or color, noise is the fluctuations, because on simple terms, the world is not stable. So these fluctuations are the imperfections of the world, not shading. However, noise is used artistically in many techniques. Noise naturally comes in colors: as you'd see the rainbow in gasoline, that's how noise would naturally look—the whole color spectrum on the same field of color and saturation; noise is the fraction of color. However, upon the invention of photo filters, monochromatic noise exists. Monochromatic noise is not how natural noise is meant to be, but for editing black and white photography and artwork, it is perfect.
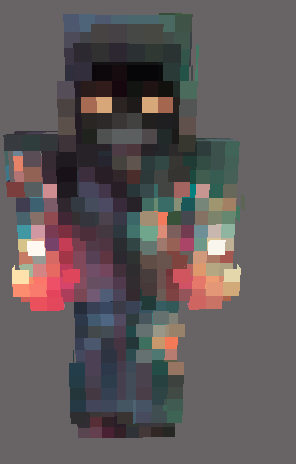
#2
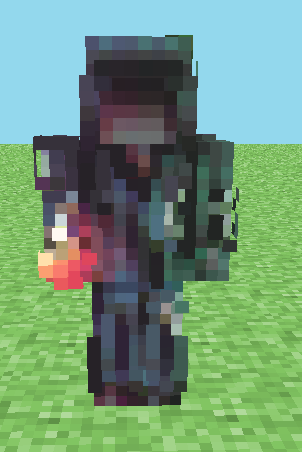
Here the skin was added dynamic light in green color. Not much can be said. How to do dynamic light is likewise, a whole tutorial on its own. However, it isn't too hard. My tips are: blend, blend, blend.
#3
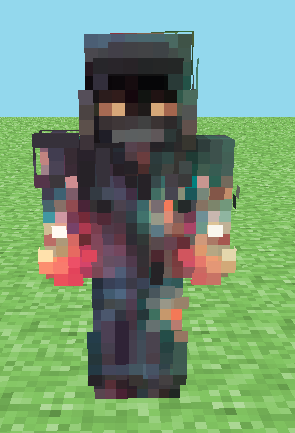
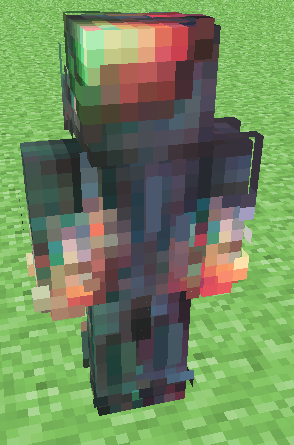
finally, the arms were complemented with dual fire balls and the scorched parts were accentuated.
For the integrated, protruding light on the head: My tips, just like above: blend, blend, blend. The dynamic light was based upon this bulb, or gradient cube, if you will, so the dynamic light is congruent to this addition. All colors join through grey—this is really the one million dollars observation. With that said, you really can just join any colors now, do the craziest gradients, you can do anything with that knowledge in mind—The keynote to blending.
#4 LATEST UPDATE AS OF FEBRUARY 2016:
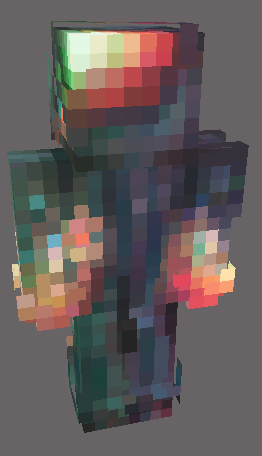
refined the shading of this skin with this update. Really cleans up the skin, makes it prettier. I will say, however, clearing this skin up wasn't easy. For such a detailed skin, it was hard, and it definitely took a lot of aptitude to not discourage yourself to work on something so detailed already. When you're redoing a skin, don't start from scratch, you will not achieve the magic like it once was. Work on top of it, and improve, observe, improve.
Hope it helped anyone, or was just insightful.
Resources:
Skin of #1
Skin of #2
Skin of #3
Skin of #4: http://www.planetminecraft.com/skin/muerte/
I really wanted to make a blog showcasing the process behind this skin like with my Magitek skin.
Thanks for all the support on this specific skin.
Link to the original skin: http://www.planetminecraft.com/skin/muerte/
Skin commission from Wonder . Wonder owns all rights to this skin and can do whatever he pleases with it.
Wonder is a very special and amazing builder, please support his work.
Walk-through:
This is the oldest image I have from when I had started the skin:
As you can see, concept is similar, just not quite the same. Wonder
originally wanted a cyclops grim-greaper, then he realized it wasn't the
best idea.
As you can see, minimal structuring had been done, and the shading was very simple from that which was. My tips for bases are: work with short palettes. 4 color palettes are really the direction anyone should take with bases. Hue-shifting is crucial, even on bases, with further steps, how broad you hue-shift, it will start blending. The key to this skin and all of my skins is really blending.
Also, I'd like to comment on that eye: It's a pretty good eye, to be honest. So I recommend you pay attention how the light and shadows work. the shadow and light does really look realistic, and eyes on their own make any kind of skin stand out a lot. I want to add this note because I lacked this for many months, a whole year, actually, proper execution on this. Four pixels, and it can completely enhance the skin.
#1
This is when the skin was fully shaded. Did the whole base first, then added noise to it. You can do this manually, if you don't know how to add noise manually, use a noise filter on photoshop, or use noise on your original palette. Once you see how nose is executed with a filter, that it's easier to get a grasp of it and mimic it. When you use a noise filter, do not use monochromatic noise, or B&W noise.
As far as the application, applying noise so it doesn't seems random, that is a whole different tutorial, really. However, here are some skins that follow the same pattern which noise would, so I'd like to show-case some examples for those who want more:
http://www.planetminecraft.com/skin/soap-bubbles/
http://www.planetminecraft.com/skin/scallysche/
What is really noise? Noise is fluctuations. Whether in sound, or color, noise is the fluctuations, because on simple terms, the world is not stable. So these fluctuations are the imperfections of the world, not shading. However, noise is used artistically in many techniques. Noise naturally comes in colors: as you'd see the rainbow in gasoline, that's how noise would naturally look—the whole color spectrum on the same field of color and saturation; noise is the fraction of color. However, upon the invention of photo filters, monochromatic noise exists. Monochromatic noise is not how natural noise is meant to be, but for editing black and white photography and artwork, it is perfect.
#2
Here the skin was added dynamic light in green color. Not much can be said. How to do dynamic light is likewise, a whole tutorial on its own. However, it isn't too hard. My tips are: blend, blend, blend.
#3
finally, the arms were complemented with dual fire balls and the scorched parts were accentuated.
For the integrated, protruding light on the head: My tips, just like above: blend, blend, blend. The dynamic light was based upon this bulb, or gradient cube, if you will, so the dynamic light is congruent to this addition. All colors join through grey—this is really the one million dollars observation. With that said, you really can just join any colors now, do the craziest gradients, you can do anything with that knowledge in mind—The keynote to blending.
#4 LATEST UPDATE AS OF FEBRUARY 2016:
refined the shading of this skin with this update. Really cleans up the skin, makes it prettier. I will say, however, clearing this skin up wasn't easy. For such a detailed skin, it was hard, and it definitely took a lot of aptitude to not discourage yourself to work on something so detailed already. When you're redoing a skin, don't start from scratch, you will not achieve the magic like it once was. Work on top of it, and improve, observe, improve.
Hope it helped anyone, or was just insightful.
Resources:
Skin of #1
Skin of #2
Skin of #3
Skin of #4: http://www.planetminecraft.com/skin/muerte/
| Credit | Wonder |
| Tags |
tools/tracking
3711756
6
skin-process-muerte


 MarioLuigi
 Ryderlb09
 PufferFishGuy_22
 Hippopotamoss
 Christ8Pizza

 WYHA-Storm
Create an account or sign in to comment.
Other than that, thanks for the compliment.
I'm not sure what this tutorial brings to your idea, but I've definitely given you something now. :P
This you describe ("using transparent colors of colors" as well as with rust) I wouldn't call noise, I would call it recreating reality, or simply focusing on visual effects in general. However, as far as variations in leather, in reality, it would just be detail. But at the abstraction that we are working, that the way to recreate that would be through noise. So, yes, you are correct (just a metonymy I'd like to clarify)—I have a few skins where I do that on my profile, if you'd like to see my wonders in leather as well. 8)
Oh, and, yes, its efficient for skintones and anything like such, but I would rely on hue-shifting for that instead in most cases (unless it were to be, for example, my Scallysche skin, where I wanted iridescence, but a recognizable blue skin-tone behind it).
But regardless of the details, thanks for the nice words. I'm really hoping you can show me your work.
Oh, and, please, don't forget to diamond the actual skin. Because I know you like the skin, but this is just a tutorial about it, or more of a "behind the scenes"—don't tend to ask for diamonds, but the struggle is real (as you can read below).
Hope that answers your questions 8)