


417
Paril talked me into joining the tutorial contest, so here we are!
This is "Whtdragon's MCSkin3D skinning tutorial: Getting started in shadows. MCSkin3D is a skin maker program created by Paril. If you're brand new to the program, or just need a quick review on some of the basics, I recommend that you check out my Colors and Brushes tutorial here.
This tutorial will be mainly dealing with some basics as well as some shading to get you started in making skins.
Recommended settings:
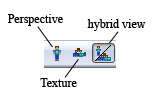
Look up at the menu bar, and find "hybrid view" and click on it. It should look something like this
now look for the toggle buttons, they should look something like this:
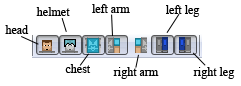
it's good practice to just go ahead and turn off the helmet button, especially if you prefer painting directly on the skin itself. I see too many people not use the toggle buttons or the hybrid view properly.
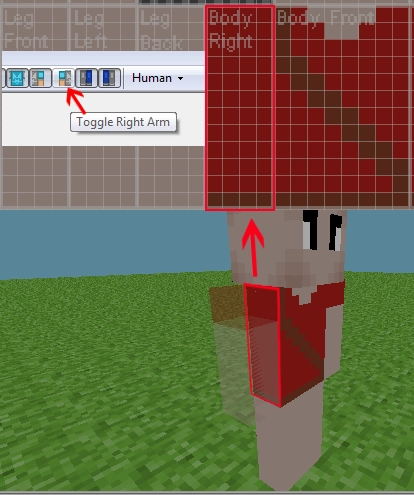
An example would be here, if you disabled the right arm from the model view:
Now that we've got that out of the way, let's get down to business!
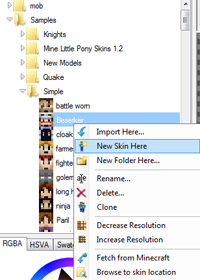
Make yourself a new skin. Right click on the skin list and select "new skin here" like in the image shown.
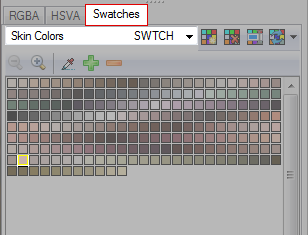
You should see a white (or black if you are using an older version) blank skin all ready to create from. Go down to the colors and pick something out as a base color to start in. If you're starting out, or simply need some help I suggest clicking on the "swatches" tab and selecting to "skin colors" shown in the diagram below. I have the color I'm going to be using in the tutorial highlighted, but you can pick whatever color you prefer.
Eyes:
For eyes, it's a bit experimental, but I have 4 pretty common examples I use in this picture here:
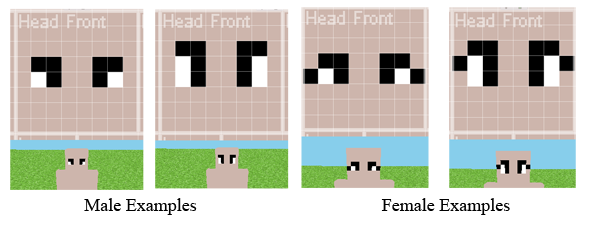
I have the grid turned on so you can better see how I make the eyes. Eyes are typically two squares long, and the height varies from one to two squares. The black line at the top is just something I personally do for shaping the eyes and can be left off if you wish. Alternatively you can color them in with a darker shade of the skin color, but I'll get to that later. Note Female eyes have an added square to either side of them to show eyelashes.
The reason why I do eyes like this is because it's very common in Super Nintendo style sprite characters, and it's simply something I've grown up with.
Shading:
Before we talk about shading I have a couple of solid rules for using MCSkin3D:
Now my method of shading is pretty easy. Pick Darken/lighten, make sure you're set to "darken" set yourself to 20 (or 30 if you feel 20 isn't dark enough) and like in the image below, pick a corner and click on each space to make a stair shape:

Do it again a second time like in the image below, and then a third time for one pixel in the corner:
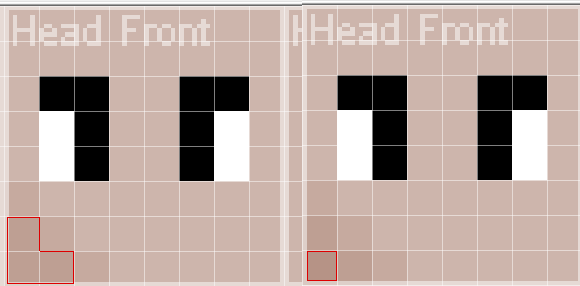
Each time you click on a pixel with the darken tool, the pixel gets darker! Save some shading time doing tools instead!
Continue this with all corners of the face and head if you wish. I call this "framing" the face and it's a great base to work on.
This method gives an almost smoothed look. I do this for most of the person's skin that shows on the body like hands or arms.
It's okay to switch out dodge/burn tool for darken/lighten. Since both of them are slightly different, they each effect
how the shading looks. If you don't like how the darken tool ends up shading, just switch over to the burn instead, or adjust the exposure until you find one you're happy with.
Let it give you the colors for shading. Work with it until you are satisfied.
Clothing:
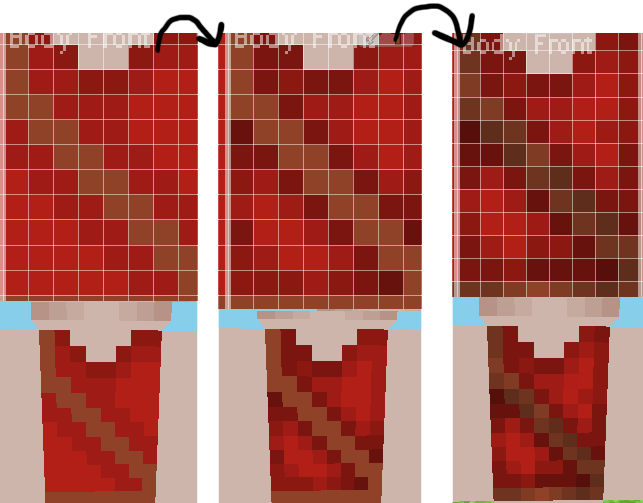
For clothing, the rules are similar. I usually do not try to frame clothing like I do with the face, because clothing folds has a certain level of it's own shadowing to worry about that's separate from the face, so we can just focus on shading within the clothing itself. Belts, straps, bags, pockets should be considered and it's really more of just experimenting with dodge/burn or darken/lighten. Try shading around items to give more definition.
If you accidentally make something too dark in shading, just switch over to the lighten or dodge tool to lighten the pixels back up, or just simply hit the undo button.
I would add more to this, but I feel like this tutorial's already huge as is with all the images. I'll probably eventually make another tutorial on other things, like how to make hair, or how to capitalize just a little more on the helmet layer.
If you guys want to see more, or have any suggestions or questions to ask, leave a comment below, and I'll see if I can't get a tutorial up for it!
Practice and Enjoy!
This is "Whtdragon's MCSkin3D skinning tutorial: Getting started in shadows. MCSkin3D is a skin maker program created by Paril. If you're brand new to the program, or just need a quick review on some of the basics, I recommend that you check out my Colors and Brushes tutorial here.
This tutorial will be mainly dealing with some basics as well as some shading to get you started in making skins.
Recommended settings:
Look up at the menu bar, and find "hybrid view" and click on it. It should look something like this
now look for the toggle buttons, they should look something like this:
it's good practice to just go ahead and turn off the helmet button, especially if you prefer painting directly on the skin itself. I see too many people not use the toggle buttons or the hybrid view properly.
An example would be here, if you disabled the right arm from the model view:
Now that we've got that out of the way, let's get down to business!
Make yourself a new skin. Right click on the skin list and select "new skin here" like in the image shown.
You should see a white (or black if you are using an older version) blank skin all ready to create from. Go down to the colors and pick something out as a base color to start in. If you're starting out, or simply need some help I suggest clicking on the "swatches" tab and selecting to "skin colors" shown in the diagram below. I have the color I'm going to be using in the tutorial highlighted, but you can pick whatever color you prefer.
Eyes:
For eyes, it's a bit experimental, but I have 4 pretty common examples I use in this picture here:
I have the grid turned on so you can better see how I make the eyes. Eyes are typically two squares long, and the height varies from one to two squares. The black line at the top is just something I personally do for shaping the eyes and can be left off if you wish. Alternatively you can color them in with a darker shade of the skin color, but I'll get to that later. Note Female eyes have an added square to either side of them to show eyelashes.
The reason why I do eyes like this is because it's very common in Super Nintendo style sprite characters, and it's simply something I've grown up with.
Shading:
Before we talk about shading I have a couple of solid rules for using MCSkin3D:
- NEVER use the Noise tool in MCskin3D. I know it can be useful, but it's extremely easy to overuse it and I've seen WAY too many skins that have been ruined by it.
- Use the Dodge/burn lighten/darken tools instead. Takes more work, but not as much as having to manually pick the colors out. A lot of artists will say "don't" do this because you won't learn anything this way, but I say if you know what you're doing you're learning plenty.
- Do NOT try to cram in a ton of details into a skin. Be it from shading or wanting to add a ton of stuff to them, unless you have a mod that supports higher resolution. It's just too much work for something that most people won't usually see or notice.
Now my method of shading is pretty easy. Pick Darken/lighten, make sure you're set to "darken" set yourself to 20 (or 30 if you feel 20 isn't dark enough) and like in the image below, pick a corner and click on each space to make a stair shape:
Do it again a second time like in the image below, and then a third time for one pixel in the corner:
Each time you click on a pixel with the darken tool, the pixel gets darker! Save some shading time doing tools instead!
Continue this with all corners of the face and head if you wish. I call this "framing" the face and it's a great base to work on.
This method gives an almost smoothed look. I do this for most of the person's skin that shows on the body like hands or arms.
It's okay to switch out dodge/burn tool for darken/lighten. Since both of them are slightly different, they each effect
how the shading looks. If you don't like how the darken tool ends up shading, just switch over to the burn instead, or adjust the exposure until you find one you're happy with.
Let it give you the colors for shading. Work with it until you are satisfied.
Clothing:
For clothing, the rules are similar. I usually do not try to frame clothing like I do with the face, because clothing folds has a certain level of it's own shadowing to worry about that's separate from the face, so we can just focus on shading within the clothing itself. Belts, straps, bags, pockets should be considered and it's really more of just experimenting with dodge/burn or darken/lighten. Try shading around items to give more definition.
If you accidentally make something too dark in shading, just switch over to the lighten or dodge tool to lighten the pixels back up, or just simply hit the undo button.
I would add more to this, but I feel like this tutorial's already huge as is with all the images. I'll probably eventually make another tutorial on other things, like how to make hair, or how to capitalize just a little more on the helmet layer.
If you guys want to see more, or have any suggestions or questions to ask, leave a comment below, and I'll see if I can't get a tutorial up for it!
Practice and Enjoy!
| Credit | Paril |
| Tags |
tools/tracking
1131010
6
whtdragons-skins-tutorial-in-mcskin3d-getting-started-in-shadows


![°αshℓєy° My Hair Shading Tutorial! [ 70 Subs Special] [ Popreel Witch Was Found After A Life Of Steves Contest Thing :P ]](https://static.planetminecraft.com/files/resource_media/screenshot/1440/small/yutrytuuuustealdisaskmehfurstbefurudownload8187369_thumb.jpg)


 Nymphali22290
 doria786
 Molitoola
 KEIKYU production
 Piggybank
 sniffercraft34
Create an account or sign in to comment.
Somehow I cannot enable the 'toggle left leg/right leg armour' button thing.
Normal
1.8
Normal one only uses head armor and 1.8 uses whole body armor. That's the difference. I think so
Or does this not feature on MCSkin3D?