


4
Minecraft Photography to me is a form of art. It follows all of the same rules as regular photography, except you control exactly what you want to take. You can expand your imagination even further.
Things you MUST follow:
1. Rule of 1/3s: Never have the focal point in the center of the picture.
2. Balancing Elements: Place your object off center just enough so the colors can balance the background to the foreground.
3. Leading Lines: This rule is a bit harder to apply to mine craft. Mainly because there aren't as many lines. Make sure that the exit point and entrance point are clear.
4. Symmetry and Patterns: Shapes can be one of the key elements to a picture. Having no texture in a picture is boring, so make sure you add certain blocks to areas to enhance the design pattern.
5. ViewPoint: The viewpoint is very important because taking a picture of a mountain with a sunset will look better on the ground, but a sunrise: in the air. Just those two things can be very different. Another example is taking pictures of people. It is usually up to the photographer to decide what is best. I suggest trying both then deciding because it can really go either way.
6. Background: In Minecraft, there are not many backgrounds to select from. There can be the sun, stars, a build, or a cave. It goes back to the second rule: Balancing Elements. Depending on your foreground, that will decide what color scheme is best for your background.
7. Depth: People say a picture is worth 1000 words. Taking a picture of a user in front of dirt rather than in front of a valley can be a 900 word difference. Depending on what the story is, the depth of the picture is key. Say for example you are taking a picture of two users on a mountain. That will tell a life story of two people who took a trip to a pretty site. Taking a picture of them in front of wool or wood can just mean "guys get together for a picture."
8. Framing: Having nature frame the picture is always an extra specification to add a new dimension to the shot. This is NOT a vital part of every picture but it can be a good technique to keep at the back of your head (not literally).
9. Cropping: This will not be something you use a lot in a mine craft shot, but it can be cool for some things. For example, say you see a fish in the water. You JUST want that fish but you can't get to close to it or else its a goner. Take a picture with it in the general area of the shot, then crop the picture (REMEMBER: do not have the fish in the middle, or in a straight line horizontally or vertically. Add Dimension).
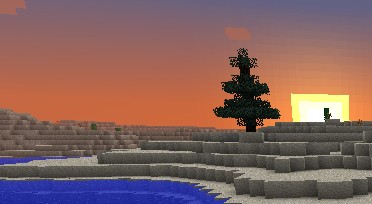
10. Experimentation: Last, but MOST CERTAINLY not least, there is experimenting different ideas. If you have a vision of a tree in the desert and its cool, build a tree and take the picture. Just like i did in the attached photo. If theres a heart shape you vision coming through the trees, craft it. Do not let building skills get into the way of your imagination. That is the only trouble with MC Photography.
I hope you guys found this useful. Please Subscribe if you like this because there is MUCH more to come!!!! Comment what else you want to learn and ill provide you with the best tips!
Things you MUST follow:
1. Rule of 1/3s: Never have the focal point in the center of the picture.
2. Balancing Elements: Place your object off center just enough so the colors can balance the background to the foreground.
3. Leading Lines: This rule is a bit harder to apply to mine craft. Mainly because there aren't as many lines. Make sure that the exit point and entrance point are clear.
4. Symmetry and Patterns: Shapes can be one of the key elements to a picture. Having no texture in a picture is boring, so make sure you add certain blocks to areas to enhance the design pattern.
5. ViewPoint: The viewpoint is very important because taking a picture of a mountain with a sunset will look better on the ground, but a sunrise: in the air. Just those two things can be very different. Another example is taking pictures of people. It is usually up to the photographer to decide what is best. I suggest trying both then deciding because it can really go either way.
6. Background: In Minecraft, there are not many backgrounds to select from. There can be the sun, stars, a build, or a cave. It goes back to the second rule: Balancing Elements. Depending on your foreground, that will decide what color scheme is best for your background.
7. Depth: People say a picture is worth 1000 words. Taking a picture of a user in front of dirt rather than in front of a valley can be a 900 word difference. Depending on what the story is, the depth of the picture is key. Say for example you are taking a picture of two users on a mountain. That will tell a life story of two people who took a trip to a pretty site. Taking a picture of them in front of wool or wood can just mean "guys get together for a picture."
8. Framing: Having nature frame the picture is always an extra specification to add a new dimension to the shot. This is NOT a vital part of every picture but it can be a good technique to keep at the back of your head (not literally).
9. Cropping: This will not be something you use a lot in a mine craft shot, but it can be cool for some things. For example, say you see a fish in the water. You JUST want that fish but you can't get to close to it or else its a goner. Take a picture with it in the general area of the shot, then crop the picture (REMEMBER: do not have the fish in the middle, or in a straight line horizontally or vertically. Add Dimension).
10. Experimentation: Last, but MOST CERTAINLY not least, there is experimenting different ideas. If you have a vision of a tree in the desert and its cool, build a tree and take the picture. Just like i did in the attached photo. If theres a heart shape you vision coming through the trees, craft it. Do not let building skills get into the way of your imagination. That is the only trouble with MC Photography.
I hope you guys found this useful. Please Subscribe if you like this because there is MUCH more to come!!!! Comment what else you want to learn and ill provide you with the best tips!
| Tags |
tools/tracking
1149518
6
minecraft-photography-1149518


 Xx_Desu_xX
 TheMountaineer
 scratchcrafter1
 Echolynx
 BlissyMissy
 ScotsMiser

 Aspirin60
 Ayanoaishi
 insert___text
 cloudkitty
Create an account or sign in to comment.