


38
There's been a lot of talk and dispute involving the ways on how to protect one's home. Sure, you could set up a few overly-used redstone-powered trap doors and have your victim (hopefully a hostile mob) fall to it's death. Now, while that's not ineffective, the trap itself is rather unoriginal, and unless placed in a relatively large quantity, it can be challenging to actually end up catching a mob in the set trap.
So unless you set up your traps like the following image, odds are, unless you've placed the trapdoor in a location you know mobs will be walking, or near a spawn point you're aware of, singular trapdoors aren't the best choice of house defense.
Here's a picture of what you'd have to do in order to actually catch something in a inparticular place:
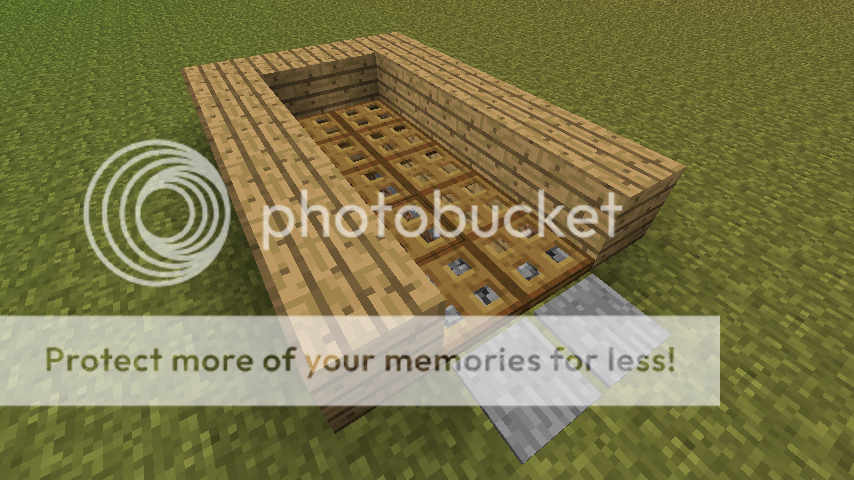
Looks kind of unprofessionally-done, but that's the basis of a patch of trapdoors you'd have to place in any random spot in order to actually get something in your snair. There's many other methods of traps out there that may catch your eye a bit more than this one, personally I believe there are dozens of much more practical and effective means of protection for your house.
However, if you do so happen to like the method shown beforehand, and you want to make one yourself, perhaps in a bit more refined and clear way, just use the diagram below to make your traps, and place them at the spot of your choosing.

Once placed in the area of your choosing, place redstone by a place by the trapdoors and activate it through the use of a redstone torch. That's the most simplistic way to just open your trapdoor. I would ellaborate deeper on the process, but this article is about the more lesser-known and effective traps in Minecraft, and this method is a bit mainstream. On that note, I ask that if you want to know more about the trap and look into the workings of pistons and wires, that you'd please refer to one of the expertly made guides, or perhaps the wiki itself.
Moving on, let's really get into the original trap ideas. I cannot promise that all will be effective, but they do work.
Method One; Cactus Wall
In order to make a cactus wall, it is fairly simple. Place a brick of sand under the area that you want the cactus to be planted, then simply place the cactus on the piece of sand and continue to make the height of the cactus the size you see fit. Be aware though, a one brick space is needed to place another cactus as close as you can to the previous, allowing a way to get it in. A way to solve this is to make a kind of "maze" around the various gaps in the cactus. For example, if you had a gap, you'd go behind it, place a cactus there, a one brick distance away from it, and you'd create an illusion that the cactus is beside the other two in-front of it. This of course may seem as a bad method, but keep in mind; this was made primarily for players. Mobs themselves will often run into the walls and end up dying there, as the AI can't quite properly navigate through the maze. Here's a arial picture of a basic cactus wall:

As you can see, you can incoporate other bricks in order to add more coverage into your home. All in all, it's a fair method of protection.
Method Number Two; Above Water House
Another method of house protection is placing your house above a source of water. There is no real in-depth explination needed for this tactic, other than the fact that most mobs keep away from water, and don't spawn there often. A simple technique for this, is to find a large body of water (the ocean and or a large lake are the best choices) and place a block from the bottom of the lake, and build up until you reach the surface of the water. Continute to build up as high as desired, and build blocks protruding from the one block, in order to give you room to actually make a house out of it. When it is as big as wanted, you may do a few more things. One, is to get a bucket of water, and place it at the end of your house, leading back down to the water. You can then proceed to destroy the blocks used to add the height to your house. This gives your house the look that it is floating, and is purely for cosmetic effect. You can use the water poured of your house to get back up. However, if the height is too large, and you run out of oxygen before reaching your house, you may want to make it smaller. Here is an example of such a house:

Option number two on the other hand, is changing the method all-together. Instead of building up, you can build to the side. In other words, you can build in a straight direction over the body of water, and build out from there, seen in this picture here:

As you can see, you just build lower to the ground, instead of higher up.
Method Number Three; Villager Sacrafice
This is one of the newer tactics, and a lot more challenging. Personally I find this method rather strange, but it works, so why not. In order to do this method, you have to be living in a village first off. And by living in a village, well I mean having that village be your main home; you don't venture far from it. The method itself is trapping a villager two blocks under the ground, and placing a brick above the hole, and leaving the villager there. The reason for this, is because if done correctly, any and all zombies within the area of detection of the villager, will focus all their attention the villager only, allowing the player to walk right beside the hostile mob without worry of attack. That's the traditional method anyways.
There is however, a much more effective means of using this seemingly-useless method. To start, you'll need a few things. A few bricks of Netherrack, and some Flint & Steel. Netherrack can be found in the Nether in abundant quantities. If you're unsure of how to get into the Nether, read on. If you're aware of how to, and how to make Flint & Steel, skip a few paragraphs.
To make a Nether Portal, you'll need 10-14 blocks of Obsidian, and Flint and Steel. Just use the following diagram to make your own:

Pretty simple eh? And there you go, it's made. You can destroy the four unrequired bricks if you like as the image suggests. If by chance you don't know how to make Flint & Steel, here's a diagram of that also.

If you didn't know already, you can find Flint from harvesting Gravel blocks.
Anyways, after you've made it to the Nether, and grabbed yourself some of those pretty red rocks, come back to where you wish to place your villager trap.
Netherrack can sustain a lit flame indefinetly, making for the perfect trap. So just place the Netherrack in the area that you have your villager caged, and sit back as you watch them burn. Here's a pretty example of that:

Of course you could interchange the Netherrack and fire for straightup lava, but it's all a matter of choice. As said though, this method is a bit impractical, but hey, it works right?
Method Number Four; Good 'Ol Golems
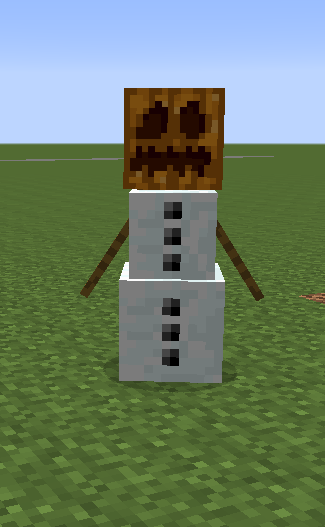
We all know and love the timeless protection method of Iron Golems. They have served the game and it's players rightly, and for what they are, are of extreme ease to construct. Typically found naturally-spawned in large villages, they can also be made rather quickly, given the right circumstances. There's a hard part, and an easy part to making them. The easy part, is getting four block of Iron, and placing them in a "T" formation, like so:

Now as for the hard part..well..it can be found right in the image; the pumpkin. Unless you've found them before, and have either kept them, or have used their seeds, it's going to be a challenge getting ahold of one. Naturally-spawned Pumpkins are more rare than Diamonds, so it won't be a "in-and-out" kind of job. While rare, they still have places in which they most commonly spawn, which in this case, is in the Tundra biome. More specifically in a mountainous Tundra biome. They can be found most prominently atop hills there. Or, if you'd prefer, you could go to local villages, making an effort to find them in chests around the village. Once found, place atop the pieces of Iron, like shown above. After which, congrats, you've made a hulking iron monster that will protect you from other monsters. Convenient right? There are still a few things to keep in mind though. Such as the fact of their size, be wise in where you chose to make them, they are four blocks in height, and can easily get stuck in one area, by which making it rather useless as a personal bouncer. Place it in wide, open places, such as outside your home. One other thing to keep in perspective, is what exactly they do. They will target Zombies more often than any other hostile mob, Skeleton, Creeper, in that order. Spiders are not attacked unless provoked through sight of your character, or you attacking it. So while they are useful, they can be overwhelmed.
Here's one of those nifty "stat" screens displaying base information about your iron titan:

Besides looking 'freakin awesome, they also pack a severe punch. Cool huh?
Final Method; Useless Gole-I mean..Snow Golems.
Excuse my typo in the title there, but uhh..let's get on with it shall we? Totally am not just including them because I ran out of ideas..*cough*
So, finally, we have the Snow Golem. The lesser-known cousin of the mighty Iron Golem. Their main ability is to constantly throw a infinite amount of non-damaging snowballs at hostile mobs, in a desperate effort to make themselves seem useful. Now while they do have a truly amazing ability, every hero's got his weakness, and in the Snow Golem's case, is rain. If a Snow Golem comes in contact with rain, he will melt on the spot. Along with this, the Snow Golem cannot also go in the Desert biome, for he will , again, melt on the spot. Best part about this guy? He takes only two bricks of snow to construct. Just get two blocks-worth of the stuff, place it right on top one another, and you're half-way there. Lastly, you must place a Pumpkin on the top of the two, much like with the Iron Golem. Honestly, they do have some upsides however. They act more of a support and or alert system, than a defense system, as they can keep up to 1-3 enemies steadily at bay, whilst you gear up and go actually finish them off. For this reason, they aren't half-bad. In case you were wondering, here's a picture of that guy:

Oops, sorry, wrong one, here's the right one:
Anyways, hope you guys liked this, please Diamond and Subscribe, it helps, and makes me feel kind of like a baws.
See ya guys, and thanks for reading.
your all really hot bye the way
So unless you set up your traps like the following image, odds are, unless you've placed the trapdoor in a location you know mobs will be walking, or near a spawn point you're aware of, singular trapdoors aren't the best choice of house defense.
Here's a picture of what you'd have to do in order to actually catch something in a inparticular place:
Looks kind of unprofessionally-done, but that's the basis of a patch of trapdoors you'd have to place in any random spot in order to actually get something in your snair. There's many other methods of traps out there that may catch your eye a bit more than this one, personally I believe there are dozens of much more practical and effective means of protection for your house.
However, if you do so happen to like the method shown beforehand, and you want to make one yourself, perhaps in a bit more refined and clear way, just use the diagram below to make your traps, and place them at the spot of your choosing.
Once placed in the area of your choosing, place redstone by a place by the trapdoors and activate it through the use of a redstone torch. That's the most simplistic way to just open your trapdoor. I would ellaborate deeper on the process, but this article is about the more lesser-known and effective traps in Minecraft, and this method is a bit mainstream. On that note, I ask that if you want to know more about the trap and look into the workings of pistons and wires, that you'd please refer to one of the expertly made guides, or perhaps the wiki itself.
Moving on, let's really get into the original trap ideas. I cannot promise that all will be effective, but they do work.
Method One; Cactus Wall
In order to make a cactus wall, it is fairly simple. Place a brick of sand under the area that you want the cactus to be planted, then simply place the cactus on the piece of sand and continue to make the height of the cactus the size you see fit. Be aware though, a one brick space is needed to place another cactus as close as you can to the previous, allowing a way to get it in. A way to solve this is to make a kind of "maze" around the various gaps in the cactus. For example, if you had a gap, you'd go behind it, place a cactus there, a one brick distance away from it, and you'd create an illusion that the cactus is beside the other two in-front of it. This of course may seem as a bad method, but keep in mind; this was made primarily for players. Mobs themselves will often run into the walls and end up dying there, as the AI can't quite properly navigate through the maze. Here's a arial picture of a basic cactus wall:
As you can see, you can incoporate other bricks in order to add more coverage into your home. All in all, it's a fair method of protection.
Method Number Two; Above Water House
Another method of house protection is placing your house above a source of water. There is no real in-depth explination needed for this tactic, other than the fact that most mobs keep away from water, and don't spawn there often. A simple technique for this, is to find a large body of water (the ocean and or a large lake are the best choices) and place a block from the bottom of the lake, and build up until you reach the surface of the water. Continute to build up as high as desired, and build blocks protruding from the one block, in order to give you room to actually make a house out of it. When it is as big as wanted, you may do a few more things. One, is to get a bucket of water, and place it at the end of your house, leading back down to the water. You can then proceed to destroy the blocks used to add the height to your house. This gives your house the look that it is floating, and is purely for cosmetic effect. You can use the water poured of your house to get back up. However, if the height is too large, and you run out of oxygen before reaching your house, you may want to make it smaller. Here is an example of such a house:
Option number two on the other hand, is changing the method all-together. Instead of building up, you can build to the side. In other words, you can build in a straight direction over the body of water, and build out from there, seen in this picture here:
As you can see, you just build lower to the ground, instead of higher up.
Method Number Three; Villager Sacrafice
This is one of the newer tactics, and a lot more challenging. Personally I find this method rather strange, but it works, so why not. In order to do this method, you have to be living in a village first off. And by living in a village, well I mean having that village be your main home; you don't venture far from it. The method itself is trapping a villager two blocks under the ground, and placing a brick above the hole, and leaving the villager there. The reason for this, is because if done correctly, any and all zombies within the area of detection of the villager, will focus all their attention the villager only, allowing the player to walk right beside the hostile mob without worry of attack. That's the traditional method anyways.
There is however, a much more effective means of using this seemingly-useless method. To start, you'll need a few things. A few bricks of Netherrack, and some Flint & Steel. Netherrack can be found in the Nether in abundant quantities. If you're unsure of how to get into the Nether, read on. If you're aware of how to, and how to make Flint & Steel, skip a few paragraphs.
To make a Nether Portal, you'll need 10-14 blocks of Obsidian, and Flint and Steel. Just use the following diagram to make your own:
Pretty simple eh? And there you go, it's made. You can destroy the four unrequired bricks if you like as the image suggests. If by chance you don't know how to make Flint & Steel, here's a diagram of that also.
If you didn't know already, you can find Flint from harvesting Gravel blocks.
Anyways, after you've made it to the Nether, and grabbed yourself some of those pretty red rocks, come back to where you wish to place your villager trap.
Netherrack can sustain a lit flame indefinetly, making for the perfect trap. So just place the Netherrack in the area that you have your villager caged, and sit back as you watch them burn. Here's a pretty example of that:
Of course you could interchange the Netherrack and fire for straightup lava, but it's all a matter of choice. As said though, this method is a bit impractical, but hey, it works right?
Method Number Four; Good 'Ol Golems
We all know and love the timeless protection method of Iron Golems. They have served the game and it's players rightly, and for what they are, are of extreme ease to construct. Typically found naturally-spawned in large villages, they can also be made rather quickly, given the right circumstances. There's a hard part, and an easy part to making them. The easy part, is getting four block of Iron, and placing them in a "T" formation, like so:
Now as for the hard part..well..it can be found right in the image; the pumpkin. Unless you've found them before, and have either kept them, or have used their seeds, it's going to be a challenge getting ahold of one. Naturally-spawned Pumpkins are more rare than Diamonds, so it won't be a "in-and-out" kind of job. While rare, they still have places in which they most commonly spawn, which in this case, is in the Tundra biome. More specifically in a mountainous Tundra biome. They can be found most prominently atop hills there. Or, if you'd prefer, you could go to local villages, making an effort to find them in chests around the village. Once found, place atop the pieces of Iron, like shown above. After which, congrats, you've made a hulking iron monster that will protect you from other monsters. Convenient right? There are still a few things to keep in mind though. Such as the fact of their size, be wise in where you chose to make them, they are four blocks in height, and can easily get stuck in one area, by which making it rather useless as a personal bouncer. Place it in wide, open places, such as outside your home. One other thing to keep in perspective, is what exactly they do. They will target Zombies more often than any other hostile mob, Skeleton, Creeper, in that order. Spiders are not attacked unless provoked through sight of your character, or you attacking it. So while they are useful, they can be overwhelmed.
Here's one of those nifty "stat" screens displaying base information about your iron titan:
Besides looking 'freakin awesome, they also pack a severe punch. Cool huh?
Final Method; Useless Gole-I mean..Snow Golems.
Excuse my typo in the title there, but uhh..let's get on with it shall we? Totally am not just including them because I ran out of ideas..*cough*
So, finally, we have the Snow Golem. The lesser-known cousin of the mighty Iron Golem. Their main ability is to constantly throw a infinite amount of non-damaging snowballs at hostile mobs, in a desperate effort to make themselves seem useful. Now while they do have a truly amazing ability, every hero's got his weakness, and in the Snow Golem's case, is rain. If a Snow Golem comes in contact with rain, he will melt on the spot. Along with this, the Snow Golem cannot also go in the Desert biome, for he will , again, melt on the spot. Best part about this guy? He takes only two bricks of snow to construct. Just get two blocks-worth of the stuff, place it right on top one another, and you're half-way there. Lastly, you must place a Pumpkin on the top of the two, much like with the Iron Golem. Honestly, they do have some upsides however. They act more of a support and or alert system, than a defense system, as they can keep up to 1-3 enemies steadily at bay, whilst you gear up and go actually finish them off. For this reason, they aren't half-bad. In case you were wondering, here's a picture of that guy:
Oops, sorry, wrong one, here's the right one:
Anyways, hope you guys liked this, please Diamond and Subscribe, it helps, and makes me feel kind of like a baws.
See ya guys, and thanks for reading.
your all really hot bye the way
| Tags |
1 Update Logs
Update #1 : by Journal 03/03/2015 9:41:07 pmMar 3rd, 2015
Blog is in final form.
tools/tracking
3256069
6
obscure-but-effective-minecraft-defense-systems
![The Story of Us- [Blog Contest #7] Minecraft Blog](https://static.planetminecraft.com/files/resource_media/screenshot/1631/steve_by_dragonitearmy-d6v433310409852_thumb.jpg)


 Ivan951236
 PsioPsia001
 katenshw
 Ww2guru73
 MyZia
MyZia Bubblez705
 Hebgbs
Create an account or sign in to comment.
Guess he has a problem or something.
Thanks.
But being hot is too mainstream.
YOU HAVE FAILED ME.
But yeah, thanks. lol