


- 38,125 views, 13 today

31
Having kits on your server is essential. That's why Essentials puts the ability for kits right into the plugin! This will tell you all about how to set up kits using the essentials plugin.
I recommend that you have and use NotePad++ for this next part.
In your server's plugins folder a folder called essentials should be there open up the folder and edit the config.yml
Remember YAML is sensitive to tabs so only use spaces! Essentials has a built in safety net for in case you use tabs. It removes the broken config file and re-uploads the default config file.
To edit your kits find the kits section in the config.yml if you need help finding it, look at the spoiler below.
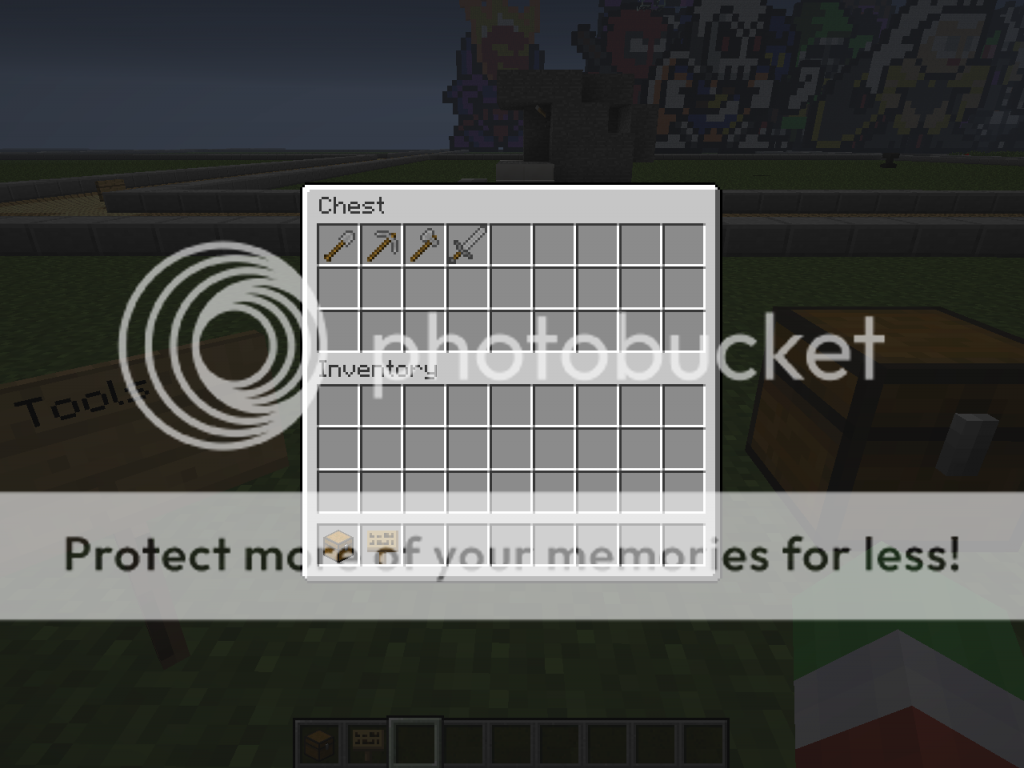
To start I imagine you already have an idea of what you want in your kits. I suggest being on your server and making the kits there first. Here's an example:
Now to add the items you chose to the config.
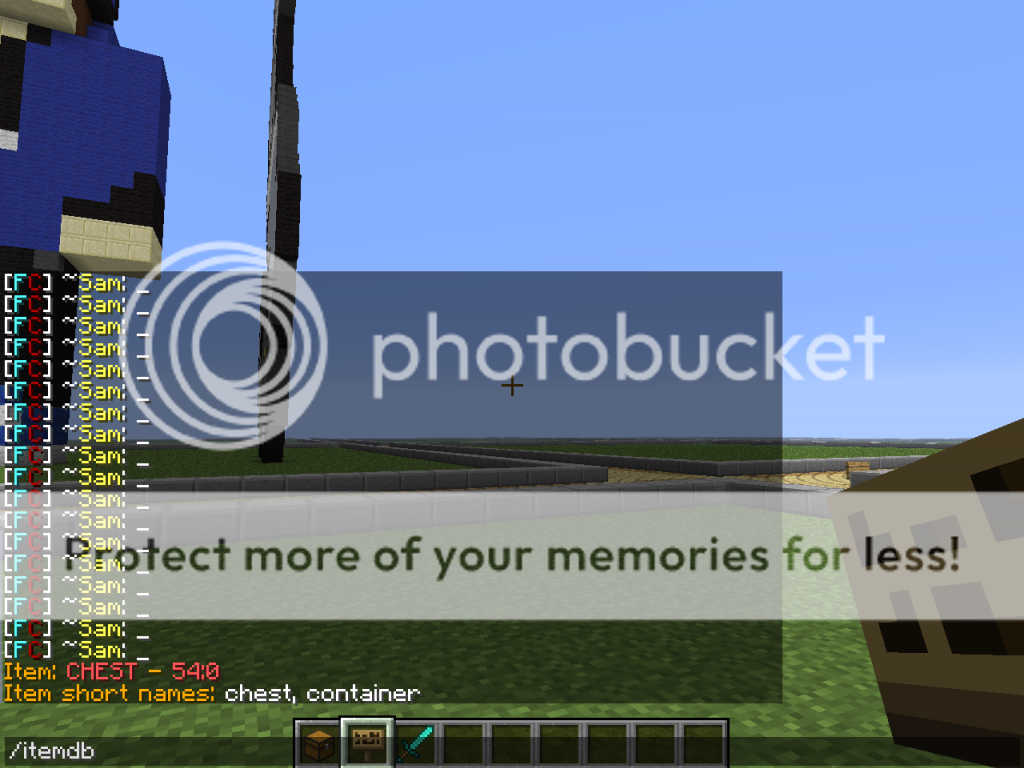
The config file doesn't take names of items. So you can't type under the items of the kit Chest. You have to find out what the item id is. You can google item ids of minecraft items or you can use the command essentials gives you.
Hold the item and type /itemdb it will do as follows:
Here's how you write the items you want into the config.yml:
You must add the Amount otherwise people will get either 64 stack of say diamond swords, or the kit will count as improperly defined.
Here are some cool things that you can do to each item:
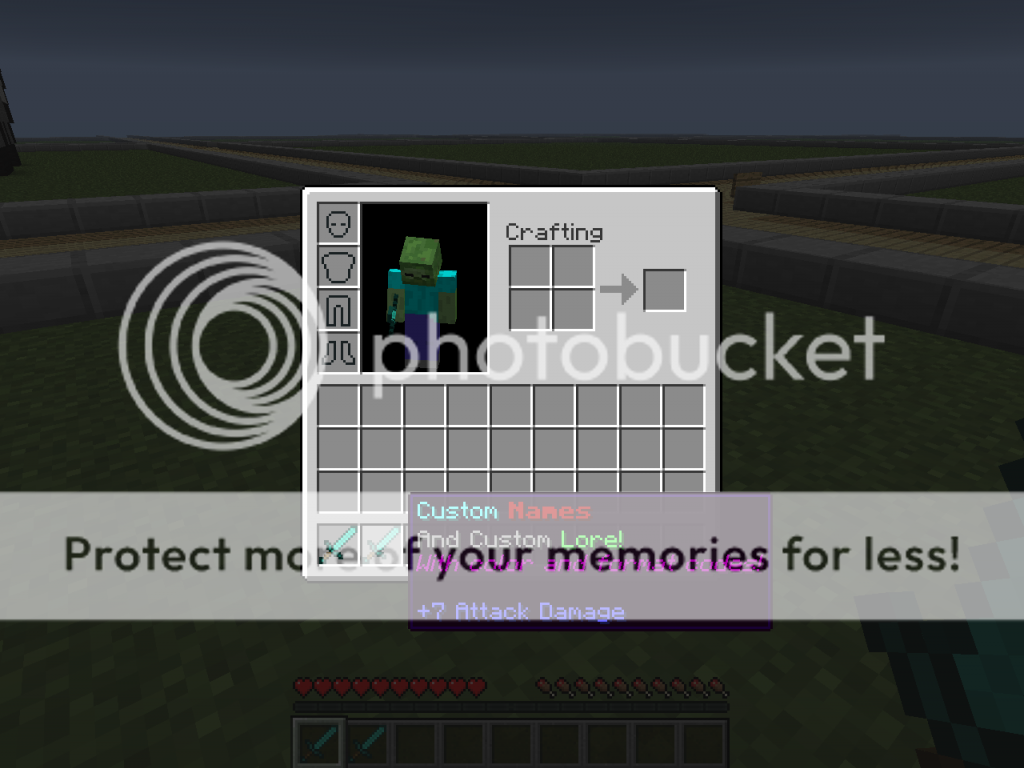
To add custom names and lore you'll add name:Custom_Name or lore:Custom_Lore repsectively.
- itemid:Datavalue amount name:Item_Name lore:Item's_Lore
With lores you can make them multi-lined by inserting a line break that looks like this: |
For the preview below this is the code:
- 276 1 name:&bCustom_&4&lNames lore:&7And_Custom_&aLore!|With_color_and_format_codes!
Adding Durability damage to items is as easy as:
itemid:damagevalue
Lets say you want to give an iron tool in a kit that has half durability to it. This is how you'd do it:
ItemIDofIronTool/Armor:125 1
125 is about half of the total uses of an iron tool or armor. So the damage shown on the item is about half.
Make sure that you put the amount after the itemid:damage so that the kit counts as properly defined!
Using what you know here to use the /give command in game! Above is how to put custom items into your essentials kits. But lets say you want to use the essentials give or item commands. Here's a short tutorial:
/give Player ItemID:DV # Other Data You want to include here
So I can give myself a piece of paper that has a custom name and lore like this:
/give sa5mmm paper 1 Name:Ticket lore:&4Admit_One!|&7To_Pepsi617's_Castle!
Instead of the word paper you can use the itemdb # of paper. The item and give commands aren't as picky as the kits are. You can also give me a diamond sword with god like enchants. (If they enchant numbers will be over the vanilla Minecraft limit be sure your config is set up properly! [Check above for adding enchants])
/give sa5mmm DiamondSword 1 Name:&eSam's_&1God_Sword! lore:&7A_Sword_fit_for|&7a_Queen! Sharpness 25 Durability 16
There are many other things you can do by referencing above and incoporating them into a /give or /item command!
What I'm adding next!
Spoilers about:
Sorry this isn't finished I add a little here and there!
Installing Essentials
- Download Essentials.
- Unzip the Essentials Folder you downloaded.
- Drag and drop the Essentials.jar into your server's plugins folder.
- Reload or restart your server. (Reload with /reload while in game or in the server console.
I recommend that you have and use NotePad++ for this next part.
In your server's plugins folder a folder called essentials should be there open up the folder and edit the config.yml
Remember YAML is sensitive to tabs so only use spaces! Essentials has a built in safety net for in case you use tabs. It removes the broken config file and re-uploads the default config file.
To edit your kits find the kits section in the config.yml if you need help finding it, look at the spoiler below.
Essentials config.yml Default Kits Section
kits:
tools:
delay: 10
items:
- 272 1
- 273 1
- 274 1
- 275 1
dtools:
delay: 600
items:
- 278 1 efficiency:1 durability:1 fortune:1 name:&4Gigadrill lore:The_drill_that_&npierces|the_heavens
- 277 1 digspeed:3 name:Dwarf lore:Diggy|Diggy|Hole
- 298 1 color:255,255,255 name:Top_Hat lore:Good_day,_Good_day
- 279:780 1
notch:
delay: 6000
items:
- 397:3 1 player:Notch
color:
delay: 6000
items:
- 387 1 title:&4Book_&9o_&6Colors author:KHobbits lore:Ingame_color_codes book:Colors
firework:
delay: 6000
items:
- 401 1 name:Angry_Creeper color:red fade:green type:creeper power:1
- 401 1 name:StarryNight color:yellow,orange fade:blue type:star effect:trail,twinkle power:1
- 401 2 name:SolarWind color:yellow,orange fade:red shape:large effect:twinkle color:yellow,orange fade:red shape:ball effect:trail color:red,purple fade:pink shape:star effect:trail power:1
To start I imagine you already have an idea of what you want in your kits. I suggest being on your server and making the kits there first. Here's an example:
Pre-making your kits
Now to add the items you chose to the config.
The config file doesn't take names of items. So you can't type under the items of the kit Chest. You have to find out what the item id is. You can google item ids of minecraft items or you can use the command essentials gives you.
Hold the item and type /itemdb it will do as follows:
Using the /itemdb command
Here's how you write the items you want into the config.yml:
Writing your kits into the config
kits:
KitName:
delay: TimeInSecondsBetweenUsing /kit KitName Command
items:
- ItemID AmountOfThatItem
Make sure the spaces stay the same! Don't Tab!To add more items copy and paste:Then just edit the ItemID and AmountOfThatItem.
KitName:
delay: TimeInSecondsBetweenUsing /kit KitName Command
items:
- ItemID AmountOfThatItem
Make sure the spaces stay the same! Don't Tab!To add more items copy and paste:
Adding more items
- ItemID AmountOfThatItem
You must add the Amount otherwise people will get either 64 stack of say diamond swords, or the kit will count as improperly defined.
Here are some cool things that you can do to each item:
Custom Names and Lore
To add custom names and lore you'll add name:Custom_Name or lore:Custom_Lore repsectively.
- itemid:Datavalue amount name:Item_Name lore:Item's_Lore
With lores you can make them multi-lined by inserting a line break that looks like this: |
For the preview below this is the code:
- 276 1 name:&bCustom_&4&lNames lore:&7And_Custom_&aLore!|With_color_and_format_codes!
Preview
Custom Written Books
I think that the custom written books are a good item to put in a starter kit!
You need to first write your book in a text editing program. I would use something that allows you to spell check and check for grammar errors, but you could use notepad or NotePad++ (the recommended text editor for configuring YAML files.)
In the essentials folder under plugins there may be a document that says book.txt. This is the file where you will need to copy and paste the book you wrote into. If this file does not exist you should save the book you wrote as book.txt.
Because of how essentials works you need to put your book as follows inside the book.txt document:
Now for putting your book into your kit!
Here's the code:
items:
- 387 1 title:Title_that_will_be_shown_in_minecraft author:Author_that_you_want_shown_in_minecraft book:NameOfBookAsItIsInbook.txt
If you do not define an author or a title in your kit then the book will show up as Written Book with nothing that says "by: Author" in the lore. You could however replace "title:" with "name:" and it will do the same job. And I suppose you could use "lore:&7by_Author" and it'd look the same as using "author:Author"
You need to first write your book in a text editing program. I would use something that allows you to spell check and check for grammar errors, but you could use notepad or NotePad++ (the recommended text editor for configuring YAML files.)
In the essentials folder under plugins there may be a document that says book.txt. This is the file where you will need to copy and paste the book you wrote into. If this file does not exist you should save the book you wrote as book.txt.
Because of how essentials works you need to put your book as follows inside the book.txt document:
book.txt
#NameOfBook
Your Written book here! You can insert color and format codes! Use the & in place of §.
Your Written book here! You can insert color and format codes! Use the & in place of §.
Now for putting your book into your kit!
Here's the code:
Code for custom book inside of your kit
items:
- 387 1 title:Title_that_will_be_shown_in_minecraft author:Author_that_you_want_shown_in_minecraft book:NameOfBookAsItIsInbook.txt
If you do not define an author or a title in your kit then the book will show up as Written Book with nothing that says "by: Author" in the lore. You could however replace "title:" with "name:" and it will do the same job. And I suppose you could use "lore:&7by_Author" and it'd look the same as using "author:Author"
Colored Leather Armor
For colored Leather Armor you might need to use another link to help you. Click this to get to it.
But for now we will use the default minecraft color codes
Here is a table of the default minecraft color codes. The columns you will use is the foreground color.

When you chose the color that you want your piece of armor, here's what you do:
Put "color:red,green,blue" somewhere after your armor's item id and amount. Then notice that in the minecraft color charts under the foreground column there are mini columns called R, G, and B. The value for your color under R replaces red, for G green, and B blue.
So lets say I wanted to use minecraft color code Gray (&7) then I'd put "color:191,191,191" after my itemdb and amount.
items:
- 301 1 color:191,191,191 name:&7Gray_Boots! lore:I_colored_these_boots_gray!
- 300 1 color:0,0,0 name:&0I_think_this_Is_black? lore:I_was_too_lazy_to_look_at_the_chart
- 299 1 color:255,255,255 name:&fI'm_pretty_sure_this_is_white. lore:Again_I_was_too_lazy_to_look
- 298 1 color:255,64,64 name:&cRed_Hat lore:Like_Little_red_riding_hood.
In case you didn't like my names and lores...:
items:
- 301 1 name:Leather_boots color:red,green,blue
- 300 1 name:Leather_pants color:red,green,blue
- 299 1 name:Leather_shirt color:red,green,blue
- 298 1 name:Leather_hat color:red,green,blue
You can replace red,green,blue however you want. You can even use the link I gave above to test out some of your creations. (I accidentally made my leather chest piece look like diamond because of the color one time.)
But for now we will use the default minecraft color codes
Default Minecraft Color Codes
Here is a table of the default minecraft color codes. The columns you will use is the foreground color.
When you chose the color that you want your piece of armor, here's what you do:
Put "color:red,green,blue" somewhere after your armor's item id and amount. Then notice that in the minecraft color charts under the foreground column there are mini columns called R, G, and B. The value for your color under R replaces red, for G green, and B blue.
So lets say I wanted to use minecraft color code Gray (&7) then I'd put "color:191,191,191" after my itemdb and amount.
Example Code
items:
- 301 1 color:191,191,191 name:&7Gray_Boots! lore:I_colored_these_boots_gray!
- 300 1 color:0,0,0 name:&0I_think_this_Is_black? lore:I_was_too_lazy_to_look_at_the_chart
- 299 1 color:255,255,255 name:&fI'm_pretty_sure_this_is_white. lore:Again_I_was_too_lazy_to_look
- 298 1 color:255,64,64 name:&cRed_Hat lore:Like_Little_red_riding_hood.
In case you didn't like my names and lores...:
items:
- 301 1 name:Leather_boots color:red,green,blue
- 300 1 name:Leather_pants color:red,green,blue
- 299 1 name:Leather_shirt color:red,green,blue
- 298 1 name:Leather_hat color:red,green,blue
You can replace red,green,blue however you want. You can even use the link I gave above to test out some of your creations. (I accidentally made my leather chest piece look like diamond because of the color one time.)
Enchants on items
First you should decide: Do I want to be able to put "over Powered," "OP," type enchants in my kits?
If the answer is yes then find this in your config.yml and make it true.
[size=1em]unsafe-enchantments[/size][size=1em]: [/size][size=1em]false[/size]
Now for adding the enchants. Here is a list of enchants and their default highest value. This is how you'll put it in the config after the itemid and amount.
[size=1em]The new enchants I'm not sure how to put into the config but I'll try:[/size]
If the answer is yes then find this in your config.yml and make it true.
[size=1em]unsafe-enchantments[/size][size=1em]: [/size][size=1em]false[/size]
Now for adding the enchants. Here is a list of enchants and their default highest value. This is how you'll put it in the config after the itemid and amount.
Enchants
- sharpness:5
- baneofarthropods:5
- smite:5
- efficiency:5
- unbreaking:3
- fireaspect:2
- knockback:2
- fortune:3
- looting:3
- respiration:3
- protection:4
- blastprotection:4
- featherfalling:4
- fireprotection:4
- projectileprotection:4
- silktouch:1
- aquaaffinity:1
- flame:1
- power:5
- punch:2
- infinity:1
- thorns:3
[size=1em]The new enchants I'm not sure how to put into the config but I'll try:[/size]
- luckofthesea:3
- lure:3
Adding Damage to items
Adding Durability damage to items is as easy as:
itemid:damagevalue
Tool types and total uses table
- Gold 33 uses
- Wood 60 uses
- Stone 132 uses
- Iron 251 uses
- Diamond 1562 uses
Lets say you want to give an iron tool in a kit that has half durability to it. This is how you'd do it:
ItemIDofIronTool/Armor:125 1
125 is about half of the total uses of an iron tool or armor. So the damage shown on the item is about half.
Make sure that you put the amount after the itemid:damage so that the kit counts as properly defined!
Adding Potions
Adding potions to kits can sometimes be complicated because of the many ways you can add potions. Hopefully this will make it easier.
There are 3 ways I know that you can add potions to kits, read each way to see if that's what you need.
1. Using the /itemdb command. For if you want to have potions that you can access via the creative inventory.
2. Data Values. For if you want to be able to use secret unused potions in your kits, or if you are willing to look up the data values of potions.
3. The Essentials custom potion maker. Useful if you are making kits for a PvP server and want to give effects like hunger, wither, or fatigue.
1. /itemdb command to add potions
This should be the simplest way to add potions to your kits. Find the desired potion you want in the creative inventory and hold it in your hand. Then type /itemdb. It will give you a number starting with 373:, the rest depends on what potion you have chosen and whether or not it is a splash potion or regular potion.
Examples of the item ids of Potions
This example potion is the Potion of Regeneration with a duration of 45sec.
- 373:8193 2
- 373:8193 2
2. Data Values
By using method 1 you are essentially finding the data value of the default Minecraft potions. But if you wanted some extra potions that can't be obtained in the game then it's best to use the data values.
I like to use the Minecraft Wiki to learn the data values of the potions I want. Click here for the link to Drinkable Potions, Splash Potions.
In the tables there is a row called DV, that stands for Data Value. So on the Drinkable Potions page you'll see Water Bottle has a DV of 0. To put a water bottle in the kit you'll put 373:0 the 0 represents the Water Bottle's Data Value. If you want a different kind of potion find it's data value and replace the 0 with it.
The wiki gives you sections called "Unbrewable Potions" and "Unused Potions" These you can only recieve in the game by command, (or essentials kits).
The "Unbrewable Potions" gives clear Data Values, but the Unused Potions do not. Here is an example of one of the unused potions:
Sparkling Potion: 47
In order to get this potion use
- 373:47 1
If you want a splash potion of that same potion add "16384" to the Data Value. (This works with all drinkable potions)
So 47 + 16384 = 16431 and the new entry for the kit would look like this:
- 373:16431 1
3. Essentials Custom Potions
This method allows the server admin to create custom potions with custom strength's and durations. In addition to the potions by default only being called water bottle this will make a for some really fun potion fights. Or possibly a Potion Roulette game?
Setup in a kit:
- 373 Amount e:Effect p:Power d:duration
You can stack up the effects as much as you want, but remember that if you add contradictory effects to one potion there could be some client side issues. Adding the same effect with different power levels won't cause as much as an issue, because the game will chose the stronger of the two powers, and will take the new duration of it.
Here's an example of adding a jump boost and regeneration to the same potion:
- 373 1 e:Jump p:4 d:60 e:Regeneration p:8 d:60
Power levels are any number from -127 to 128. A negative power reverses the result of the potion.
Duration is number of seconds you want the potion to last.
I have no idea how to make these a splash potion, if you know how to do that please leave a message and I'll add it as soon as possible.
Also, by default all of these custom potions will look like enchanted water bottles, named "Water Bottle," if you want your players to know what each potion does consider adding a name and lore to your potions!
Setup in a kit:
- 373 Amount e:Effect p:Power d:duration
You can stack up the effects as much as you want, but remember that if you add contradictory effects to one potion there could be some client side issues. Adding the same effect with different power levels won't cause as much as an issue, because the game will chose the stronger of the two powers, and will take the new duration of it.
Here's an example of adding a jump boost and regeneration to the same potion:
- 373 1 e:Jump p:4 d:60 e:Regeneration p:8 d:60
Power levels are any number from -127 to 128. A negative power reverses the result of the potion.
Duration is number of seconds you want the potion to last.
Possible Effects to chose from
Speed
Slowness
Haste
Fatigue
Strength
Heal
Harm
Jump
Nausea
Regeneration
Resistance
Fireresist
WaterBreath
Invisibility
Blindness
Nightvision
Hunger
Weakness
Poison
Wither
Healthboost
Absorption
Saturation
Slowness
Haste
Fatigue
Strength
Heal
Harm
Jump
Nausea
Regeneration
Resistance
Fireresist
WaterBreath
Invisibility
Blindness
Nightvision
Hunger
Weakness
Poison
Wither
Healthboost
Absorption
Saturation
I have no idea how to make these a splash potion, if you know how to do that please leave a message and I'll add it as soon as possible.
Also, by default all of these custom potions will look like enchanted water bottles, named "Water Bottle," if you want your players to know what each potion does consider adding a name and lore to your potions!
Using what you know here to use the /give command in game! Above is how to put custom items into your essentials kits. But lets say you want to use the essentials give or item commands. Here's a short tutorial:
/give Player ItemID:DV # Other Data You want to include here
So I can give myself a piece of paper that has a custom name and lore like this:
/give sa5mmm paper 1 Name:Ticket lore:&4Admit_One!|&7To_Pepsi617's_Castle!
Instead of the word paper you can use the itemdb # of paper. The item and give commands aren't as picky as the kits are. You can also give me a diamond sword with god like enchants. (If they enchant numbers will be over the vanilla Minecraft limit be sure your config is set up properly! [Check above for adding enchants])
/give sa5mmm DiamondSword 1 Name:&eSam's_&1God_Sword! lore:&7A_Sword_fit_for|&7a_Queen! Sharpness 25 Durability 16
There are many other things you can do by referencing above and incoporating them into a /give or /item command!
What I'm adding next!
Spoilers about:
- Add different effects to fireworks
Sorry this isn't finished I add a little here and there!
| Tags |
7 Update Logs
/give & /item Commands : by sa5mmm 05/27/2014 10:19:27 pmMay 27th, 2014
I added a little section about using the essentials /give and /item commands with what you know from the rest of the tutorial.
LOAD MORE LOGS
tools/tracking
2639019
6
guide-to-essentials-kits


 theprophetjade
 alicat
 WhisperOfTheWild
 Dim the Enderman
 Frwf
Frwf sniffercraft34
 shackfu
 ScotsMiser

 WYHA-Storm
Create an account or sign in to comment.
Thanks