

- 1,097 views, 1 today

0
NOTE: this is not finished. Just saying.
Alright, if you came here, your probabally new to building. If you want help on your journy to becoming an Builder - and even use Command Blocks (NOT included in my building guide but will be in my Command Block Guide, about 2016?), you should drop off here. Alright, I suck at intros and outros. I wish there was an intro/outro guide on PM. Woah, I'm getting off track already! Well, then I'll start off with one of the easiest forms of building: Pixel Art.
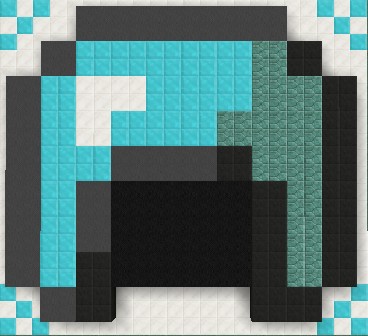
You might want to start off with something you can copy like an Diamond Helmet. An Diamond Helmet is really easy, as well. It is also an in-game item so you can copy it streight off the actual Diamond Helmet.
Tips I learnt:
If I can't find an block the color I want, use an Texture Pack.
Build each pixel 2X2.
Look carefully for even the smallest of differences that can make your art 10X better.
Keep it free of ugliness!
Place down an block and put an Item Frame on it. Then place the item in it to help me copy.
One: Finding your blocks
Look carefully in your Creative Inventory (Yes, start with Creative to build something) carefully through each and every block. It doesn't HAVE to be an color block. (Stained Clay, Wool, etc.) I used Prismarine Bricks for my helmet. You don't need to get the 100% YES BEST blocks on your first build but you can use other blocks as placeholders. Remember to look at the Diamond Helmet each time you select a new block.
Two: Starting to Build
Start with the rarest color on the helmet, or the shine. Due to there being only 3 pixels, we can easily start from there. I'll use quartz but you can use whatever you want. Good. Now build around it. There is an gray pixel in the top right and an 2 gray and 1 black in the bottom right. After that build all of the other pixels around it (Diamond Block). This won't be the case for many builds such as Bedrock (our next build) due to there being about the same amount of every block. In this case, start from the corner.
Three: Close Detail
While building, have you noticed that there are two different types of black in the helmet? One a bit bluer and one solid black. This is the reason I told you to pay close attention to the picture. Coal Blocks for the bluer one and Black Wool for the other. I won't give you any more Close Detail hints for at least the rest of Basic Pixel Art.
Four: The Final Touches
After you are done, you can do many things to make the Helmet neater such as:
Background(s)
Texture Pack(s)
Remove Unneccasry Object(s)/Mob(s)
Partical(s)
Fill In Placeholder(s)
Double-Check (and maybe more)
And that's only the tip of the iceburg.
Five: Completion!
Congraduations for finishing! We will now move on to the next Pixel Art: Bedrock. Remember that this is 2D Pixel Art, not an 3D Block. Also, I would like to see your Diamond Helmet below. (If you learnt something, of course.)

------------------------------------------------------------------------------------------------------------
Eleven: Placeholders come in!
If you followed my previous steps, you'll know what to do first. But you might of stumbled across an problem: How do you do this block? Remember: Placeholders. They work. It's actually pretty simple.
Twelve: Where to start?
You start at the Top-left. Find small clustered spots to use to measure the pixels of larger groups. Just remember that this doesn't have to be 100%, this is Pixel Art. No one will be mad at you if they see it. Work on it slowly. Alright?
Thirteen: TOO HARD
You are screaming TOO HARD. In your head. I know it. Simply make the pixels 1 block each as bedrock has many pixels due to it being an block. Also, don't do the background if this is just THAT hard. No, seriously.
Fourteen: Filling in the placeholders
No hints. Use some different-looking blocks other that single-color ones, maybe even Bedrock itself. Just remember to use the other tips and slowly use them as to completion.
Fifteen: How to add the Final Touches?
For an Bedrock? It doesn't need much Final Touches! Do as many as you can. They are Final Touches and they are not required.
Sixteen: Hurray!
You completed bedrock? ALREADY? Come on. You are reading too quick. ACTUALLY build it if you want to learn ANYTHING. Seriously! I'm not joking. I'm not.
Seventeen: Completed!!!
Alright. That was pretty easy and nice and quick like the helmet! Well, remember: Practice makes Perfect. And quick. Alright, Let's just blow away all your troubles with the next one.
------------------------------------------------------------------------------------------------------------
Twentyone: Explosively Hard
Yes. We're doing TNT. And not just one side. We're doing all SIX sides! SEPERATLY! Sounds like an challenge to me. Well, practice makes perfect (I think)...
Twentytwo: Top! (No. Not a top like an spinning one. Or the shop "top" or whatever.)
You can't use an Item Frame for this one. Luckily, TNT is an Block, not an Item. So plop it on the ground and study it's pattern. Place it everywhere. And you might want to blow the TNT up using TNT after the build's over. Well, if you want to.
Twentythree: Blown Away were ya?
After doing that 1X1 bedrock. That's not how TNT works. Come on, don't be afraid to try an 4X4 or 3X3. Just kidding. I mean, why would- Well, it won't be an 1X1 doe. It's an 2X2/pixel.
-------------------------------------------------------------------------------------------------------------
Alright, if you came here, your probabally new to building. If you want help on your journy to becoming an Builder - and even use Command Blocks (NOT included in my building guide but will be in my Command Block Guide, about 2016?), you should drop off here. Alright, I suck at intros and outros. I wish there was an intro/outro guide on PM. Woah, I'm getting off track already! Well, then I'll start off with one of the easiest forms of building: Pixel Art.
You might want to start off with something you can copy like an Diamond Helmet. An Diamond Helmet is really easy, as well. It is also an in-game item so you can copy it streight off the actual Diamond Helmet.
Tips I learnt:
If I can't find an block the color I want, use an Texture Pack.
Build each pixel 2X2.
Look carefully for even the smallest of differences that can make your art 10X better.
Keep it free of ugliness!
Place down an block and put an Item Frame on it. Then place the item in it to help me copy.
One: Finding your blocks
Look carefully in your Creative Inventory (Yes, start with Creative to build something) carefully through each and every block. It doesn't HAVE to be an color block. (Stained Clay, Wool, etc.) I used Prismarine Bricks for my helmet. You don't need to get the 100% YES BEST blocks on your first build but you can use other blocks as placeholders. Remember to look at the Diamond Helmet each time you select a new block.
Two: Starting to Build
Start with the rarest color on the helmet, or the shine. Due to there being only 3 pixels, we can easily start from there. I'll use quartz but you can use whatever you want. Good. Now build around it. There is an gray pixel in the top right and an 2 gray and 1 black in the bottom right. After that build all of the other pixels around it (Diamond Block). This won't be the case for many builds such as Bedrock (our next build) due to there being about the same amount of every block. In this case, start from the corner.
Three: Close Detail
While building, have you noticed that there are two different types of black in the helmet? One a bit bluer and one solid black. This is the reason I told you to pay close attention to the picture. Coal Blocks for the bluer one and Black Wool for the other. I won't give you any more Close Detail hints for at least the rest of Basic Pixel Art.
Four: The Final Touches
After you are done, you can do many things to make the Helmet neater such as:
Background(s)
Texture Pack(s)
Remove Unneccasry Object(s)/Mob(s)
Partical(s)
Fill In Placeholder(s)
Double-Check (and maybe more)
And that's only the tip of the iceburg.
Five: Completion!
Congraduations for finishing! We will now move on to the next Pixel Art: Bedrock. Remember that this is 2D Pixel Art, not an 3D Block. Also, I would like to see your Diamond Helmet below. (If you learnt something, of course.)
------------------------------------------------------------------------------------------------------------
Eleven: Placeholders come in!
If you followed my previous steps, you'll know what to do first. But you might of stumbled across an problem: How do you do this block? Remember: Placeholders. They work. It's actually pretty simple.
Twelve: Where to start?
You start at the Top-left. Find small clustered spots to use to measure the pixels of larger groups. Just remember that this doesn't have to be 100%, this is Pixel Art. No one will be mad at you if they see it. Work on it slowly. Alright?
Thirteen: TOO HARD
You are screaming TOO HARD. In your head. I know it. Simply make the pixels 1 block each as bedrock has many pixels due to it being an block. Also, don't do the background if this is just THAT hard. No, seriously.
Fourteen: Filling in the placeholders
No hints. Use some different-looking blocks other that single-color ones, maybe even Bedrock itself. Just remember to use the other tips and slowly use them as to completion.
Fifteen: How to add the Final Touches?
For an Bedrock? It doesn't need much Final Touches! Do as many as you can. They are Final Touches and they are not required.
Sixteen: Hurray!
You completed bedrock? ALREADY? Come on. You are reading too quick. ACTUALLY build it if you want to learn ANYTHING. Seriously! I'm not joking. I'm not.
Seventeen: Completed!!!
Alright. That was pretty easy and nice and quick like the helmet! Well, remember: Practice makes Perfect. And quick. Alright, Let's just blow away all your troubles with the next one.
------------------------------------------------------------------------------------------------------------
Twentyone: Explosively Hard
Yes. We're doing TNT. And not just one side. We're doing all SIX sides! SEPERATLY! Sounds like an challenge to me. Well, practice makes perfect (I think)...
Twentytwo: Top! (No. Not a top like an spinning one. Or the shop "top" or whatever.)
You can't use an Item Frame for this one. Luckily, TNT is an Block, not an Item. So plop it on the ground and study it's pattern. Place it everywhere. And you might want to blow the TNT up using TNT after the build's over. Well, if you want to.
Twentythree: Blown Away were ya?
After doing that 1X1 bedrock. That's not how TNT works. Come on, don't be afraid to try an 4X4 or 3X3. Just kidding. I mean, why would- Well, it won't be an 1X1 doe. It's an 2X2/pixel.
-------------------------------------------------------------------------------------------------------------
| Tags |
3 Update Logs
Update #3: Shoe Polish Is Always Good (Even against werewolves) : by luiyay 05/07/2015 10:45:53 pmMay 7th, 2015
Put some Shoe Polish on it. Looks a lot neater now. :D
LOAD MORE LOGS
3297097
6


 CrystalRuby
 Dermugettum
 IceKingA121
 HudSolo2009
 Eligames2009
 FunkySpaceDust
 TopJet

 mister kostya
 Blueybird
Create an account or sign in to comment.