


421
Command Block Syntax Highlighter for Notepad++
+an Installation Tutorial for Notepad++ Languages

Hello, folks!
Recently, I created a syntax highlighter/language definition for Notepad++ which many of you might enjoy.
Well, I might not be the first one to do this, however I added quite nice coloring aswell as nice features like using "<" and ">" to collapse text in order to keep it organized.
I will first present you my concept and then give you a tutorial for installation of languages in Notepad++. (This is a tutorial blog after all)
INSTALLATION GUIDE
Since this is a tutorial blog, I'll now also give you a tutorial for the installation of languages for Notepad++.
1. Notepad++ uses .xml files for loading language definitions into the system.
First download the file and save it somewhere on the computer, where you can access it later on.
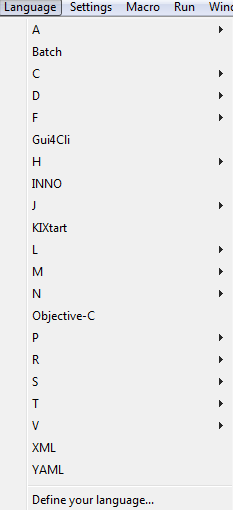
2. Now open up Notepad++ and open the rider "Language".
You'll see a list of already existing languages and the option "Define your Language".
Click on that option.
3. Now click on "Import..." in the window that popped up and search for the file, you saved earlier on on your computer.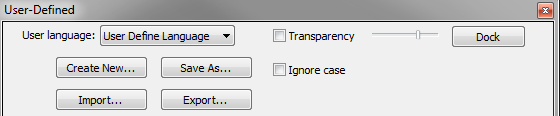
4. After successfully importing the language and saving it in Notepad++. you can activate it in your language options when you open up a file.
From then on, Notepad++ will associate the file with your language, so you don't have to set your language whenever you open the file.
(If you are already experienced, you can change settings such as colors inside the "User Defined" window to personalize the highlighting.
If you find any kind of highlighting errors or other bugs, please report them to me)

+an Installation Tutorial for Notepad++ Languages
Hello, folks!
Recently, I created a syntax highlighter/language definition for Notepad++ which many of you might enjoy.
Well, I might not be the first one to do this, however I added quite nice coloring aswell as nice features like using "<" and ">" to collapse text in order to keep it organized.
I will first present you my concept and then give you a tutorial for installation of languages in Notepad++. (This is a tutorial blog after all)
| LIST OF FEATURES |
Command Highlighting Correctly spelled commands get a purple color. This way you can see mistakes and mispelled command easily and you also get a sense of orientation inside your text files. |
Selector Highlighting Selectors get a blue color, which helps you distinguish them from the rest of the command. In addition to that, numbers inside selectors stand out even more due to the blue-red contrast. (NBT Tags get aqua highlighting) |
Comments and collapsable text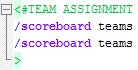 You can create comments which are always being displayed in green using "#". Also, you are able to start collapsable text using "<", to close the text simply use ">". This feature is incredibly useful for keeping your text organized and for adding categories and functions that are supposed to be hidden. |
Number Highlighting Quite often when working with command blocks, you will copy and paste the same command over and over and just change one number. Number Highlighting makes it much easier to focus on these important things that have to be changed and helps you seeing the difference between two nearly identical commands. |
String Highlighting Strings get an orange highlighting. Inside strings, tags, selectors, numbers, operators and more all have the same color, which makes them stand out of the rest and which suggests that all characters inside are part of the string. |
| Operator Highlighting Operators such as "~" "=" "/" and more have a dark blue highlighting which also helps you seperate them from the rest of the text. |
INSTALLATION GUIDE
Since this is a tutorial blog, I'll now also give you a tutorial for the installation of languages for Notepad++.
1. Notepad++ uses .xml files for loading language definitions into the system.
First download the file and save it somewhere on the computer, where you can access it later on.
2. Now open up Notepad++ and open the rider "Language".
You'll see a list of already existing languages and the option "Define your Language".
Click on that option.
View Image
3. Now click on "Import..." in the window that popped up and search for the file, you saved earlier on on your computer.
View Image
4. After successfully importing the language and saving it in Notepad++. you can activate it in your language options when you open up a file.
From then on, Notepad++ will associate the file with your language, so you don't have to set your language whenever you open the file.
(If you are already experienced, you can change settings such as colors inside the "User Defined" window to personalize the highlighting.
If you find any kind of highlighting errors or other bugs, please report them to me)
| Credit | Headaxe |
| Tags |
tools/tracking
3234353
6
command-block-syntax-highlighting-for-notepad


![Headaxe's Photoshop Magic [100 Diamonds!] Minecraft Blog](https://static.planetminecraft.com/files/resource_media/screenshot/1450/h27950078_thumb.jpg)


 IonTheGamer
 Firestar2477278
 Knitsuj
 Escapazition
 hotsuop
 Cytals
 ScotsMiser


 GalaxyCat24
Create an account or sign in to comment.
Is there a version for editing books as well?