


1
Step 1: Reference
It is imperative that you find a good picture to start with, full naval plans and model ship blueprints are an awesome way to get an idea what your product should look like. I started only with blueprint pictures but I've had a lot of practise to freehand a lot of ships.
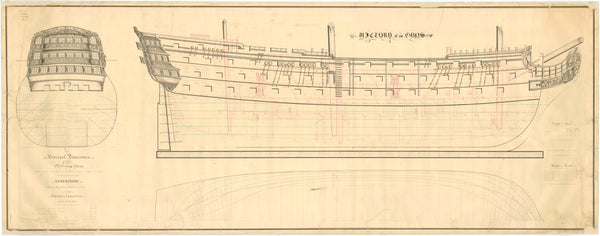

I will be building the above 'orange' ship in this tutorial, The HMS Assurance
Step 2: Scale
personally, I build ships in 1:1 scale, some build 1:2, 1:1.5 or even larger to squeeze in more detail, but in my opinion, they will be massively oversized for your Minecraft character and it will ruin the immersion. I start by marking out the gun ports, this will give you the rough length of a ship. for me, that is 1 block for the port and 2 blocks in between the 2 ports.

Step 3: Stern
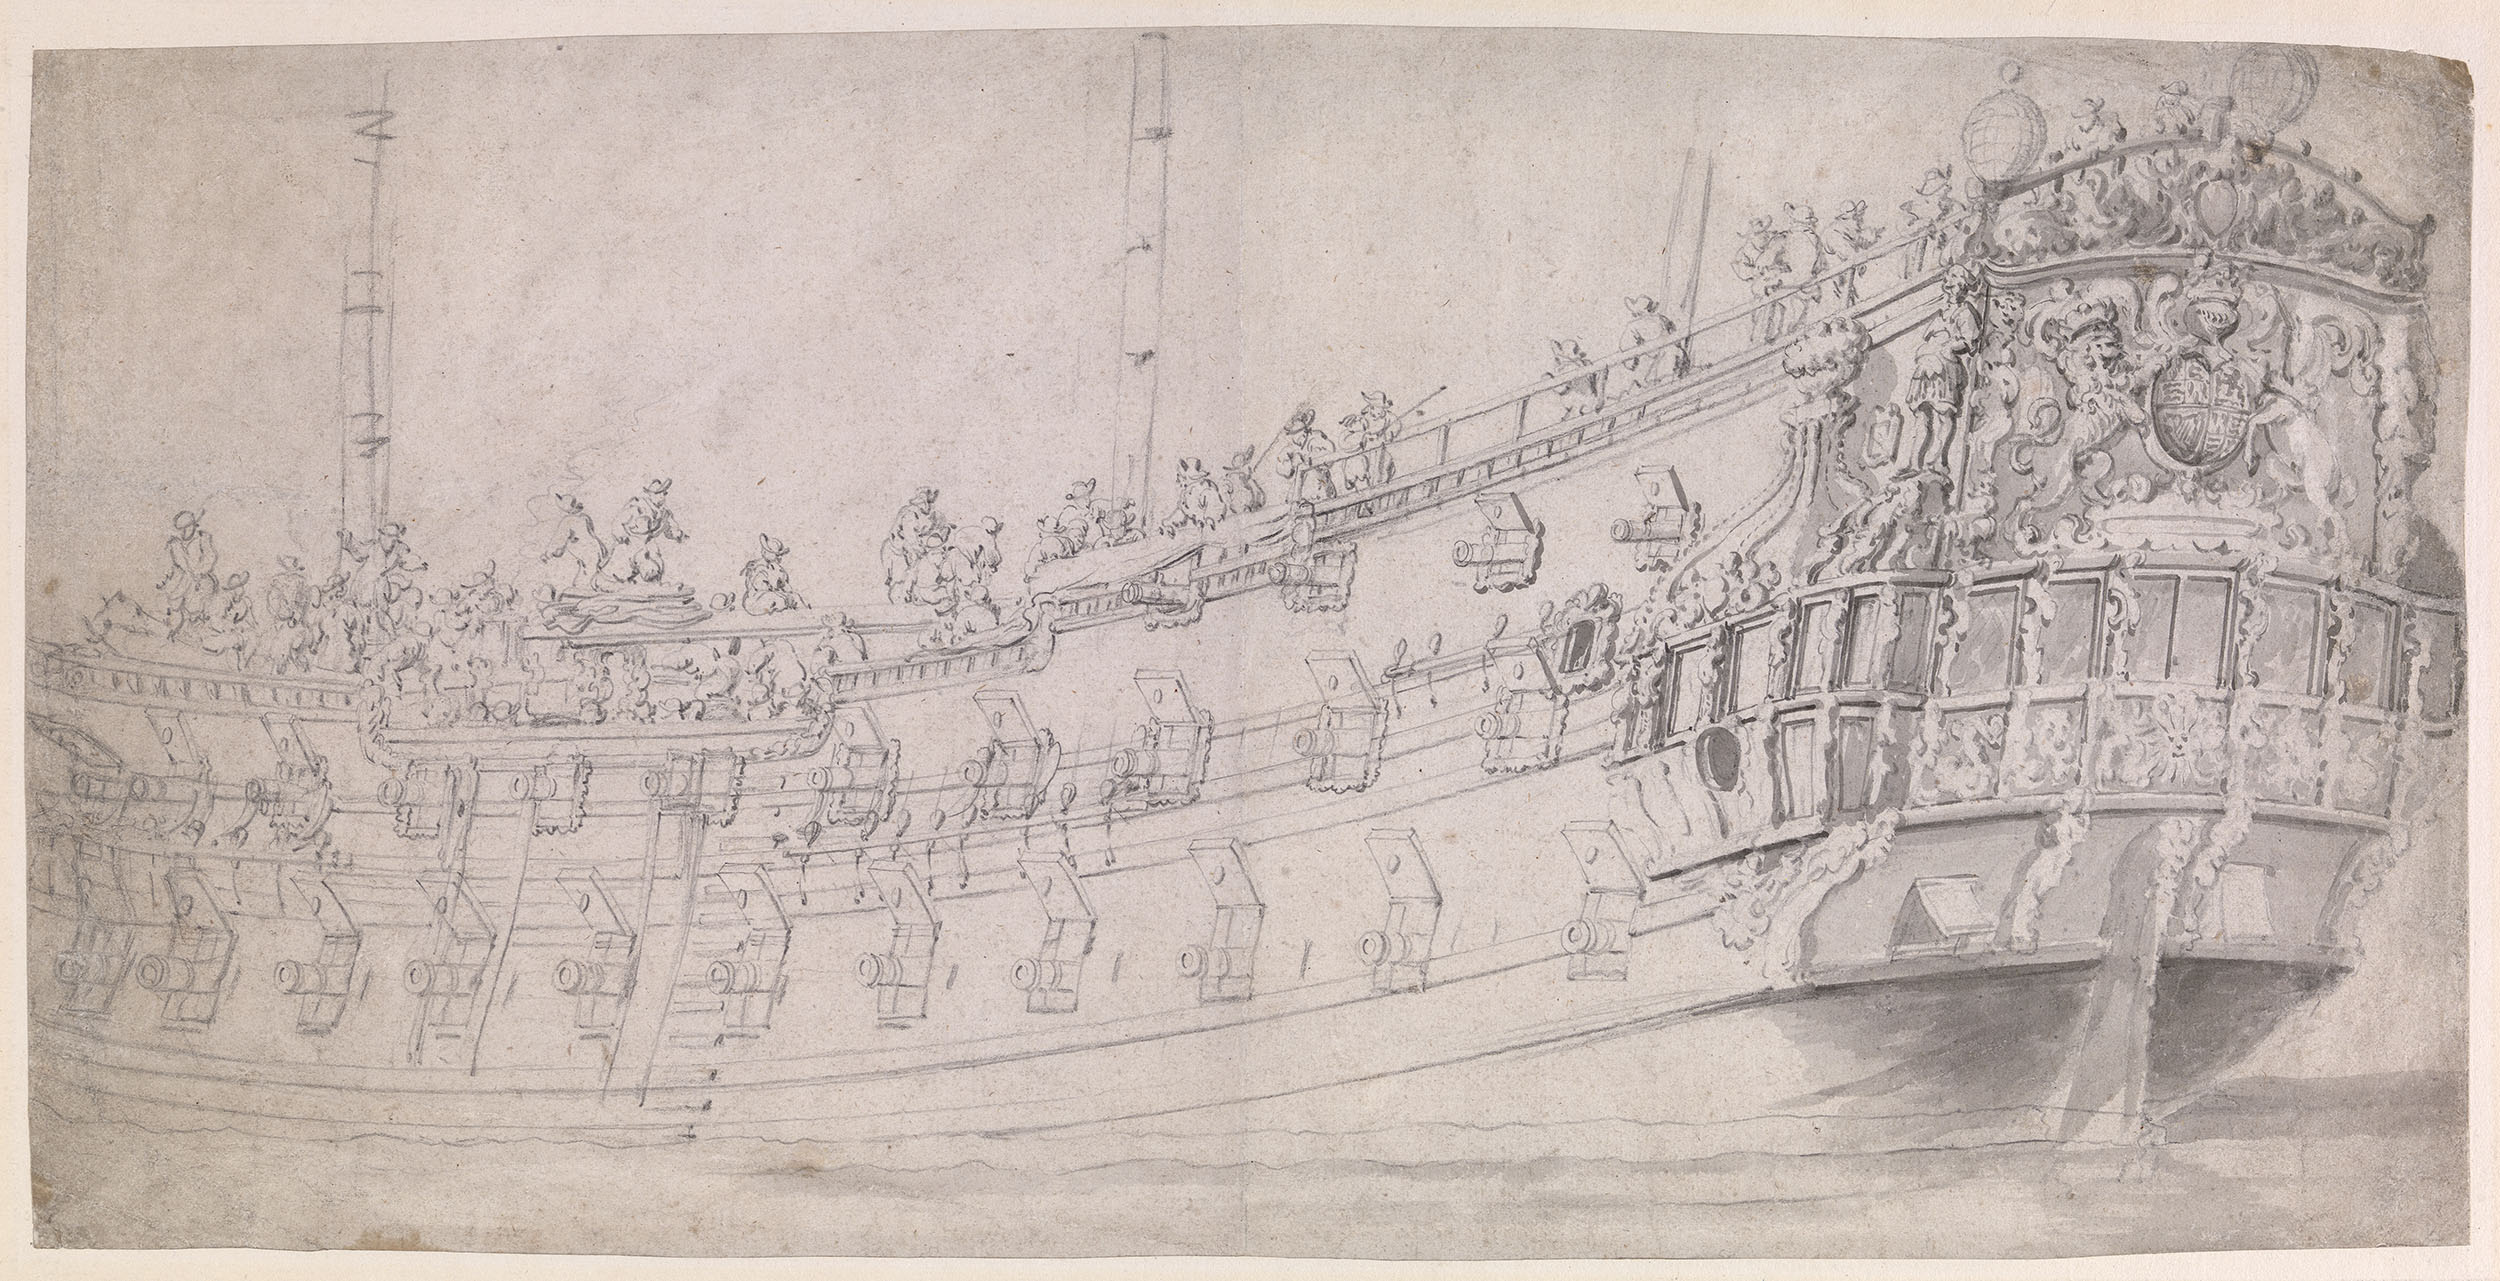
building the back of the ship will give you the scale of the width. I find that at the very back and top of the stern, the width should be at least 5, 3 if you're building half the ship. If your reference picture doesn't include a stern picture, find another ship that does and is similar to your original plan. I had to do this for this ship.


2ndary picture of a stern from a different ship
Some other stern examples:

Napoleonic French frigate


Tips: Use trapdoors, fence gates and levers for detailing of those gilded statuette thingies, it will go a long way in adding detail.
Step 3.1: Bow and hull shape
next you will want to get your bow and hull shape. Unlike the conventional rib design that was practiced in real life and early Minecraft tutorials, I rather build everything in ovals, everything comes down to making circles in ships. For early line of battle ships, they will be smaller than in Napoleonic times, and for them I recommend that the bottom of the ship is at least 2 blocks away from the middle. For the depth of the hull it really depends on the ship size. In my experience, smaller Anglo-Dutch wars ships should be 3 blocks + 0.5 slab keel or 4 blocks in total, larger ships 4.5 or 5, and even larger 6 and so on... I try to find the info of the ship on a site called Three Decks, here's what I found for this particular ship: https://threedecks.org/index.php?display_type=show_ship&id=401
Your bulwark will most likely expand to allow more space, I find that 2 or 3 blocks should be fine for any size of a ship, unless you're dealing with some specific plan, for example the merchant fluyt is extremely thin at the stern (3 or maybe even 1 block wide). At the front you squeeze it again by 1 block for the last 3 blocks of the ship length. Imagine an unzipped purse, that's basically how the weather deck should look.
You will want for the outer most ellipsoid to peak half over waterline and half underwater, this will give your ship a stable feeling when sitting in the water. Many ships I see are comically top heavy, I suspect that's more a case of laziness of not wanting to build underwater.

Tip for building in survival: it's easier to build underwater if you make a schematic with the litematica mod and use easy place. This will limit your time spent guessing where goes what. I generally then fill the hull with gravel up to the waterline to dry the inside, when I remove the gravel with a fortune spade, I get bones in return and I can recycle them into bone blocks for sails :)

above picture is from another project I was showing to someone
Tips: I find that early Dutch ships had a longer beak , meaning that the slope from the keel up to the top of the beak would be a straight 1x1 diagonal, like you can see in the picture below. English and French, and possibly Spanish, etc. has a steeper, shorter nose, for that I go up 2 blocks for every 1 block I go away from the hull. in between the 2 blocks I place a wall block to give a more sleek feel
Step 3.2: rounding up the hull
as you see in the examples above, the curves are filled in with slabs in between the full blocks, this will give you a much rounder overall shape when viewing from front and back. I recommend you put only upside down slabs for at least half the width of the diagonal. for example, for a 2 block wide gap, you put 1 slab next to the lower block. again, consult the above pictures.

Step 4: Hull colour
Contrary to popular belief, Napoleonic navies did NOT have an uniform colour scheme and so they didn't look at the ship's hull paint to determine a friend or foe. It was much easier to just look at the flags they were flying... Therefore all British ships were not ochre, all French were not white, all Spanish were not red and so on and so on. The captains themselves picked whatever they liked. It was later in the 19th century that most switched to pure black and white because those 2 colours were simply cheaper to produce and for military purpose, any antifouling colour will do.
(whatever floats your boat as they say ;) )

example of what it might look like within a single fleet, picture from a different project of mine
For ships of the Anglo-Dutch wars I typically use:
Misc Nation accents:
for Napoleonic era:
Step 5: hull interior (cannons)
I use 2 different designs for cannons, one for sitting on full blocks, one for half, both are around 1 block high so there's no real opportunity to make different cannon types at this scale.

I unfortunately didn't have enough space to make a full storage for this ship as you wouldn't be able to stand in it properly, but here's an example from a bigger ship


here you can see the charge (sand blocks) room and the shot (jungle blocks)
Tips: don't forget to make 'rescue boats' above the main 'storage hole part' i generally build 1 for smaller ships and 3 - 1 stacked on top of 2 for bigger ones. I use dark oak for the boat itself and then cover the top with white carpet and polished diorite slabs
Step 5: the dreaded rigging, ugh
even after so much time, the rigging is still tedious and unpleasant, I have the convenience of being able to copy the crows nest/ shooting platforms to save myself a bit of time.
use //line iron_bars for steep ropes, //line chain[axis=whatever makes it fit] for more horizontal ones.
don't bother curving the ropes as they must be under stress to control the sails, you'll only give yourself more work for something that wont look realistic.


Tips: as you can see in above pictures, pre 17th century ships still had that classic 'Pirate' style fenced off shooting platforms, in later Napoleonic era ships they got a bit flatter and bigger
here's an example, but I unfortunately don't have a closeup of the masts
Step 5.1 5.2: Shrouds, ratlines and stays
Shrouds and ratlines make those net-like ladders that you see sailors climb on. Stay ropes carry the staysails, which are the triangular, rectangular free flying sheets that help the ship manoeuvre better.
Tips: After looking at paintings of Anglo-Dutch wars, I didn't notice a presence of stay sails, so you can save yourself a bit of time from not making those :P You wont have the same convenience in later ships tho...
i use //gmask 0 and select both ends of the chains. then I write //line yellow_wool to make a line. I repeat this process until i complete 1 set of shrouds. After that i replace all the yellow wool with iron bars using //replace yellow_wool iron_bars. this makes the process a bit faster


Step 6: even more pain, the sails themselves
this is by far the part where you'll spend your most of your time to complete your ship. You could save yourself a bit of time in just making a ship that's currently stationary in the port and simply avoid making sails, but nevertheless here's some examples of how I do it.

example of a docked ship on the left - you lower the middle mast down to where your top of the shooting platform bit ends, same for the top sails i use a gradient of birch -- smooth sandstone --- bone block for extra depth. I i used to reverse the effect so the dark part would be on top, but this I think makes more sense.

I simply use the world edit brush to create the gradient:

example of ship with stay sails
Tips: use upside down birch slabs on the bottom of a sail to give it a more round shape
again, think in circles, the sails are just made of smaller and smaller ovals on top of each other
As technology progresses, the lateen sail as you see in the picture above (the triangular back sail) gets replaced. Your Napoleonic ships will probably all use the gaff sail. The build process is basically the same, but instead of continuing the yard past the mast, it will instead attach to it. You will also have to add an extra boom stick at the bottom of the sail, this will move in unison with the diagonal yard.
Your back sail will also determine how your back flag will sit, if your ship has a lateen sail, you will have to build a diagonal stick with fences to hoist the flag on it. On the gaff sail, you will have to draw an iron bar line from end to end of the and build the flag on top of it.
here's a quick example:


Tips: make the back flag go in the same direction as the sails, kinda perpendicular to the square sails. I make my sails diagonal to give it a bit more life, you don't have to do it if you're new to making ships, but i rotate the yards with a 3 block interval.
I used to make yards with half blocks, then i switched to fences and fence gates, now i went back to slabs because using fence stuff is a bit too time consuming, overcomplicated and if your not using a texture pack, it makes those holes in your yards, which don't look too structurally sound. Go for a darker tone on the yards, I recommend blackstone or dark oak.
In the Napoleonic era, the French used to have a black base on their mast and white for their lower part. after that i use mud walls to simulate a thinner log and spruce fences on top. the middle and top parts of the masts are basically the same for any nation.
For the British, use a red base and stripped oak lower part, same as the French for the middle and top parts.
In the Anglo-Dutch wars ships I use the same stripped spruce for all nations on all parts of the ship + mud walls
I put signs around a black concrete block to get that iron truss to prevent the mast in expanding and warping. if you're using a spruce colour tone, you could also substitute it with barrels since they have integrated those iron bits already in the texture.

Step 6.1: don't forget to name your ship!
Step 6.2: the end, take pictures :D

Misc useful pics and links:
Anglo-Dutch Painting & Rigging Guide V1.pdf (rodlangton.com)
nice guide of miniature assembly
some really bad pirated low res paint scheme screen grabs :P


I use Chocaptic shaders with a custom preset, maybe I'll upload it here somehow, sometimes I use SEUS also. some pictures are taken with default texture pack, some with Patrix 32x (the realistic), some with the Terra 1912 texture pack. (black iron bars)
I recommend and will always point people to this video, it's what taught me how to build:
www.youtube.com/watch?v=OCMBMMgj_m0
It is imperative that you find a good picture to start with, full naval plans and model ship blueprints are an awesome way to get an idea what your product should look like. I started only with blueprint pictures but I've had a lot of practise to freehand a lot of ships.
I will be building the above 'orange' ship in this tutorial, The HMS Assurance
Step 2: Scale
personally, I build ships in 1:1 scale, some build 1:2, 1:1.5 or even larger to squeeze in more detail, but in my opinion, they will be massively oversized for your Minecraft character and it will ruin the immersion. I start by marking out the gun ports, this will give you the rough length of a ship. for me, that is 1 block for the port and 2 blocks in between the 2 ports.
Step 3: Stern
building the back of the ship will give you the scale of the width. I find that at the very back and top of the stern, the width should be at least 5, 3 if you're building half the ship. If your reference picture doesn't include a stern picture, find another ship that does and is similar to your original plan. I had to do this for this ship.
2ndary picture of a stern from a different ship
Some other stern examples:
Napoleonic French frigate
Tips: Use trapdoors, fence gates and levers for detailing of those gilded statuette thingies, it will go a long way in adding detail.
Step 3.1: Bow and hull shape
next you will want to get your bow and hull shape. Unlike the conventional rib design that was practiced in real life and early Minecraft tutorials, I rather build everything in ovals, everything comes down to making circles in ships. For early line of battle ships, they will be smaller than in Napoleonic times, and for them I recommend that the bottom of the ship is at least 2 blocks away from the middle. For the depth of the hull it really depends on the ship size. In my experience, smaller Anglo-Dutch wars ships should be 3 blocks + 0.5 slab keel or 4 blocks in total, larger ships 4.5 or 5, and even larger 6 and so on... I try to find the info of the ship on a site called Three Decks, here's what I found for this particular ship: https://threedecks.org/index.php?display_type=show_ship&id=401
Your bulwark will most likely expand to allow more space, I find that 2 or 3 blocks should be fine for any size of a ship, unless you're dealing with some specific plan, for example the merchant fluyt is extremely thin at the stern (3 or maybe even 1 block wide). At the front you squeeze it again by 1 block for the last 3 blocks of the ship length. Imagine an unzipped purse, that's basically how the weather deck should look.
You will want for the outer most ellipsoid to peak half over waterline and half underwater, this will give your ship a stable feeling when sitting in the water. Many ships I see are comically top heavy, I suspect that's more a case of laziness of not wanting to build underwater.
Tip for building in survival: it's easier to build underwater if you make a schematic with the litematica mod and use easy place. This will limit your time spent guessing where goes what. I generally then fill the hull with gravel up to the waterline to dry the inside, when I remove the gravel with a fortune spade, I get bones in return and I can recycle them into bone blocks for sails :)
above picture is from another project I was showing to someone
Tips: I find that early Dutch ships had a longer beak , meaning that the slope from the keel up to the top of the beak would be a straight 1x1 diagonal, like you can see in the picture below. English and French, and possibly Spanish, etc. has a steeper, shorter nose, for that I go up 2 blocks for every 1 block I go away from the hull. in between the 2 blocks I place a wall block to give a more sleek feel
Step 3.2: rounding up the hull
as you see in the examples above, the curves are filled in with slabs in between the full blocks, this will give you a much rounder overall shape when viewing from front and back. I recommend you put only upside down slabs for at least half the width of the diagonal. for example, for a 2 block wide gap, you put 1 slab next to the lower block. again, consult the above pictures.
Step 4: Hull colour
Contrary to popular belief, Napoleonic navies did NOT have an uniform colour scheme and so they didn't look at the ship's hull paint to determine a friend or foe. It was much easier to just look at the flags they were flying... Therefore all British ships were not ochre, all French were not white, all Spanish were not red and so on and so on. The captains themselves picked whatever they liked. It was later in the 19th century that most switched to pure black and white because those 2 colours were simply cheaper to produce and for military purpose, any antifouling colour will do.
(whatever floats your boat as they say ;) )
example of what it might look like within a single fleet, picture from a different project of mine
For ships of the Anglo-Dutch wars I typically use:
- Dutch :dark oak, grey terracotta, black hulls, red and greenish/blueish (cyan terracotta) accents on the bulwarks
- English: oak, black concrete with oak signs hull, red and black accents on the bulwarks
Misc Nation accents:
for Napoleonic era:
- Brazil: green bulwark
- France: oak hull, blue bulwark
- Ottoman: reddish or greenish bulwark
- Portuguese: blue bulwark
- Spain: yellow or blue bulwark
- Sweden: blue or red bulwark
Step 5: hull interior (cannons)
I use 2 different designs for cannons, one for sitting on full blocks, one for half, both are around 1 block high so there's no real opportunity to make different cannon types at this scale.
I unfortunately didn't have enough space to make a full storage for this ship as you wouldn't be able to stand in it properly, but here's an example from a bigger ship
here you can see the charge (sand blocks) room and the shot (jungle blocks)
Tips: don't forget to make 'rescue boats' above the main 'storage hole part' i generally build 1 for smaller ships and 3 - 1 stacked on top of 2 for bigger ones. I use dark oak for the boat itself and then cover the top with white carpet and polished diorite slabs
Step 5: the dreaded rigging, ugh
even after so much time, the rigging is still tedious and unpleasant, I have the convenience of being able to copy the crows nest/ shooting platforms to save myself a bit of time.
use //line iron_bars for steep ropes, //line chain[axis=whatever makes it fit] for more horizontal ones.
don't bother curving the ropes as they must be under stress to control the sails, you'll only give yourself more work for something that wont look realistic.
Tips: as you can see in above pictures, pre 17th century ships still had that classic 'Pirate' style fenced off shooting platforms, in later Napoleonic era ships they got a bit flatter and bigger
here's an example, but I unfortunately don't have a closeup of the masts
Step 5.1 5.2: Shrouds, ratlines and stays
Shrouds and ratlines make those net-like ladders that you see sailors climb on. Stay ropes carry the staysails, which are the triangular, rectangular free flying sheets that help the ship manoeuvre better.
Tips: After looking at paintings of Anglo-Dutch wars, I didn't notice a presence of stay sails, so you can save yourself a bit of time from not making those :P You wont have the same convenience in later ships tho...
i use //gmask 0 and select both ends of the chains. then I write //line yellow_wool to make a line. I repeat this process until i complete 1 set of shrouds. After that i replace all the yellow wool with iron bars using //replace yellow_wool iron_bars. this makes the process a bit faster
Step 6: even more pain, the sails themselves
this is by far the part where you'll spend your most of your time to complete your ship. You could save yourself a bit of time in just making a ship that's currently stationary in the port and simply avoid making sails, but nevertheless here's some examples of how I do it.
example of a docked ship on the left - you lower the middle mast down to where your top of the shooting platform bit ends, same for the top sails i use a gradient of birch -- smooth sandstone --- bone block for extra depth. I i used to reverse the effect so the dark part would be on top, but this I think makes more sense.
I simply use the world edit brush to create the gradient:
- //mask white_concrete
- //br s white_concrete,birch_planks 1
- //br s white_concrete,smooth_sandstone 2
- select the whole upper part of the ship with //pos1 //pos2 and type //replace white_concrete bone_block
example of ship with stay sails
Tips: use upside down birch slabs on the bottom of a sail to give it a more round shape
again, think in circles, the sails are just made of smaller and smaller ovals on top of each other
As technology progresses, the lateen sail as you see in the picture above (the triangular back sail) gets replaced. Your Napoleonic ships will probably all use the gaff sail. The build process is basically the same, but instead of continuing the yard past the mast, it will instead attach to it. You will also have to add an extra boom stick at the bottom of the sail, this will move in unison with the diagonal yard.
Your back sail will also determine how your back flag will sit, if your ship has a lateen sail, you will have to build a diagonal stick with fences to hoist the flag on it. On the gaff sail, you will have to draw an iron bar line from end to end of the and build the flag on top of it.
here's a quick example:
Tips: make the back flag go in the same direction as the sails, kinda perpendicular to the square sails. I make my sails diagonal to give it a bit more life, you don't have to do it if you're new to making ships, but i rotate the yards with a 3 block interval.
I used to make yards with half blocks, then i switched to fences and fence gates, now i went back to slabs because using fence stuff is a bit too time consuming, overcomplicated and if your not using a texture pack, it makes those holes in your yards, which don't look too structurally sound. Go for a darker tone on the yards, I recommend blackstone or dark oak.
In the Napoleonic era, the French used to have a black base on their mast and white for their lower part. after that i use mud walls to simulate a thinner log and spruce fences on top. the middle and top parts of the masts are basically the same for any nation.
For the British, use a red base and stripped oak lower part, same as the French for the middle and top parts.
In the Anglo-Dutch wars ships I use the same stripped spruce for all nations on all parts of the ship + mud walls
I put signs around a black concrete block to get that iron truss to prevent the mast in expanding and warping. if you're using a spruce colour tone, you could also substitute it with barrels since they have integrated those iron bits already in the texture.
Step 6.1: don't forget to name your ship!
Step 6.2: the end, take pictures :D
Misc useful pics and links:
Anglo-Dutch Painting & Rigging Guide V1.pdf (rodlangton.com)
nice guide of miniature assembly
some really bad pirated low res paint scheme screen grabs :P
I use Chocaptic shaders with a custom preset, maybe I'll upload it here somehow, sometimes I use SEUS also. some pictures are taken with default texture pack, some with Patrix 32x (the realistic), some with the Terra 1912 texture pack. (black iron bars)
I recommend and will always point people to this video, it's what taught me how to build:
www.youtube.com/watch?v=OCMBMMgj_m0
| Tags |
tools/tracking
6191738
6
shipbuilding-guide-w-tips-17th-18th-century-ships
 Noncommercial
 MoonAstraea
 sniffercraft34
 Molitoola
 Mrsillyman14
 Cornbread_Alphanumeric
 WYHA-Storm
Create an account or sign in to comment.
Edit: imgur removed pictures, trying dropbox...