

![Gordon Freeman (Half-Life) [A skinning tutorial] Minecraft Skin](https://static.planetminecraft.com/files/resource_media/preview/gerpdomfroodmang_minecraft_skin-420138.jpg "Gordon Freeman (Half-Life) [A skinning tutorial] Minecraft Skin")
- 14,792 views, 2 today
- 1,156 downloads, 0 today

2,737
People have been asking me, so consider this my 'tutorial'. I'm going to update this skin multiple times, and post the 'states' here in the description as I complete them. Check back on this skin for updates, as I will be posting downloads for each 'step' so that you can see how each are different.
I am working off of this source image, with a bit of help from this one as well.
Step 1: Shaping (20%)
This step can actually be the longest and most complicated step. It's important to lay out the character in a way that the shapes of the bits will resemble the original source material, but not so much as that you want to include every single little detail. Trying to put 'too much' on a skin can really detract from the skin's overall appearance. In this particular case, the elbow and knee pads had to go, and were included in the 'underarmor' layer instead. This is, of course, not necessarily the final shape, as it may need to be tweaked a bit in later steps as shading and coloration are added. Yes, most, if not all of my skins, start out looking something like this.

Step 2: Color Matching (40%)
It's absolutely imperative that the skin's colors match the source material for a good looking outcome. You can't just play by memory - I've learned that mistake. Use a tool like paint.net, GIMP, or Photoshop and get the exact colors you want to use. As it turns out, for instance, Gordon's armor here is actually a much darker orange/brown than I initially painted it, and I had no idea that his jumpsuit was actually dark grey/purple until I had a second look. I technically already started on shading as I was applying brush strokes. You want to pick out the highlight color, the mid-tone, and the low-light colors for each specific 'part' and put them in roughly the spots you want to use them. It helps out greatly for later in the process.

Step 3: Shading & Texture (90%)
At this point, you should be absolutely sure that all of your base colors and shapes are correct. Then, you start moving around the inside of each shape, darkening or lightening as appropriate to give them the right texture. Cloths, for instance, should be wavy and smooth, with ripples. Metals or plastics should brighten at the apex, or darken at convex points, and 'gleam' a bit. If the character has hair, use the dodge and burn tools in an alternating pattern to give them streaks of highlights and low-lights. Some color correction may be necessary during this step when using the dodge and burn, but it should be very minor and mostly for contrast purposes. For instance, went back to darken the center 'belly' area to better match the subject material.

Step 4: Shadow & Detail (100%)
This is the step everyone else seems to leave out. Once everything is properly shaded, textured, and in place, I like to add some shadow below the parts that 'stick out' to give the skin a bit more a feeling of depth. Small bits, such as facial features, straps, weapon holsters, or otherwise insignificant portions should be added at this point, once everything else is in place. I jumped the gun by adding the glasses to this one so early, but it's more so a judgement call when the detail elements aren't significant enough to mess up the process. This step doesn't take long at all, and while the difference can be subtle, it's that extra bit of attention that sets the work apart from the others. I'd call this skin done now, unless I notice something about I don't like and go back to fix it later. Final version is up for download now!

Be sure to up-vote if you found this tutorial useful, and if you feel like giving it a try, link me to a skin you made using it in the comments!
I am working off of this source image, with a bit of help from this one as well.
Step 1: Shaping (20%)
This step can actually be the longest and most complicated step. It's important to lay out the character in a way that the shapes of the bits will resemble the original source material, but not so much as that you want to include every single little detail. Trying to put 'too much' on a skin can really detract from the skin's overall appearance. In this particular case, the elbow and knee pads had to go, and were included in the 'underarmor' layer instead. This is, of course, not necessarily the final shape, as it may need to be tweaked a bit in later steps as shading and coloration are added. Yes, most, if not all of my skins, start out looking something like this.
Step 2: Color Matching (40%)
It's absolutely imperative that the skin's colors match the source material for a good looking outcome. You can't just play by memory - I've learned that mistake. Use a tool like paint.net, GIMP, or Photoshop and get the exact colors you want to use. As it turns out, for instance, Gordon's armor here is actually a much darker orange/brown than I initially painted it, and I had no idea that his jumpsuit was actually dark grey/purple until I had a second look. I technically already started on shading as I was applying brush strokes. You want to pick out the highlight color, the mid-tone, and the low-light colors for each specific 'part' and put them in roughly the spots you want to use them. It helps out greatly for later in the process.
Step 3: Shading & Texture (90%)
At this point, you should be absolutely sure that all of your base colors and shapes are correct. Then, you start moving around the inside of each shape, darkening or lightening as appropriate to give them the right texture. Cloths, for instance, should be wavy and smooth, with ripples. Metals or plastics should brighten at the apex, or darken at convex points, and 'gleam' a bit. If the character has hair, use the dodge and burn tools in an alternating pattern to give them streaks of highlights and low-lights. Some color correction may be necessary during this step when using the dodge and burn, but it should be very minor and mostly for contrast purposes. For instance, went back to darken the center 'belly' area to better match the subject material.
Step 4: Shadow & Detail (100%)
This is the step everyone else seems to leave out. Once everything is properly shaded, textured, and in place, I like to add some shadow below the parts that 'stick out' to give the skin a bit more a feeling of depth. Small bits, such as facial features, straps, weapon holsters, or otherwise insignificant portions should be added at this point, once everything else is in place. I jumped the gun by adding the glasses to this one so early, but it's more so a judgement call when the detail elements aren't significant enough to mess up the process. This step doesn't take long at all, and while the difference can be subtle, it's that extra bit of attention that sets the work apart from the others. I'd call this skin done now, unless I notice something about I don't like and go back to fix it later. Final version is up for download now!
Be sure to up-vote if you found this tutorial useful, and if you feel like giving it a try, link me to a skin you made using it in the comments!
| Gender | Male |
| Model | Steve |
| Tags |
1 Update Logs
Update #1 : by Cipher_Punk 06/24/2012 3:03:51 amJun 24th, 2012
Updated to account for the flip of underside textures.
tools/tracking
166932
5
gordon-freeman-half-life-166932
![Prosk Mech Pilot [Hawken] Minecraft Skin](https://static.planetminecraft.com/files/resource_media/preview/ProskPilot_minecraft_skin-4983668.jpg)


 Khangbo84
 TheMountaineer
 Zelvind
 MindOfSocial
 AloComet
 ScotsMiser
 Team UNNAMED
 MistFaller
 star_weaver

 Anthracycline
 Bubblez705
 fumo
fumo
 mitsuu
 Halubulaaaa
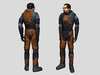
Create an account or sign in to comment.
I think it's a tutorial!
Greatest tutorial ever known!