


16
Hey everyone! :3
I've had a few people ask me how I go about making my skins. It's not that difficult, really.
My skins are all.... simple to say the least. That's how they're supposed to be:
Easy to make,
Pleasant to look at.
My first step is coming up with an idea. My inspiration can come from many things. Among them are music, art, or real-life experiences. Recently, I went to paintball for the first time. That's where I got the inspiration to make a paintball skin.
After I get an idea, I picture a skin in my head. One must keep in mind the amount of detail that a minecraft skin can hold.
A minecrafter's head is an 8x8x8 block. That means you can have a ton of different variations of head designs. (Keep in mind that most of them are just random colors plopped all over the place. :3)
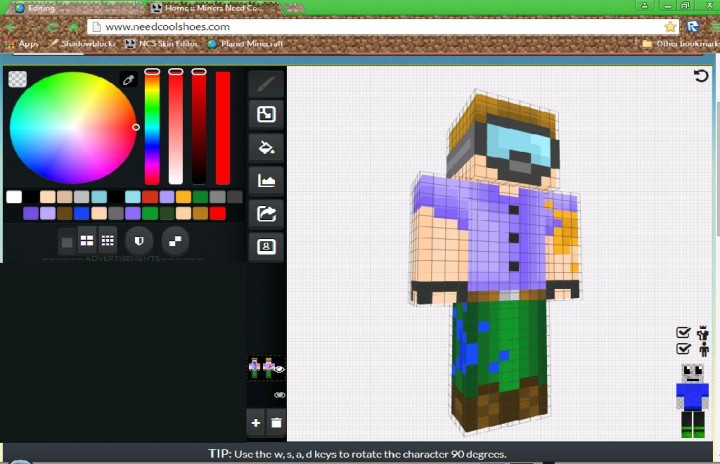
Once I have a rough idea of what to make, I go to the "Miners Need Cool Shoes" website to make my skins. The user interface is very easy to handle, and is a wonderful tool for making skins.
I select my color for the face/head first. This is usually the base color for the entire skin. Then I'll take this color and trace the outline of the head with it. (This color tends to be darker than the inside parts of the head)
I'll then make the base color slightly lighter by dragging the slider downwards towards the white on the second slider tab from the color wheel. Whoof. What a mouthful. :3
I'd use that color on the next iniside layer, and repeat the same process until the entire face is done.
These four skin colors will make up your character's skin. Only those colors. Nothing else. Understand? Good. :3
You can then go ahead and outline every body part with those base colors. The darkest color goes on the outermost bits of a part's surfaces, and the next color goes another pixel in and so on. (When I do my arms, I only ever have 2 skin colors in use; the darkest and second darkest.)
Then you can plan out your clothes' colors. For our sake, we'll pretend that my skin will have a red shirt. I'll grab a red from the color wheel, and darken the color a bit by making the slider go down a bit on the third slider bar from the color wheel. That color should be your darkest shirt color. You repeat the same process with the shirt as you had done with the head and skin.
You can do the same thing for your character's hair, boy or girl. It doesn't matter. I just try to make a shape that looks natural, and not overly choppy.
I do most of my pants differently than my other body parts, and yet it is still as easy. I take the darkest color and put it on the outside pixels except for the bottom, which is where our shoes would go. Then you can just lighten the colors as you move inwards.
Shoes are pretty easy, just take a dark color and make the outline and then fill in the blank parts with a lighter color.
That's really all there is to it! There's tons of little intricacies that I could go into, but it's stuff that you guys can just find out by yourselves.
If you want to learn more about my techniques, the best thing to do is to dissect one! (Don't actually dissect my skins! xD) You can download one of my skins off of PMC, and open it in the Need Cool Shoes Editor. There, you can look at my skins from different angles and hide skin parts that you don't want to see, such as the hat layer and entire body parts.
There are a few spotlights on the skin website, my favorite is by OMGCraft. There is a link to his spotlight video here.
That's all for this blog, I hope it helped with your skin making needs!
-InfinitePanther
DISCLAIMER: I am not sponsored or supported by the Miners Need Cool Shoes website or OMGCraft or any of their associates. I just enjoy them. :3
I've had a few people ask me how I go about making my skins. It's not that difficult, really.
My skins are all.... simple to say the least. That's how they're supposed to be:
Easy to make,
Pleasant to look at.
My first step is coming up with an idea. My inspiration can come from many things. Among them are music, art, or real-life experiences. Recently, I went to paintball for the first time. That's where I got the inspiration to make a paintball skin.
After I get an idea, I picture a skin in my head. One must keep in mind the amount of detail that a minecraft skin can hold.
A minecrafter's head is an 8x8x8 block. That means you can have a ton of different variations of head designs. (Keep in mind that most of them are just random colors plopped all over the place. :3)
Once I have a rough idea of what to make, I go to the "Miners Need Cool Shoes" website to make my skins. The user interface is very easy to handle, and is a wonderful tool for making skins.
I select my color for the face/head first. This is usually the base color for the entire skin. Then I'll take this color and trace the outline of the head with it. (This color tends to be darker than the inside parts of the head)
I'll then make the base color slightly lighter by dragging the slider downwards towards the white on the second slider tab from the color wheel. Whoof. What a mouthful. :3
I'd use that color on the next iniside layer, and repeat the same process until the entire face is done.
These four skin colors will make up your character's skin. Only those colors. Nothing else. Understand? Good. :3
You can then go ahead and outline every body part with those base colors. The darkest color goes on the outermost bits of a part's surfaces, and the next color goes another pixel in and so on. (When I do my arms, I only ever have 2 skin colors in use; the darkest and second darkest.)
Then you can plan out your clothes' colors. For our sake, we'll pretend that my skin will have a red shirt. I'll grab a red from the color wheel, and darken the color a bit by making the slider go down a bit on the third slider bar from the color wheel. That color should be your darkest shirt color. You repeat the same process with the shirt as you had done with the head and skin.
You can do the same thing for your character's hair, boy or girl. It doesn't matter. I just try to make a shape that looks natural, and not overly choppy.
I do most of my pants differently than my other body parts, and yet it is still as easy. I take the darkest color and put it on the outside pixels except for the bottom, which is where our shoes would go. Then you can just lighten the colors as you move inwards.
Shoes are pretty easy, just take a dark color and make the outline and then fill in the blank parts with a lighter color.
That's really all there is to it! There's tons of little intricacies that I could go into, but it's stuff that you guys can just find out by yourselves.
If you want to learn more about my techniques, the best thing to do is to dissect one! (Don't actually dissect my skins! xD) You can download one of my skins off of PMC, and open it in the Need Cool Shoes Editor. There, you can look at my skins from different angles and hide skin parts that you don't want to see, such as the hat layer and entire body parts.
There are a few spotlights on the skin website, my favorite is by OMGCraft. There is a link to his spotlight video here.
That's all for this blog, I hope it helped with your skin making needs!
-InfinitePanther
DISCLAIMER: I am not sponsored or supported by the Miners Need Cool Shoes website or OMGCraft or any of their associates. I just enjoy them. :3
| Tags |
tools/tracking
3421037
6
how-to-make-a-simple-skin
![How to make a [Simple] Skin! Minecraft Blog](https://static.planetminecraft.com/files/resource_media/screenshot/1533/blocpic119262805_thumb.jpg)
 Sophisticated_Trashcan
 HeyThisGuyVapes
 _Blanc__
 TravisaInc
 Danesto
 CrystalRuby
 User5098101G
 EarthUser
 User5115289G

 WYHA-Storm
Create an account or sign in to comment.