


404
Present your build in style. These rough notes are based on REGMAE’S VIDEO HERE!
There is potentially another, easier method to do a 360 render that doesn’t involve blender nodes: Chunky tutorial: Introduction to the animated renders plugin – PREMIUM MINECRAFT BLOG

THIS DID NOT WORK FOR ME, BLENDER WOULDN’T LOAD MATERIALS IN THE USDA FILE!
IMPORTING BUILD AND ADDING LIGHT
ADDING GRADIENT REFLECT NODES

SETTING UP 360 CAMERA
SET UP RENDER SETTINGS
There is potentially another, easier method to do a 360 render that doesn’t involve blender nodes: Chunky tutorial: Introduction to the animated renders plugin – PREMIUM MINECRAFT BLOG
Mineways export step
- File -> Open world -> Find your world… -> level.dat
- Set Max height to 255 and Lower to 0
- If you need a texture pack, you need the full (not minimal) version of Mineways. See instruction at File -> Download terrain files Mineways: using ChannelMixer and TileMaker – YouTube
- Drag to select build. File -> Export for rendering. Split materials into subtypes & set 100mm blocks.
Texture pack step
THIS DID NOT WORK FOR ME, BLENDER WOULDN’T LOAD MATERIALS IN THE USDA FILE!
- Mineways -> TileMaker -> Make a folder and extract pack files there.
- Open CMD and go to wherever Mineways is, e.g. “cd \users\<Your user>\downloads”
- “cd mineways” and “cd TileMaker”
- “ChannelMixer.exe -i <Your pack folder> -o <Name of a new folder>”. You might get warnings for duplicate/fancy custom model textures.
- “TileMaker.exe -d <The new folder you made> -i <Name of pack output image>.png -t 64.” You can either ignore errors or modify the textures.
- Done. In Mineways go to FIle -> Open Terrain File. If the TileMaker made multiple texture files, choose the first default PNG.
- Export for rendering -> Pick USDA file type. This will export that file alongside a materials folder.
Blender render step
IMPORTING BUILD AND ADDING LIGHT
- Delete starting cube. Then File -> Import -> Wavefront (.obj). Keep it centered and click S to scale the build down.
- To preview colors, go to top right and switch view modes (the ball icons).
- Select the floating light (or find it in the top right list of objects).
- On bottom right go to “object data properties” (lightbulb icon) and set the light to “sun”
- To position the light: Press R to rotate it. Press G + Middle click to position it along the axis.
- Use the small XYZ axis top right to rotate your entire view of everything.
- Optionally add more light objects around the whole build since the 360 render = all sides.
- You should be able to select a block and go into Materials tab on the right to edit its properties.
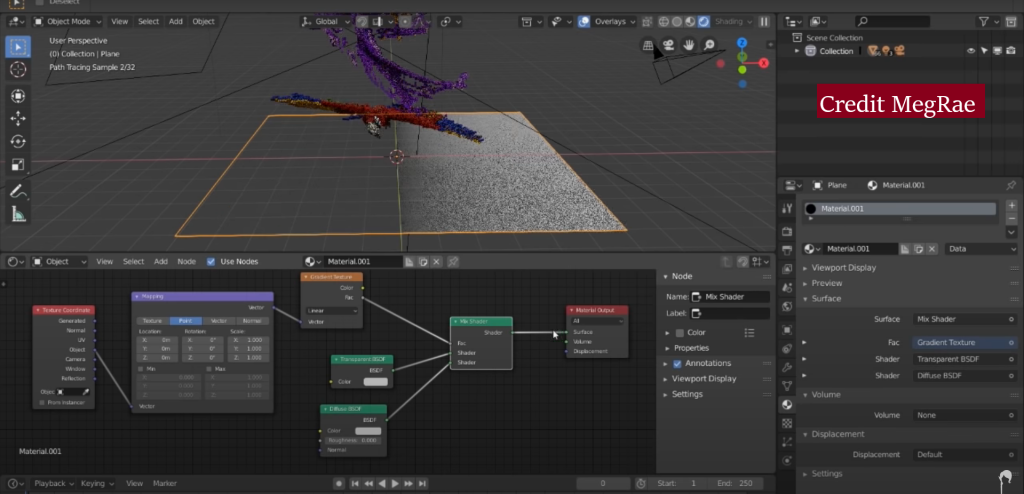
ADDING GRADIENT REFLECT NODES
- Add mesh plane under the build, keep it selected, and scale it up under the whole build.
- Put mouse on a bottom corner until a + appears and drag up a new Blender window. Change editor type to shader editor. In there, only keep the Material Output.
- Add: texture coordinate, mapping, gradient texture, transparent BSDF, diffuse BSDF, mix shader.
- Texture coordinate (object) into mapping (vector)
- Mapping (vector) into gradient texture (vector)
- Gradient texture (Fac) into mix shader (bar/Fac)
- Transparent BSDF (BSDF) and Diffuse BSDF (BSDF) into Mix shader (shader/shader)
- Mix shader (shader) into Output (surface)
- Change Gradient texture from linear to spherical.
- Duplicate Mix Shader and drag it between the Diffuse and Mix Shader. Connect Glossy shader (BSDF) into the new Mix Shader (shader)
- To change reflective-ness, edit Glossy shader roughness bar and the new Mix Shader Fac bar.
- Move the mesh plane up/closer to the build if desired.
- You can change Diffuse BSDF color. Optionally change the background color to blend in on the World tab on the right.
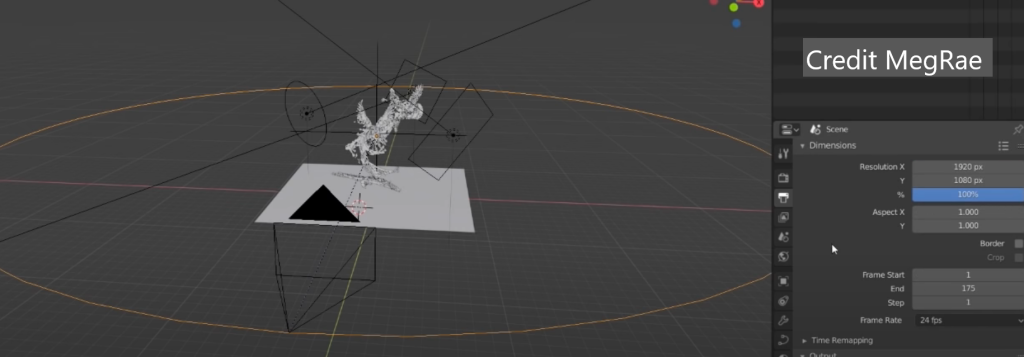
SETTING UP 360 CAMERA
- Change view mode to color-less for less lag.
- Add curve -> circle for the camera path. G + Middle click to move it up and S to scale.
- Add empty -> plain axis that the camera will stare at. Move it up and scale it to not lose it (the camera won’t be able to see it)
- Select circle, TAB to enter object edit mode. Select one of the points on the circle. Shift + S -> cursor to selected. TAB to exit, click camera, Shift + S and selection to cursor.
- Shift click camera THEN circle, right click, parent -> follow path.
- Select camera, go to object constraints tab on the right. Add a Track To constraint. Target = empty. To = -Z. Up = Y. Check Target Z.
- Press Num0 to enter/exit what the camera sees. To adjust the view:
- Move Empty element up/down, and scale the circle.
- In camera preview press N and uncheck Lock Camera To View to zoom/move camera there.
- See Camera Settings tab on the right.
- Play the bottom timeline to check the build doesn’t get cut off in the 360 spin.
SET UP RENDER SETTINGS
- Select circle, go Object Data tab on the right, under Path Animation set frames to render for the 360 video. E.g. 100-200.
- Go Output tab, set End Frame to the same number as above. Change Resolution % to like 50 if you don’t need the build to be a large size portfolio file.
- Select Output location (Blender will create the same amount of images as your set frames there). Adding \name at the end will auto-name your images. E.g. name001…name100
- Go Render properties tab and edit Sampling -> Render to change quality – how many times each single frame is “sampled”.
- At the top, Render -> Render Image to see a preview. If happy, go Render -> Render Animation.

Photoshop (or similar software) animation step
- File -> Scripts -> Load files into stack -> select all images Blender rendered and wait for import.
- At the top Window -> Timeline if none is open.
- In timeline -> Create frame animation -> top right option box -> make frames from layers.
- You can right click to change frame delay (default 0).
- You can do any post-process image editing here.
- Top right option box -> convert to video timeline. File -> save for web (export as GIF)
| Tags |
tools/tracking
5909070
6
my-text-summery-of-how-to-do-a-360-blender-render


 Ivyman1992
 Triloms
 UnderCTRL
 ambarubulw
 amateurpainter32
 VentoxMC
 MindOfSocial
 King_Artifact
 GoggleD0GG

 ajthepeach
 Patience
 ThatOneIdiotNamedGhoul
 Panda_Shark
 Hermitcraft and Friends!
Create an account or sign in to comment.