

1
MCedit Tutorial: Make Minecraft Maps like the Pros!
 MrJohnson5
 Endercon
Hello everyone, Johnson here!
I created a little MCedit Guide For people who want to start making maps like the pros!
Most of these features were introduced in recient minecraft updates, and make your map look a whole lot better.
Firstly, you will need MCedit. Which can be downloaded here:
http://www.mcedit.net/
You must although have some understanding on how to use MCedit though.
Heres a brief tutorial on how to use it:
Okay, Lets get started!
EDIT: Sorry about the pictures being too large. I cant do anything about the Resolution.
CREATING GEARED MOBS:
CREATING NAMED MOBS:
CREATING CUSTOM COLORED ITEMS
CREATING VILLAGERS THAT SELL CUSTOM GEAR
I hope these Brief Turorials Helped you!
Thanks For reading!
Tell me what you think of them, and point out any errors you find in the Tutorial.
I created a little MCedit Guide For people who want to start making maps like the pros!
Most of these features were introduced in recient minecraft updates, and make your map look a whole lot better.
Firstly, you will need MCedit. Which can be downloaded here:
http://www.mcedit.net/
You must although have some understanding on how to use MCedit though.
Heres a brief tutorial on how to use it:
Okay, Lets get started!
EDIT: Sorry about the pictures being too large. I cant do anything about the Resolution.
CREATING GEARED MOBS:
Click to reveal
To create mobs with Armour and swords you must Download Sethbling's MCedit Filter Called Create Geared Mobs.
Download it here: http://sethbling.com...tegearedmobs.py
You will also need the Persistent mobs Filter so they dont Despawn!
Download it here: http://www.file-uplo...nceMobs.py.html
Okay now lets go to Minecraft and this is what you must do next.
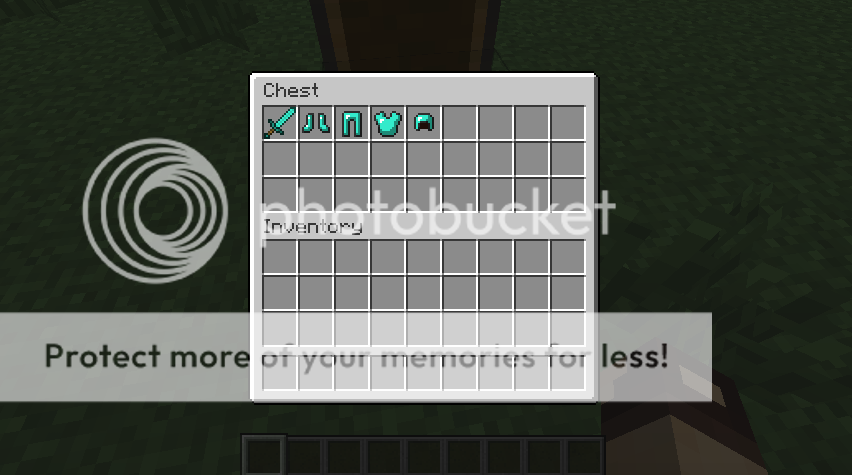
You need to create a chest where you want your mob to go.
You set out the Armour like so:
Then we swing over to MCedit. MAKE SURE MINECRAFT IS COMPLETELY CLOSED!
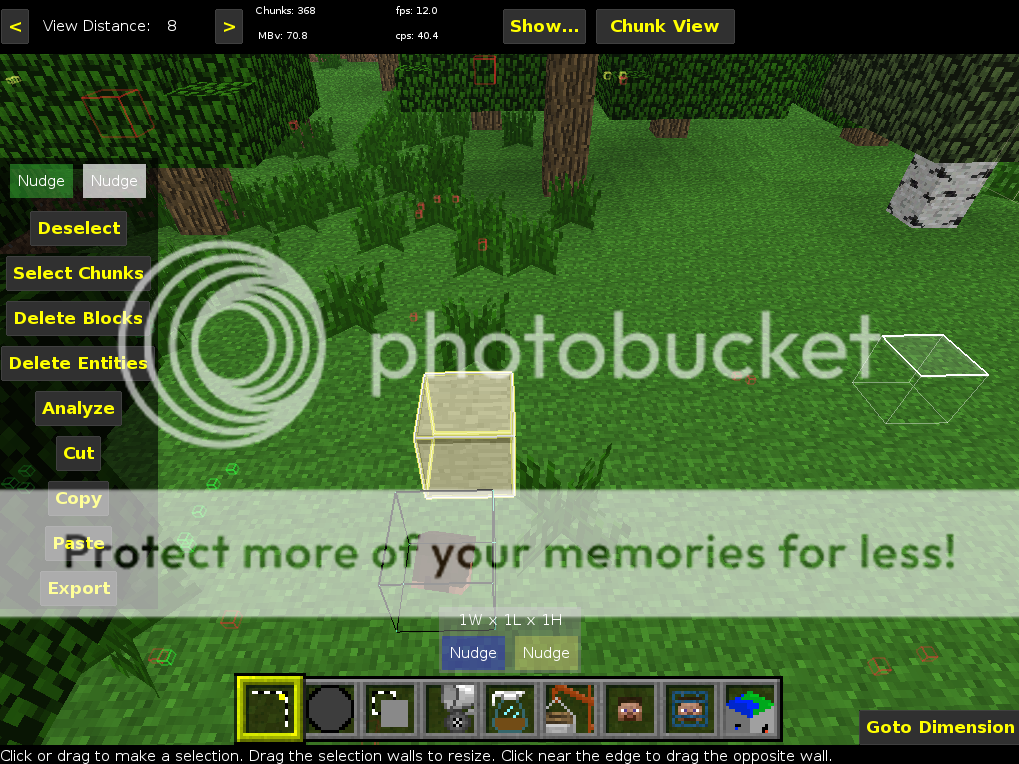
Now when in MCedit you must Select the chest by slowly clicking on it twice.
It should look like this:
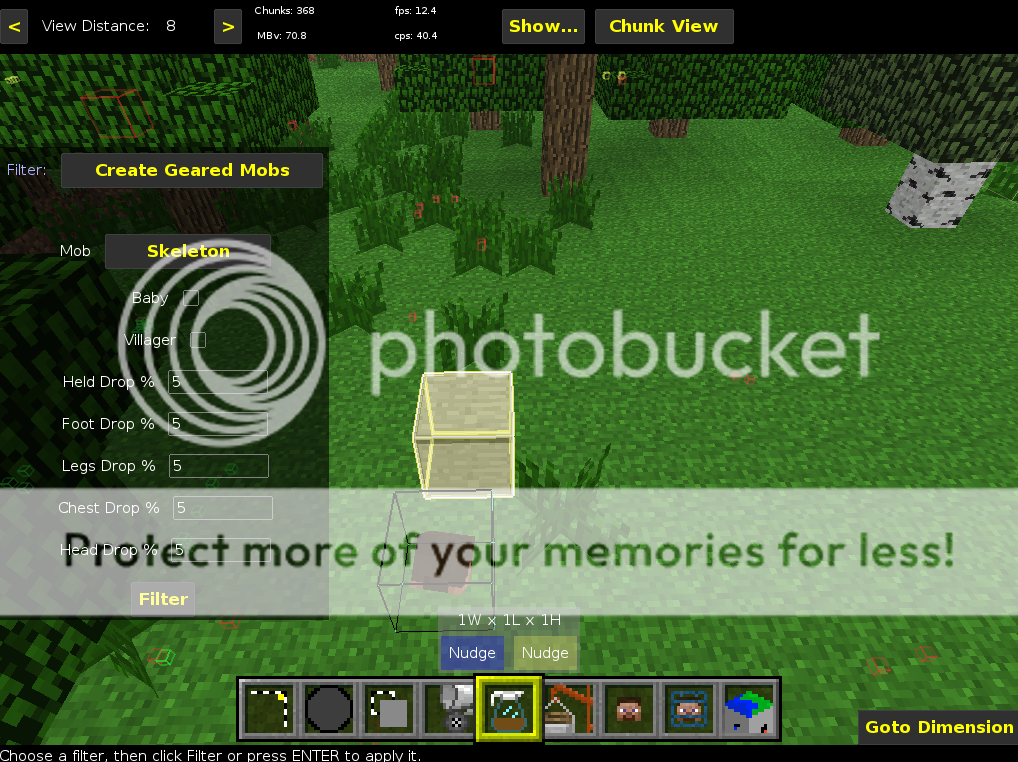
Now press the Filter button at the Bottom.
Its the one I have selected in the picture below:
(Its the one with the yellow box around it)
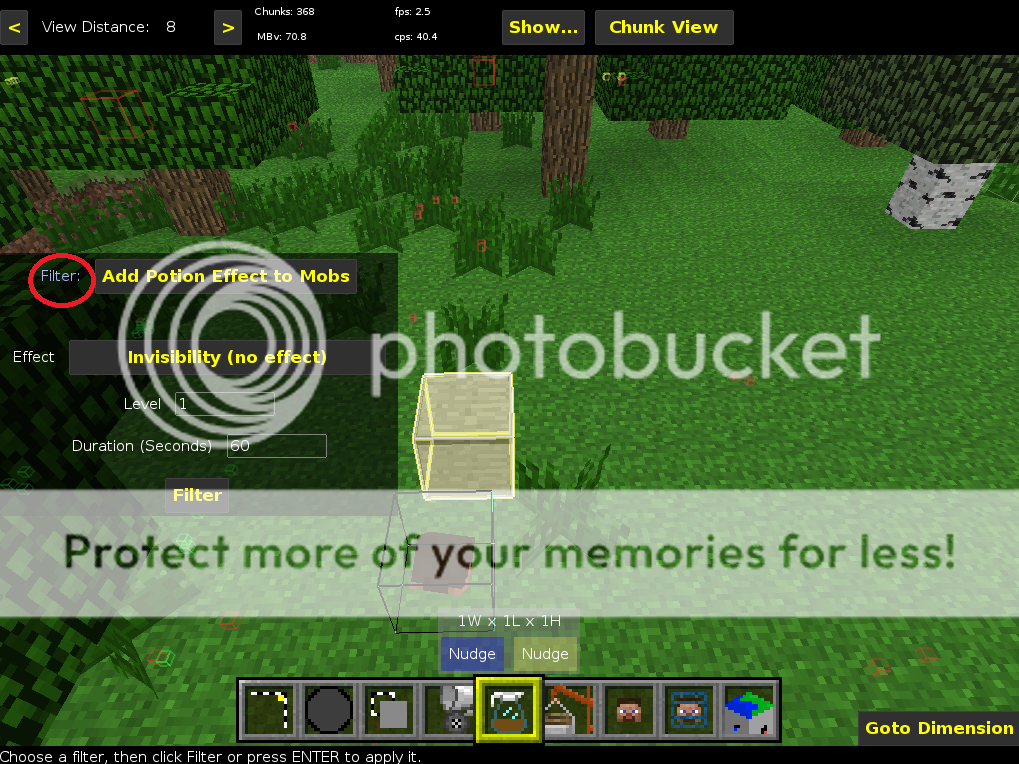
Now press the Purple Button that says Filter: Which I have circled in red.
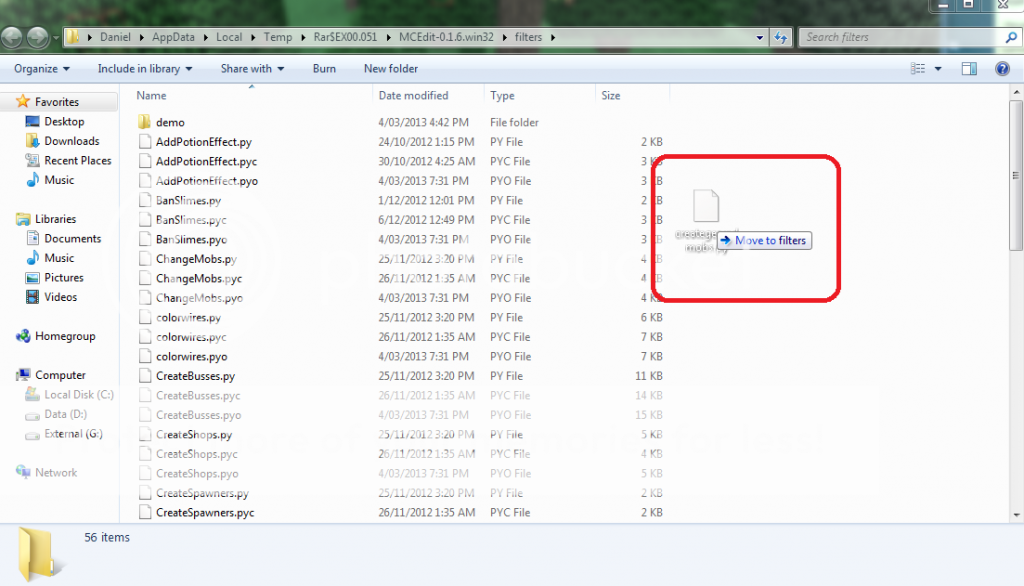
That will now bring up a large box. Now drag and drop the 2 Filters that you just Downloaded into the Folder.
Now you need to close the Folder and Close the Filters box by Pressing the ESC key. Then open it again by pressing on the Button you pressed Previously.
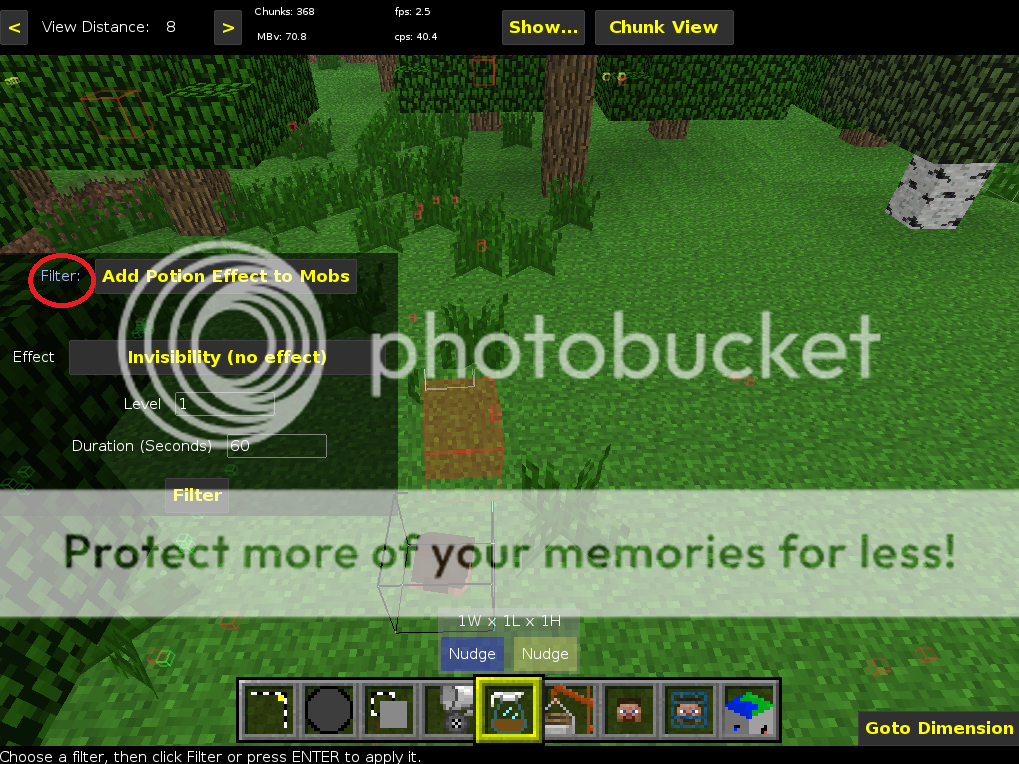
Now you must Press on the Yellow Button on the Top. (It should say ad potion effects to mobs)
Then find the Filter called Create Geared Mobs.
Now you are on the Same screen as the Picture above!
Now you can choose what mob you want it to be, if its a baby or a evil Villager Zombie and the Percentage of the Armour Drop. (By Default it is 5%)
Now when your happy press the Filter button.
But if you want to Make the Mobs to not Despawn, Search for The Persistent Mobs Filter (The same way as before) And simply press Filter.
Then press Ctrl and S to Save it!
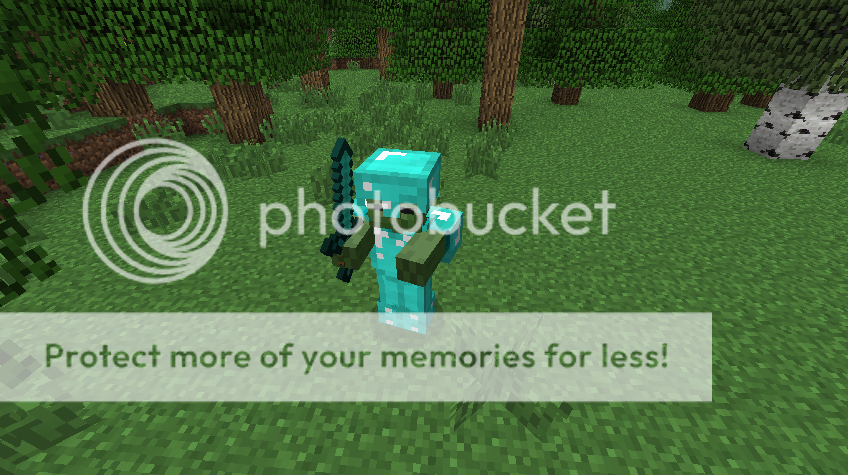
Once back in minecraft you will have a zombie with gear!
Download it here: http://sethbling.com...tegearedmobs.py
You will also need the Persistent mobs Filter so they dont Despawn!
Download it here: http://www.file-uplo...nceMobs.py.html
Okay now lets go to Minecraft and this is what you must do next.
You need to create a chest where you want your mob to go.
You set out the Armour like so:
Then we swing over to MCedit. MAKE SURE MINECRAFT IS COMPLETELY CLOSED!
Now when in MCedit you must Select the chest by slowly clicking on it twice.
It should look like this:
Now press the Filter button at the Bottom.
Its the one I have selected in the picture below:
(Its the one with the yellow box around it)
Now press the Purple Button that says Filter: Which I have circled in red.
That will now bring up a large box. Now drag and drop the 2 Filters that you just Downloaded into the Folder.
Now you need to close the Folder and Close the Filters box by Pressing the ESC key. Then open it again by pressing on the Button you pressed Previously.
Now you must Press on the Yellow Button on the Top. (It should say ad potion effects to mobs)
Then find the Filter called Create Geared Mobs.
Now you are on the Same screen as the Picture above!
Now you can choose what mob you want it to be, if its a baby or a evil Villager Zombie and the Percentage of the Armour Drop. (By Default it is 5%)
Now when your happy press the Filter button.
But if you want to Make the Mobs to not Despawn, Search for The Persistent Mobs Filter (The same way as before) And simply press Filter.
Then press Ctrl and S to Save it!
Once back in minecraft you will have a zombie with gear!
CREATING NAMED MOBS:
Click to reveal
To Create Named Mobs in Minecraft you will, of Course need a mob to
give it a name! (It can be Anything!)
Next, You will need Sethblings Change mob properties Filter.
Downlaod it here:sethbling.com/media/4342/changemobs.py
Okay, Now we have the Filter and the Mob in minecraft.
Now make sure that Minecraft is closed! When Opening MCedit!
Okay now we are in MCedit. You will see a red box, Dont worry, That is your mob.
Select a box completly around the red box to Select your mob.
Now press the Filter button at the Bottom.
Its the one I have selected in the picture below:
(Its the one with the yellow box around it)
Now press the Purple Button that says Filter: Which I have circled in red.
That will now bring up a large box. Now drag and drop the Filter that you just Downloaded into the Folder.
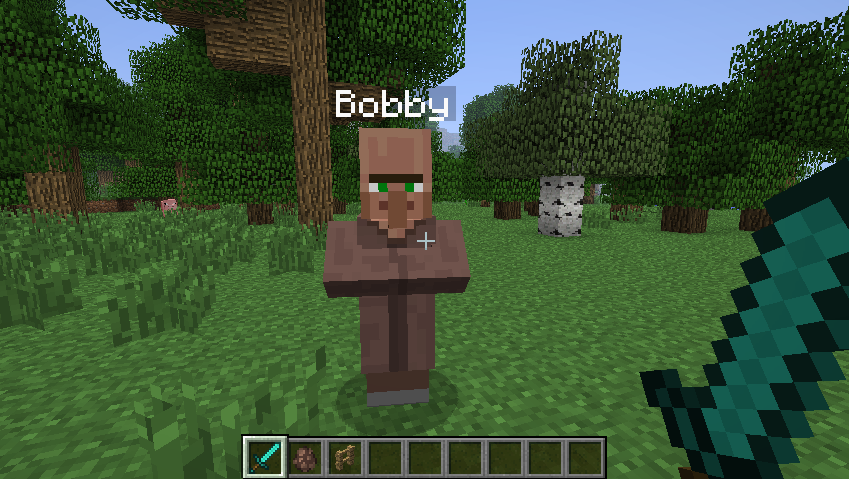
Now you need to close the Folder and Close the Filters box by Pressing the ESC key. Then open it again by pressing on the Button you pressed Previously. Now simply Select the Change Mob Properties Filter and it should look like this:
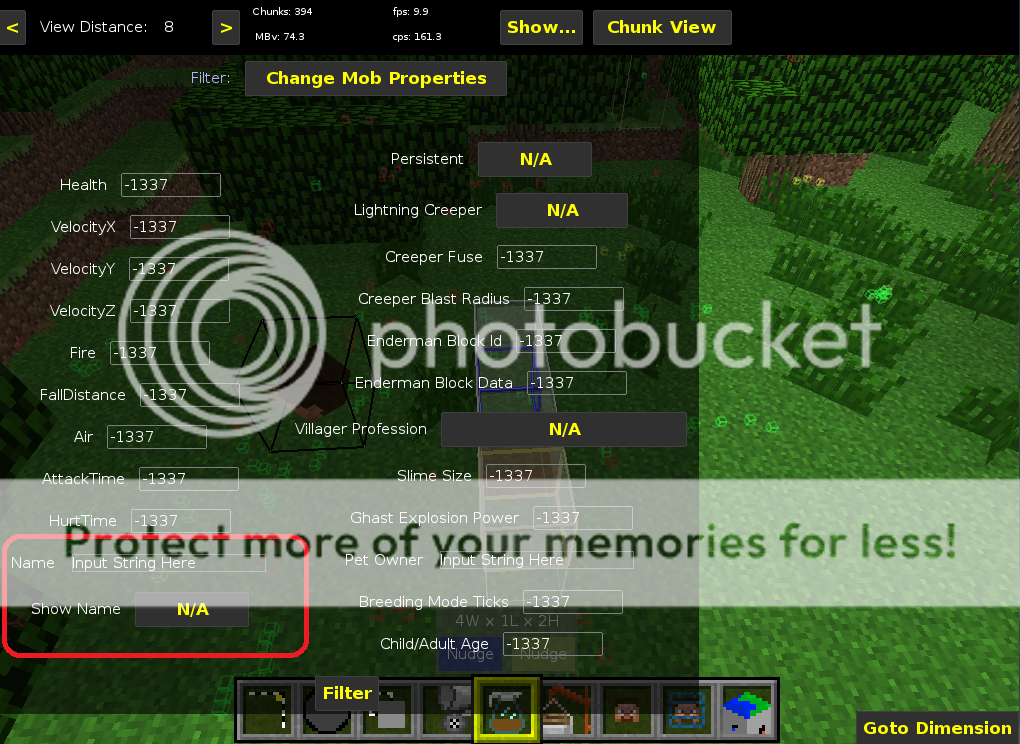
The Part I outlined in red is the Part where you name your mob.The Show name Button is if you want to see the mobs name. Put it as Yes, and you will be able to see its name in game.Then, Simply press the Filter Button, and Press Ctrl and S to save!Back in minecraft, we have a villager Called bobby!
Hope you created a Named Villager too!
give it a name! (It can be Anything!)
Next, You will need Sethblings Change mob properties Filter.
Downlaod it here:sethbling.com/media/4342/changemobs.py
Okay, Now we have the Filter and the Mob in minecraft.
Now make sure that Minecraft is closed! When Opening MCedit!
Okay now we are in MCedit. You will see a red box, Dont worry, That is your mob.
Select a box completly around the red box to Select your mob.
Now press the Filter button at the Bottom.
Its the one I have selected in the picture below:
(Its the one with the yellow box around it)
Now press the Purple Button that says Filter: Which I have circled in red.
That will now bring up a large box. Now drag and drop the Filter that you just Downloaded into the Folder.
Now you need to close the Folder and Close the Filters box by Pressing the ESC key. Then open it again by pressing on the Button you pressed Previously. Now simply Select the Change Mob Properties Filter and it should look like this:
The Part I outlined in red is the Part where you name your mob.The Show name Button is if you want to see the mobs name. Put it as Yes, and you will be able to see its name in game.Then, Simply press the Filter Button, and Press Ctrl and S to save!Back in minecraft, we have a villager Called bobby!
Hope you created a Named Villager too!
CREATING CUSTOM COLORED ITEMS
Click to reveal
Okay! To make Coloured Items with Lore
You will need Sethblings Modify Item Strings Filter:
Download it here:sethbling.com/media/3873/modifyitemstrings.py
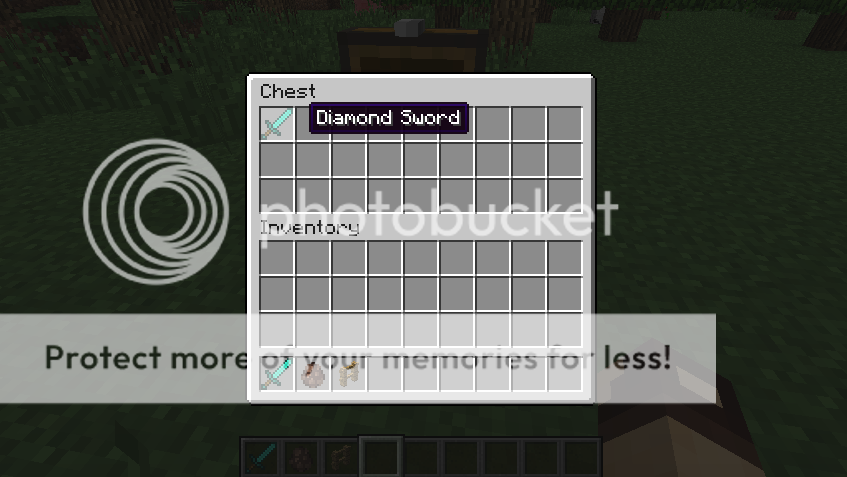
Okay now hop into minecraft, And you need to have the item you want in a chest, like this:
Okay, Now go into MCedit, WITHOUT MINECRAFT OPEN!
You will see a box in front of you, That is the Chest. Select it by clicking on it twice, Slowly.
Now press the Filter button at the Bottom.Its the one I have selected in the picture below:(Its the one with the yellow box around it)
Now press the Purple Button that says Filter: Which I have circled in red.That will now bring up a large box. Now drag and drop the Filter that you just Downloaded into the Folder.
Now you need to close the Folder and Close the Filters box by Pressing the ESC key. Then open it again by pressing on the Button you pressed Previously. Now simply Select the Modify Item Strings Filter and it should look like this:
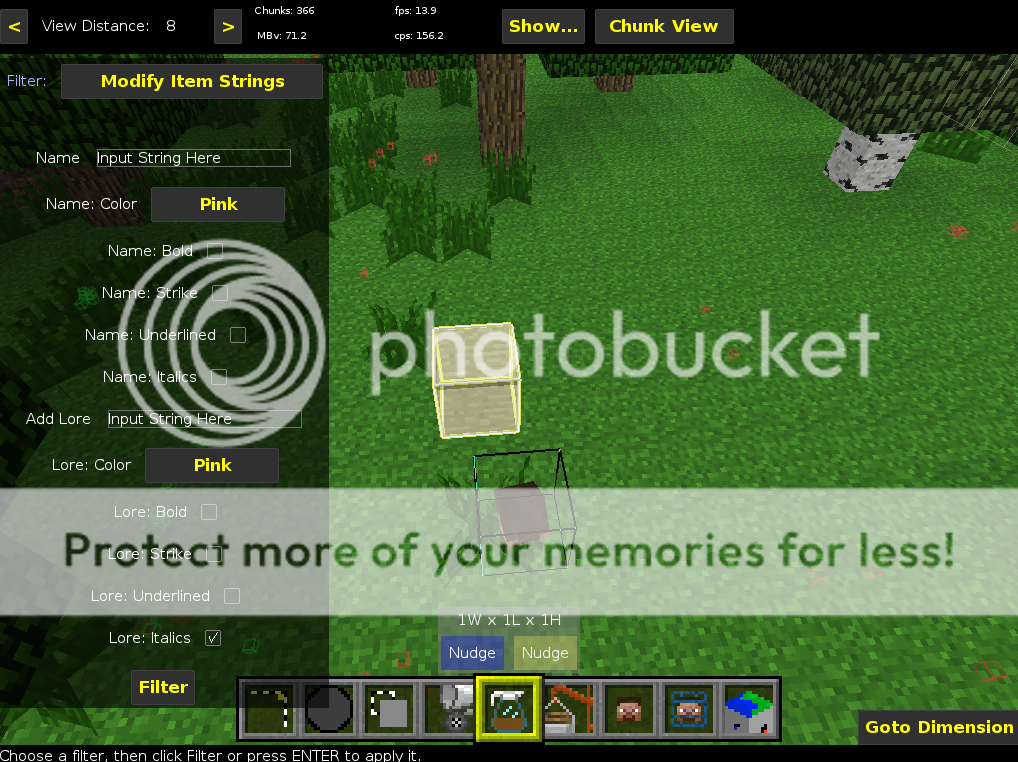
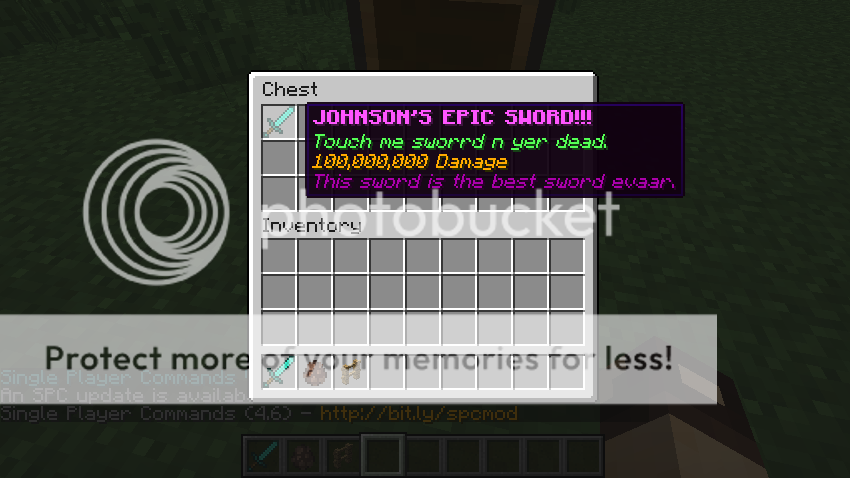
This is, as you can see quite straightforward. The name is Exactly that.The name colour is the Colour for your name.You can set it as Bold, Strike, Underlined and Italics.Now lore is the Text under the Item name. It is used in enchantments.You can add Multiple Lores!Once again you can change colours and text and all that.So when your happy you can press Filter. And then Ctrl and S to save it!Back in Minecraft, I got myself an Epic Sword!
Hope this worked for you!
You will need Sethblings Modify Item Strings Filter:
Download it here:sethbling.com/media/3873/modifyitemstrings.py
Okay now hop into minecraft, And you need to have the item you want in a chest, like this:
Okay, Now go into MCedit, WITHOUT MINECRAFT OPEN!
You will see a box in front of you, That is the Chest. Select it by clicking on it twice, Slowly.
Now press the Filter button at the Bottom.Its the one I have selected in the picture below:(Its the one with the yellow box around it)
Now press the Purple Button that says Filter: Which I have circled in red.That will now bring up a large box. Now drag and drop the Filter that you just Downloaded into the Folder.
Now you need to close the Folder and Close the Filters box by Pressing the ESC key. Then open it again by pressing on the Button you pressed Previously. Now simply Select the Modify Item Strings Filter and it should look like this:
This is, as you can see quite straightforward. The name is Exactly that.The name colour is the Colour for your name.You can set it as Bold, Strike, Underlined and Italics.Now lore is the Text under the Item name. It is used in enchantments.You can add Multiple Lores!Once again you can change colours and text and all that.So when your happy you can press Filter. And then Ctrl and S to save it!Back in Minecraft, I got myself an Epic Sword!
Hope this worked for you!
CREATING VILLAGERS THAT SELL CUSTOM GEAR
Click to reveal
To Create Villagers that sell Custom Items, you will need Sethblins Create Shops Filter.
Download Sethbling's Create Shops Filter Here:sethbling.com.../createshops.py
Now, This is a bit tricky. You need to create a chest in Minecraft and Set it out like how it is in the Picture:
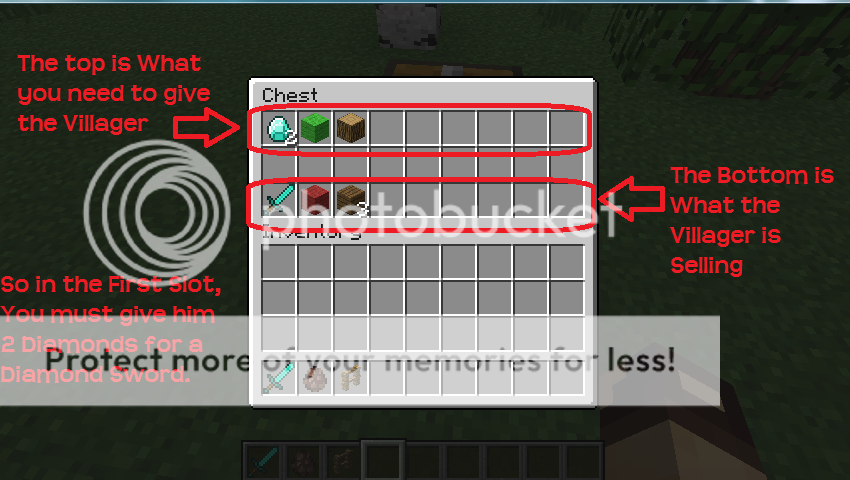
It explains how to set it out in the Picture Above.
So, once you are done you can go into MCedit. WITHOUT MINECRAFT OPEN!
Now when in MCedit you must Select the chest by slowly clicking on it twice Slowly.
It should look like this:
Now press the Filter button at the Bottom.
Its the one I have selected in the picture below:
(Its the one with the yellow box around it)
Now press the Purple Button that says Filter: Which I have circled in red.That will now bring up a large box. Now drag and drop the Filter that you just Downloaded into the Folder.
Now you need to close the Folder and Close the Filters box by Pressing the ESC key. Then open it again by pressing on the Button you pressed Previously. Now simply Select the Create Shops Filter and it should look like this:
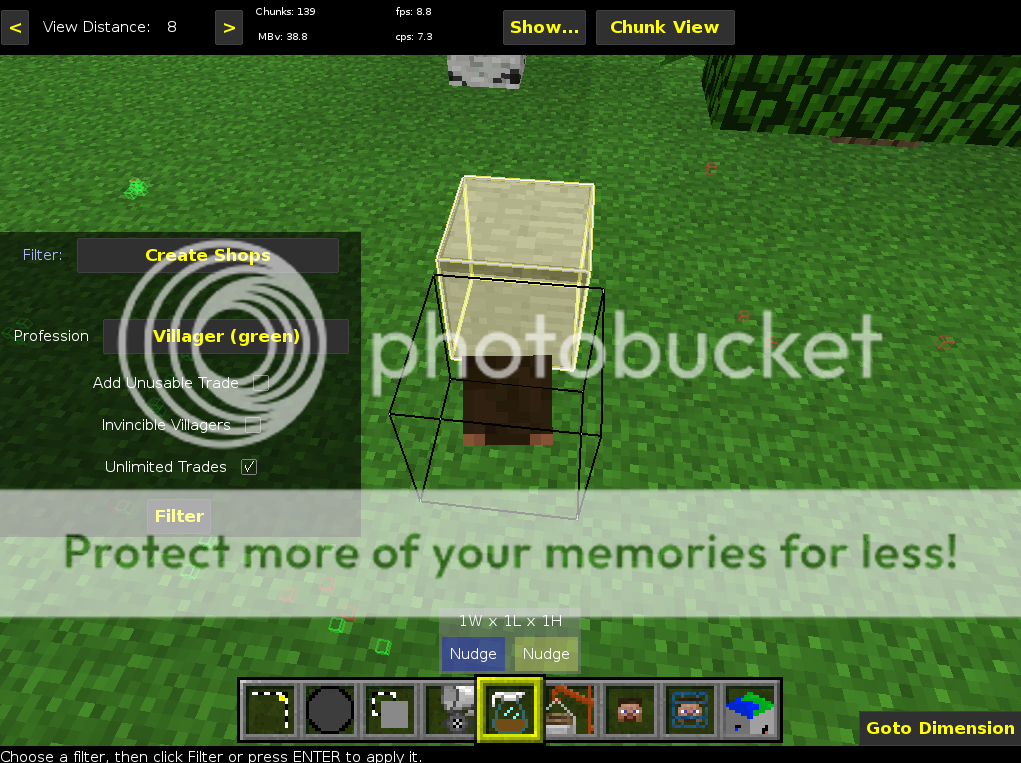
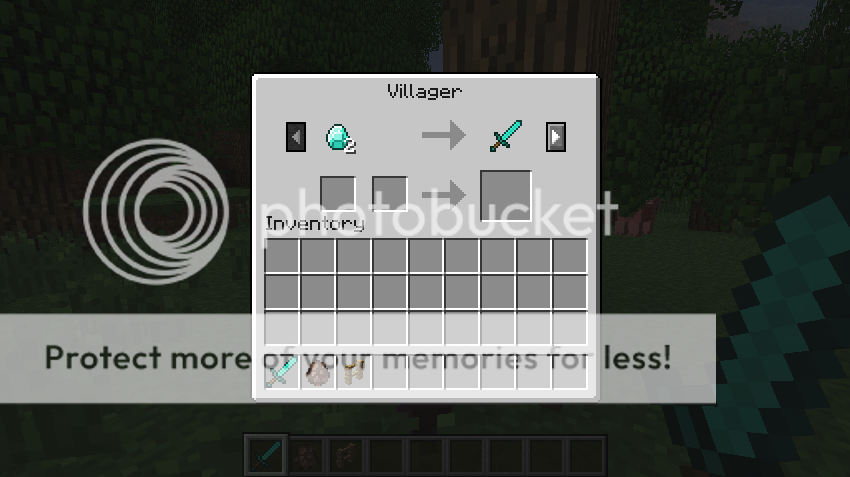
This is fairly StraightForward. The Proffesion is what Type of Villager you want. (Priest, Blacksmith?)The Unusable trade is reccomended to be ticked if you do not want any more trades to appear. Usefull of Adventure Maps.The Invincible Villagers button Makes the Villager Invincible and Not able to be Killed.Unlimited trades Needs to be ticked.Okay! Now just press Filter, And Ctrl and S to Save!And back in minecraft...
Download Sethbling's Create Shops Filter Here:sethbling.com.../createshops.py
Now, This is a bit tricky. You need to create a chest in Minecraft and Set it out like how it is in the Picture:
It explains how to set it out in the Picture Above.
So, once you are done you can go into MCedit. WITHOUT MINECRAFT OPEN!
Now when in MCedit you must Select the chest by slowly clicking on it twice Slowly.
It should look like this:
Now press the Filter button at the Bottom.
Its the one I have selected in the picture below:
(Its the one with the yellow box around it)
Now press the Purple Button that says Filter: Which I have circled in red.That will now bring up a large box. Now drag and drop the Filter that you just Downloaded into the Folder.
Now you need to close the Folder and Close the Filters box by Pressing the ESC key. Then open it again by pressing on the Button you pressed Previously. Now simply Select the Create Shops Filter and it should look like this:
This is fairly StraightForward. The Proffesion is what Type of Villager you want. (Priest, Blacksmith?)The Unusable trade is reccomended to be ticked if you do not want any more trades to appear. Usefull of Adventure Maps.The Invincible Villagers button Makes the Villager Invincible and Not able to be Killed.Unlimited trades Needs to be ticked.Okay! Now just press Filter, And Ctrl and S to Save!And back in minecraft...
I hope these Brief Turorials Helped you!
Thanks For reading!
Tell me what you think of them, and point out any errors you find in the Tutorial.
Create an account or sign in to comment.
16
1
Thank Man For All Your Help. I Gave you some credit for my map i made.
1

How can you teach people to use Mcedit like a pro if you aren't a pro yourself?
G'day.
G'day.
1
THANKS SOOOOOO MUCH MAN.
1

I still need a bit of help can any of u use mcedit to put hunger maps like breeze island, survival games 4 and others on the same map so I can use it for my server thanks.
1

Really helpful post!
1

Nice, mind making another one, but more advanced?
1

Use [simg] tags instead of [img] tags to make the pictures smaller. Great job on the tuts!
-BD
-BD
1

This is great!
1
Why, Thank you!
1
Bump
1

Hmm, could use how to make colored commandblocks.
1
Oh! To do that you will need to use NBTedit. I actually have no real experience with that, but people have told me that, that is the only real way to color command block text.
Heres the NBTedit page: http://www.minecraftforum.net/topic/6661-nbtedit/
Heres the NBTedit page: http://www.minecraftforum.net/topic/6661-nbtedit/
1
nice even tho i dont make maps or use mcedit lols
1

looks great!
1
Thanks!
1
Feedback is Appreciated.