


12
Have you ever built yourself a house on Minecraft and despite how hard you try it comes out looking like a wooden box?
Well I am here to help and I am going to pimp your Minecraft Pad!!
My first project was a house my friend built on his single player creative world and he asked me to help him out by designing a house that he could use to put in his multi player server.
I hope this blog also act's as a tutorial for anyone who also wishes to pimp their own house on Minecraft.
If you want me to pimp your Minecraft pad in my next episode then just leave a comment below or send me a private message.
Thanks in advance and I hope you enjoy!
P.S. For a great server to play on and also check out some of my more impressive builds log onto
- fr9.mooshroom.net:2567 .
Stage 1 - The house before I had pimped it out. Notice the familiar wooden box.
Stage 2 - The view from above the house before I had started work.
Stage 3 - When building in Minecraft you should always plan before you start and that means choosing how many floors you want your building to have. Here i chose to have two floors with an additional floor in the roof at the end.
Stage 4 - You should also try and avoid the classic box shape design for your house. While a square or rectangle is suitable some times I find that a corner house or an irregular shape gives the best end product.Here I added on a side room to the bottom floor which also gives a variety in the height of the house.
Stage 5 - I then brought the side room forward to give the house an irregular shape and one that I was happy with. I did this for the reasons I mentioned above.
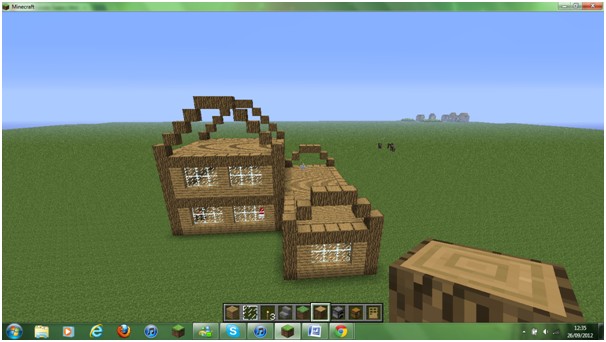
Stage 6 - When building the walls of your house you should look the give them some variety. Here I changed the corners of the house into wooden logs to give the house more character and a bit of a medieval look.
Stage 7 - I removed the walls of the house and continued the wooden logs around the edge of the floors to give the house a really distinctive look. It also shows off how many floors the house has.
Stage 8 - The next thing you should consider when building is where you are going to put your windows and how they are going to be bordered. Here I chose a nice easy style where you put a U of wooden planks around the windows. This works well with the wooden logs and also gives the walls of your house a nice design that you can continue round the whole building.
Stage 9 - Now you have to put the windows in the gaps left after making the walls. You can use glass blocks or panes but I find that panes give a more impressive feel and are also more cost effective if you are playing on survival.
Stage 10 - After completing the walls you should look to start on the roof of your house. You should mark out the ends of the roof by creating triangles at either end of your roof. You can make them as high or as flat as you like. I decided to create a roof with a flat top instead of a peak here by leaving the three middle blocks at the same level.
Stage 11 - Now you should fill the roof by using stairs of your choice. Make sure that the stairs are all the right way round as sometimes it can be easy to misplace them. I chose stone bricks which worked well with the wood of the house. I also find that bringing the roof 1 block away from the house gives a nice effect of an overhanging roof but its up to you if you want to do this.
Stage 12 - Following the roof you need to fill in the gaps at either end. Treat them as walls and try to continue the same design that you have done for the rest of the building. I used wooden planks and glass to make them fit in with the rest of the house. I also chose to use the roof of the main building as a third floor for a bedroom.
Stage 13 - Now your house is pretty much done but you should look to add some details by using slabs, fences, trapdoors etc anything that will make your house look that extra but special. I used trapdoors to give the windows a better look as well as fences coming down from the roof edges. I also bordered the front door and around the house to make it stand out from its surroundings.
There you have it the new and improved house after I pimped it out. I hope you enjoyed reading this tutorial and managed to take some tips from the build.
Thanks :D
Well I am here to help and I am going to pimp your Minecraft Pad!!
My first project was a house my friend built on his single player creative world and he asked me to help him out by designing a house that he could use to put in his multi player server.
I hope this blog also act's as a tutorial for anyone who also wishes to pimp their own house on Minecraft.
If you want me to pimp your Minecraft pad in my next episode then just leave a comment below or send me a private message.
Thanks in advance and I hope you enjoy!
P.S. For a great server to play on and also check out some of my more impressive builds log onto
- fr9.mooshroom.net:2567 .
Stage 1 - The house before I had pimped it out. Notice the familiar wooden box.
Stage 2 - The view from above the house before I had started work.
Stage 3 - When building in Minecraft you should always plan before you start and that means choosing how many floors you want your building to have. Here i chose to have two floors with an additional floor in the roof at the end.
Stage 4 - You should also try and avoid the classic box shape design for your house. While a square or rectangle is suitable some times I find that a corner house or an irregular shape gives the best end product.Here I added on a side room to the bottom floor which also gives a variety in the height of the house.
Stage 5 - I then brought the side room forward to give the house an irregular shape and one that I was happy with. I did this for the reasons I mentioned above.
Stage 6 - When building the walls of your house you should look the give them some variety. Here I changed the corners of the house into wooden logs to give the house more character and a bit of a medieval look.
Stage 7 - I removed the walls of the house and continued the wooden logs around the edge of the floors to give the house a really distinctive look. It also shows off how many floors the house has.
Stage 8 - The next thing you should consider when building is where you are going to put your windows and how they are going to be bordered. Here I chose a nice easy style where you put a U of wooden planks around the windows. This works well with the wooden logs and also gives the walls of your house a nice design that you can continue round the whole building.
Stage 9 - Now you have to put the windows in the gaps left after making the walls. You can use glass blocks or panes but I find that panes give a more impressive feel and are also more cost effective if you are playing on survival.
Stage 10 - After completing the walls you should look to start on the roof of your house. You should mark out the ends of the roof by creating triangles at either end of your roof. You can make them as high or as flat as you like. I decided to create a roof with a flat top instead of a peak here by leaving the three middle blocks at the same level.
Stage 11 - Now you should fill the roof by using stairs of your choice. Make sure that the stairs are all the right way round as sometimes it can be easy to misplace them. I chose stone bricks which worked well with the wood of the house. I also find that bringing the roof 1 block away from the house gives a nice effect of an overhanging roof but its up to you if you want to do this.
Stage 12 - Following the roof you need to fill in the gaps at either end. Treat them as walls and try to continue the same design that you have done for the rest of the building. I used wooden planks and glass to make them fit in with the rest of the house. I also chose to use the roof of the main building as a third floor for a bedroom.
Stage 13 - Now your house is pretty much done but you should look to add some details by using slabs, fences, trapdoors etc anything that will make your house look that extra but special. I used trapdoors to give the windows a better look as well as fences coming down from the roof edges. I also bordered the front door and around the house to make it stand out from its surroundings.
There you have it the new and improved house after I pimped it out. I hope you enjoyed reading this tutorial and managed to take some tips from the build.
Thanks :D
Additional Notes
No texture pack used.| Progress | 100% complete |
| Tags |
tools/tracking
1466344
2
pimp-my-minecraft-pad-pmp---how-to-make-better-houses-in-minecraft


 GalaxyCat24
 Speeeeed_Buuump
 r3dleaf
 kw1bli
 Loppycraft52
 ThatOneIdiotNamedGhoul
 Aetheric_
 DragonBjorn
 Nikki_Craft

 Stubbs1
 MrMattRanger
 Vextrosity

Create an account or sign in to comment.
thanks i this really helped me to learn to build ive been playing minecraft for long but i didnt build so much becuz my buildings looked like crap but this helped me