
• 2/2/14 10:20 pm
- 2.5k views • 0 today
- 1
- 0

1
[1.6.4] CrafticMC's Modding Tutorials [forge]
Welcome to my modding tutorial blog. Each tutorial will be categorized based on difficulty
[1.6.4] CrafticMC's Modding Tutorials [forge]
Welcome to my modding tutorial blog. Each tutorial will be categorized based on difficulty
[Easy
Setting Everything Up]
When creating a minecraft mod you are going to need to get this three things.
Java JDK - (http://www.oracle.com/technetwork/java/javase/downloads/jdk7-downloads-1880260.html)
Eclipse - (www.eclipse.org/downloads/)
 Minecraft Forge - [get 1.6.4] (http://files.minecraftforge.net/)

Eclipse
Open Up Eclipse, and select your work path by going to your forge folder,mcp, then click on eclipse, make sure it is selected then click ok to proceed. Once you in eclipse go to the left panel that displays a folder named "minecraft", click the drop down arrow then do the same to the folder called "src"
 Then right click on your src folder, new and click create new package and call it "MODNAME.main".
Now you should see an emty package, right click on it, new, class. Name it "MainClass", then click finish.
You should see something like this.
so now you going to want to paste this under the code stating what package that class is on.
@Mod(modid = MainClass.modid, name = "Mod Name", version = "1.0")
@NetworkMod(clientSideRequired = true, serverSideRequired = false)
What does code does it adds a name for the mod when you check it in your main menu, in the tab "Mods". Also shows its version. The second line of code simply makes it so that the mod is required to play in singleplayer but not required when joining a server.
You should have lots of errors, press ctrl+SHIFT+o, now all errors except 1 should go away. To fix this next error you will need to add this line of code in between the brackets of your public class.
public static final String modid = "NAME_MODNAME";

Now there is just one more step, you will need to paste these codes in between your public class brackets, under your modid code.
@EventHandler
public void load(FMLInitializationEvent event)
{
}
Then once again press "ctrl + SHIFT + O" to import your code. Your Code should Now Look like this.
Make sure to hit save-all in the top left, or ctrl+shift+s
You Have Now Completed This Tutorial
When creating a minecraft mod you are going to need to get this three things.
Java JDK - (http://www.oracle.com/technetwork/java/javase/downloads/jdk7-downloads-1880260.html)
Eclipse - (www.eclipse.org/downloads/)
Minecraft Forge - [get 1.6.4] (http://files.minecraftforge.net/)- Next you will need to install java jdk.
- Extract Eclipse.
- Create A Folder and call it anything you like.
- Drag your forge folder inside it. (found inside the forge file downloaded)
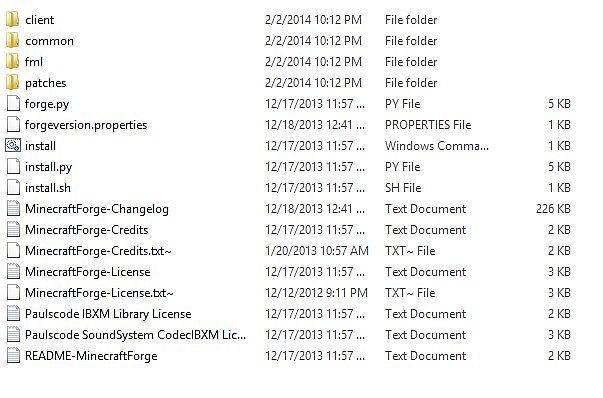
- Inside your forge folder you will see a cmd file named install, run it.
Eclipse
Open Up Eclipse, and select your work path by going to your forge folder,mcp, then click on eclipse, make sure it is selected then click ok to proceed.
Once you in eclipse go to the left panel that displays a folder named "minecraft", click the drop down arrow then do the same to the folder called "src"Then right click on your src folder, new and click create new package and call it "MODNAME.main". Now you should see an emty package, right click on it, new, class. Name it "MainClass", then click finish.
You should see something like this.
so now you going to want to paste this under the code stating what package that class is on.
@Mod(modid = MainClass.modid, name = "Mod Name", version = "1.0")
@NetworkMod(clientSideRequired = true, serverSideRequired = false)
What does code does it adds a name for the mod when you check it in your main menu, in the tab "Mods". Also shows its version. The second line of code simply makes it so that the mod is required to play in singleplayer but not required when joining a server.
You should have lots of errors, press ctrl+SHIFT+o, now all errors except 1 should go away. To fix this next error you will need to add this line of code in between the brackets of your public class.
public static final String modid = "NAME_MODNAME";
Now there is just one more step, you will need to paste these codes in between your public class brackets, under your modid code.
@EventHandler
public void load(FMLInitializationEvent event)
{
}
Then once again press "ctrl + SHIFT + O" to import your code. Your Code should Now Look like this.
Make sure to hit save-all in the top left, or ctrl+shift+s
You Have Now Completed This Tutorial
[Easy
Creating an Item]
When creating an item the first thing you want to do is insert this code on top of your @EventHandler (make sure to import Item). Replace ITEMNAME with your item name (nospace)
public static Item ITEMNAME;
This simply tells minecraft that your making a new item.
Next, your going to want to insert this code (inside the brackets of FMLInitilizationEvent event). Make sure to import if necessary.
tutorialitem = new tutorialmod.items.Itemtutorialitem(5000).setUnlocalizedName("tutorialitem");
LanguageRegistry.addName(tutorialitem, "Tutorial Item");

Your first line of code basically registers your item, the (5000) is the id for that item.
Now you will see an error under tutorialmod.items.Itemtutorialitem (make sure to change tutorialmod to your mods name) to fix this error simply hover over the error and hit create class "blabla" in package "blalabla". Hit finish.
Now you should see this.
Now your going to have to hit ctrl + a and hit backspace, then paste this code in.
package tutorialmod.items;
import net.minecraft.client.renderer.texture.IconRegister;
import net.minecraft.creativetab.CreativeTabs;
import net.minecraft.item.Item;
import tutorialmod.main.MainClass;
import cpw.mods.fml.relauncher.Side;
import cpw.mods.fml.relauncher.SideOnly;
public class Itemtutorialitem extends Item
{
public Itemtutorialitem(int id)
{
super(id);
this.setCreativeTab(CreativeTabs.tabMaterials);
}
@SideOnly(Side.CLIENT)
public void registerIcons(IconRegister par1IconRegister)
{
this.itemIcon = par1IconRegister.registerIcon(MainClass.modid + ":" + (this.getUnlocalizedName().substring(5)));
}
}
So now if you launch minecraft you will see an untextured item.
Adding Texture
Once you have created your texture, in order to use it in minecraft you will need to do the following:
Find your forge folder,mcp,src,assets, Inside your assets folder you will need to create a newfolder and call it your mod id.

Inside it create another folder called textures.
Inside that create 2 folders, one called items and one called blocks.
Drag your texture for your item inside the items folder and if done correctly when you load up minecraft it should have the texture.
You have know completed this tutorial.
When creating an item the first thing you want to do is insert this code on top of your @EventHandler (make sure to import Item). Replace ITEMNAME with your item name (nospace)
public static Item ITEMNAME;
This simply tells minecraft that your making a new item.
Next, your going to want to insert this code (inside the brackets of FMLInitilizationEvent event). Make sure to import if necessary.
tutorialitem = new tutorialmod.items.Itemtutorialitem(5000).setUnlocalizedName("tutorialitem");
LanguageRegistry.addName(tutorialitem, "Tutorial Item");
Your first line of code basically registers your item, the (5000) is the id for that item.
Now you will see an error under tutorialmod.items.Itemtutorialitem (make sure to change tutorialmod to your mods name) to fix this error simply hover over the error and hit create class "blabla" in package "blalabla". Hit finish.
Now you should see this.
Now your going to have to hit ctrl + a and hit backspace, then paste this code in.
package tutorialmod.items;
import net.minecraft.client.renderer.texture.IconRegister;
import net.minecraft.creativetab.CreativeTabs;
import net.minecraft.item.Item;
import tutorialmod.main.MainClass;
import cpw.mods.fml.relauncher.Side;
import cpw.mods.fml.relauncher.SideOnly;
public class Itemtutorialitem extends Item
{
public Itemtutorialitem(int id)
{
super(id);
this.setCreativeTab(CreativeTabs.tabMaterials);
}
@SideOnly(Side.CLIENT)
public void registerIcons(IconRegister par1IconRegister)
{
this.itemIcon = par1IconRegister.registerIcon(MainClass.modid + ":" + (this.getUnlocalizedName().substring(5)));
}
}
So now if you launch minecraft you will see an untextured item.
Adding Texture
Once you have created your texture, in order to use it in minecraft you will need to do the following:
Find your forge folder,mcp,src,assets, Inside your assets folder you will need to create a newfolder and call it your mod id.
Inside it create another folder called textures.
Inside that create 2 folders, one called items and one called blocks.
Drag your texture for your item inside the items folder and if done correctly when you load up minecraft it should have the texture.
You have know completed this tutorial.
[Easy
Creating A New Block]
[Easy
Creating a Creative Tab]You have now completed this tutorial
More like this
 Creating a Minecraft Forge Server with Mods 1.6.2 ONLY!Tutorial Blog
 zymasas
•8/3/13 10:17
32.9k 30x 152
zymasas
•8/3/13 10:17
32.9k 30x 152 Creating a Minecraft Forge 1.7.10 ModTutorial Blog
 QuickWhitt7
4/1/15 7:34
• posted 1/24/15 10:49
12k 675
QuickWhitt7
4/1/15 7:34
• posted 1/24/15 10:49
12k 675![[1.6.4] Forge Minecraft Blog](https://static.planetminecraft.com/files/resource_media/screenshot/1338/forge_6418638_thumb.jpg)
-

 Sdvnchannel
 GamerAndAHalf
 Blurricle
2731277
6








 ICanGamez
 uzvarua
Have something to say?