


527
On Planet Minecraft more often that not it will be your thumbnail image that will get you views. Taking screenshots in Minecraft is easy, but if your project is too big to fit on the screen then you may want to try one of these other methods. For this tutorial I will be using Outpost 11 as a demonstration.
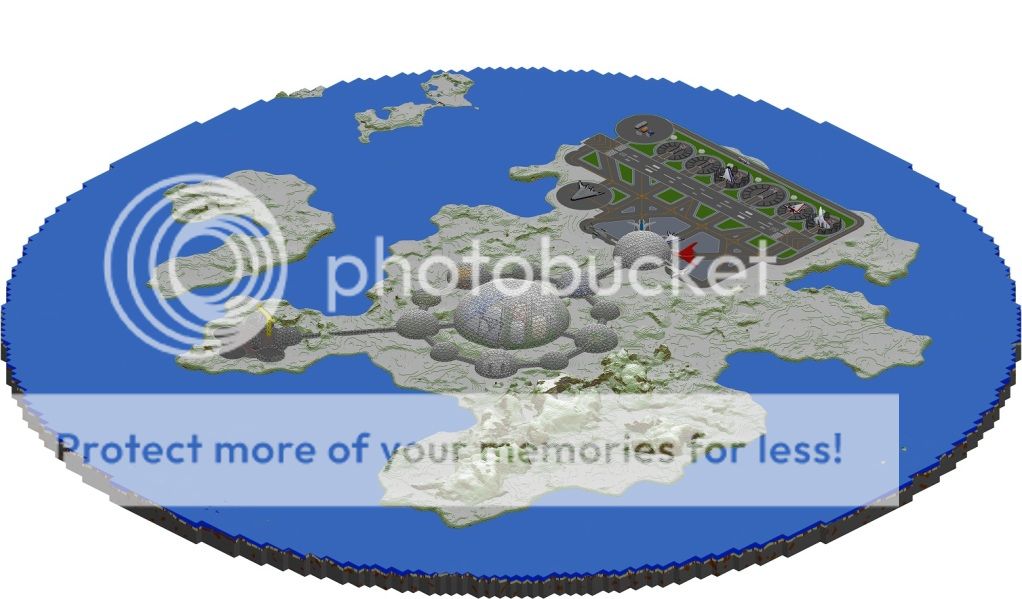
Mapper programs can create parallel-projection views of your entire world. The easiest to use is mcmap. All you have to do is download the program here, select your world and click start. It can also render your world at night and change the direction of the camera. Here is Outpost 11 rendered with mcmap:
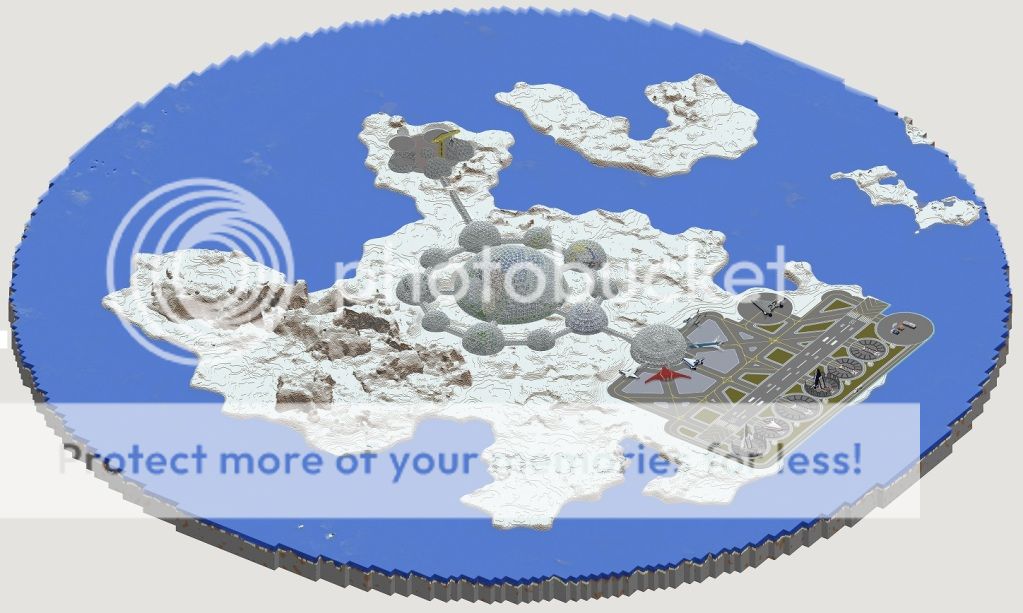
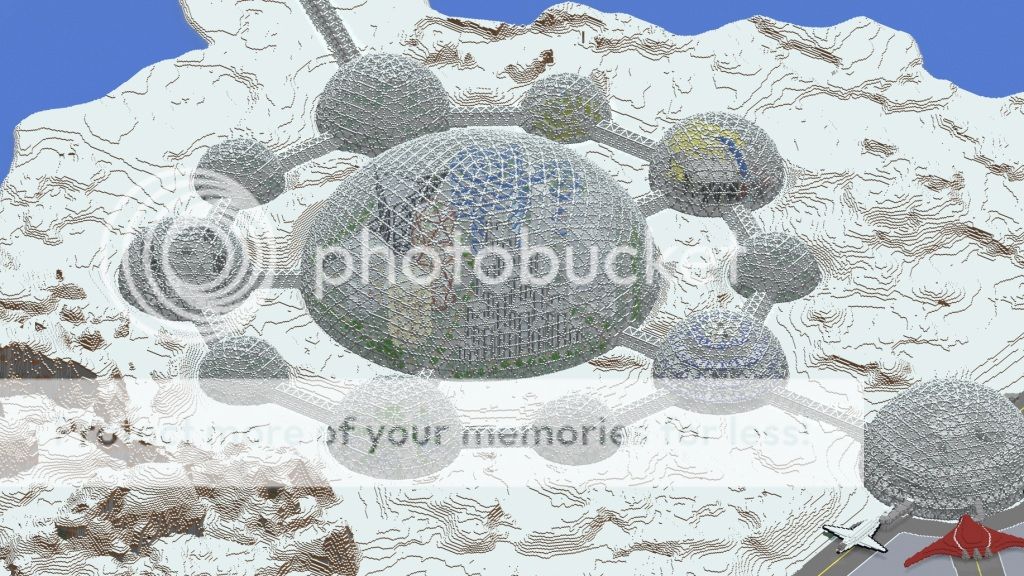
OK, this next mapper is not exactly super easy, but I am including it because it's one of my favorites: Tectonicus. Unlike MCMap it renders using block textures and can even render signs with text. It also has the ability to render at any angle (MCMap only does the four 45 degree angles) and any inclination. There are two downsides to using Tectonicus; it is command line only so it is more difficult to use and it takes much longer to render worlds than MCMap. Here is a quick guide for beginners:
- Copy your world save folder onto your root directory and rename it something simple like "map". The folder path is then C:map.
- Download the latest version of Tectonicus and put it in a folder on the root directory (like C:Tectonicus).
- Create a text file in the same folder as Tectonicus and call it myconfig.xml
- Here is the config I used for my map, just change the file paths and the angle settings:
- Open up the command line prompt. Navigate to your Tectonicus folder (type in "cd C:Tectonicus").
- Run Tectonicus with the prompt: java -jar Tectonicus_v2.14.jar config=myconfig.xml
This render took three hours. You can probably speed it up by changing the zoom settings.
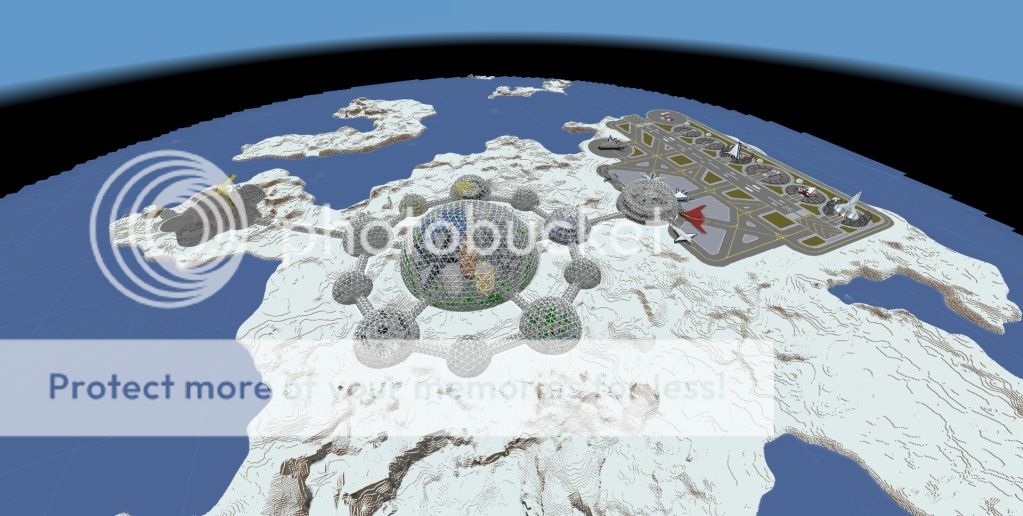
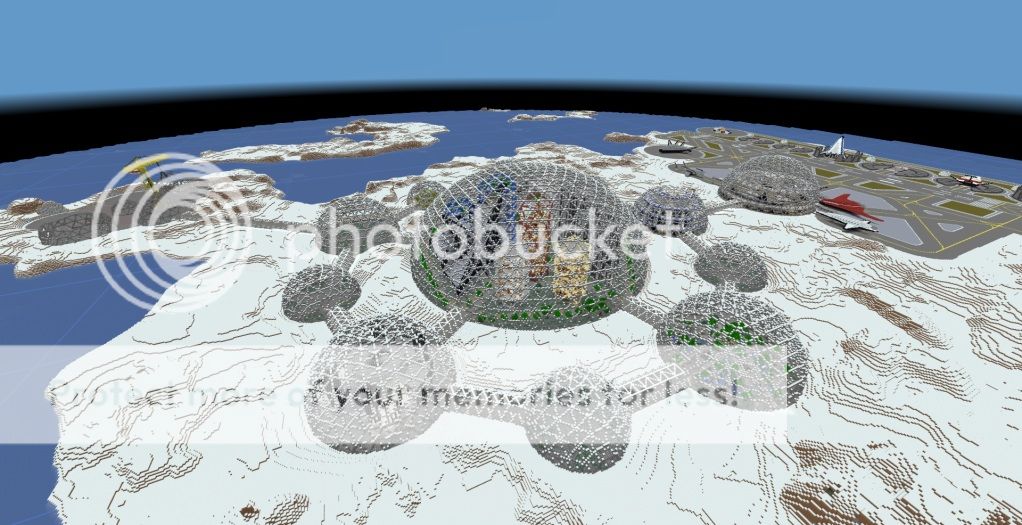
Now if you want an image with perspective, you need different tools. A lot of people use MCedit for taking screenshots with greater distance, but that isn't what it's for, and doesn't always produce the best results. I strongly recommend a program called Eihort. Eihort is an OpenGL based Minecraft world viewer and is amazing. You can increase the view distance well past 2000 blocks. It also features the ability to change the texture pack and lighting, it also display sign text and is super easy to use.
There are of course other ways to render images, but these are easy enough to use that there is no reason not to add some rendered images to your Planet Minecraft projects. The mcmap and Eihort images I show here literally took less than five minutes to make and you don't need to figure out Blender or mods.
Mapper programs can create parallel-projection views of your entire world. The easiest to use is mcmap. All you have to do is download the program here, select your world and click start. It can also render your world at night and change the direction of the camera. Here is Outpost 11 rendered with mcmap:
OK, this next mapper is not exactly super easy, but I am including it because it's one of my favorites: Tectonicus. Unlike MCMap it renders using block textures and can even render signs with text. It also has the ability to render at any angle (MCMap only does the four 45 degree angles) and any inclination. There are two downsides to using Tectonicus; it is command line only so it is more difficult to use and it takes much longer to render worlds than MCMap. Here is a quick guide for beginners:
- Copy your world save folder onto your root directory and rename it something simple like "map". The folder path is then C:map.
- Download the latest version of Tectonicus and put it in a folder on the root directory (like C:Tectonicus).
- Create a text file in the same folder as Tectonicus and call it myconfig.xml
- Here is the config I used for my map, just change the file paths and the angle settings:
Click to reveal
<tectonicus version="2">
<config mode = "cmd"
outputDir = "C:/output"
outputHtmlName = "map.html"
minecraftJar = "C:/Users/Momentaneously/AppData/Roaming/.minecraft/bin/minecraft.jar"
texturePack = "C:/Users/Momentaneously/AppData/Roaming/.minecraft/bin/minecraft.jar"
numZoomLevels = "5"
singlePlayerName = "Momentaneously"
spawnInitiallyVisible = "false"
playersInitiallyVisible = "false"
bedsInitiallyVisible = "false"
signsInitiallyVisible = "false"
portalsInitiallyVisible = "false"
viewsInitiallyVisible = "false"
numDownsampleThreads = "2"
eraseOutputDir = "false"
useCache = "true"
logFile = "C:/Tectonicus/TectonicusLog.txt"
/>
<link title="Custom link!"
destination = "www.google.co.uk"
image = "/Users/John/TectonicusTests/Logo.png"
/>
<!-- Rasteriser config applies to all layers -->
<rasteriser type = "lwjgl"
colourDepth = "32"
alphaBits = "0"
numSamples = "4"
tileSize = "512"
>
</rasteriser>
<!-- Maps to process (must have at least one map) -->
<map name="Terra"
cameraAngle="55"
cameraElevation="35"
closestZoomSize="12"
worldDir="C:/map"
dimension="terra"
useBiomeColours="false"
>
<!-- Markers to export for this map -->
<signs filter="special" />
<portals filter="all" />
<views filter="all" imageFormat="png" imageCompressionLevel="0.95" drawDistance="200" />
<spawn show="true" />
<!-- Optional world subset -->
<subset>
<CircularSubset radius="2000" />
</subset>
<!-- Layers to draw for this map (must have at least one layer) -->
<layer name="Day"
lighting="day"
/>
<layer name="Night"
lighting="night"
/>
<layer name="Caves"
lighting="cave"
renderStyle="cave"
imageFormat="jpg"
imageCompressionLevel="0.95"
/>
</map>
<!-- Tweeks that you shouldn't need but work around quirks on some machines -->
<tweeks
extractLwjglNatives = "true"
forceLoadAwt = "false"
force32BitNatives = "false"
force64BitNatives = "false"
>
</tweeks>
<!-- Debug options, you shouldn't need to tinker with these -->
<debug maxTiles = "-1"
>
</debug>
</tectonicus>
- Open up the command line prompt. Navigate to your Tectonicus folder (type in "cd C:Tectonicus").
- Run Tectonicus with the prompt: java -jar Tectonicus_v2.14.jar config=myconfig.xml
This render took three hours. You can probably speed it up by changing the zoom settings.
Now if you want an image with perspective, you need different tools. A lot of people use MCedit for taking screenshots with greater distance, but that isn't what it's for, and doesn't always produce the best results. I strongly recommend a program called Eihort. Eihort is an OpenGL based Minecraft world viewer and is amazing. You can increase the view distance well past 2000 blocks. It also features the ability to change the texture pack and lighting, it also display sign text and is super easy to use.
There are of course other ways to render images, but these are easy enough to use that there is no reason not to add some rendered images to your Planet Minecraft projects. The mcmap and Eihort images I show here literally took less than five minutes to make and you don't need to figure out Blender or mods.
| Tags |
tools/tracking
1218318
6
a-couple-super-easy-methods-for-rendering-large-projects


 _Blanc__
 TravisaInc
 Danesto
 CrystalRuby
 User5098101G
 EarthUser
 Team UNNAMED
 User5115289G
 MindOfSocial

 WYHA-Storm
Create an account or sign in to comment.
i1233.photobucket.com/albums/ff382/momentaneously/Chunky1.png
i1233.photobucket.com/albums/ff382/momentaneously/Chunky2.png
Check out this guys tutorial:
www.planetminecraft.com/blog/howto-render-minecraft-worlds-into-3d/