• 3/8/21 8:01 pm
- 1.9k views • 3 today
Added CreditMy friend Alex
- 14
- 12
- 5

62
Hello!
Welcome to Advanced Command Creations!
Creations in this course are much more detailed with more problems fixed. These creations will be explained in way more depth because they are more complex systems and generally require more commands to work.
These tutorials are roughly in difficulty order.
To view the rest of my Minecraft commands series click here!
Good luck!
I hope you like the tutorial! You can check out my full series here!
Thank you Alex for helping me with the commands. Please subscribe because it really helps me!
Welcome to Advanced Command Creations!
Creations in this course are much more detailed with more problems fixed. These creations will be explained in way more depth because they are more complex systems and generally require more commands to work.
These tutorials are roughly in difficulty order.
To view the rest of my Minecraft commands series click here!
Good luck!
Working Chairs
In this tutorial, I will be making invisible horses on stairs to make chairs. If you are here for the commands rather than learning they are all at the bottom of the page.
The commands I will be using to achieve this are:
• Summon
• Team
• Execute
• Kill
• Give
Method / Explanation:
Firstly we need to establish how we are going to make our seat. I want to have it so my seat is a stair that I can right-click on to make my player sit down on it. I am also going to add a spawn egg I place to automatically build me one to save doing it by hand every time. However, we need to start off by working out how we do it manually. I am going to use horses although you could use pigs. I want my horse to be Invisible, Silent, NoGravity (So it doesn't fall into the ground), and already tame. Luckily for us, these are all data tags so can give it already with these features in a summon command.
/summon horse ~ ~-2 ~ {NoGravity:1b,Type:0,Variant:0,Tame:1,Silent:1,ActiveEffects:[{Id:14,Amplifier:1,Duration:20000000,ShowParticles:0b}]}
Although having lots of tags may seem daunting, do not worry, using the methods in my data tags tutorial here, it is easy to find out what the tags we need are. Furthermore, a really good summon command website called mcstacker can also be used.
McStacker
Here is a quick showcase of it. If you do not understand mcstacker, it will very quickly become easy, understandable and a go-to website like it is for me!
Quick McStacker Showcase
Now you should have a summon command a bit like the one I had.
Next, we need to summon it on top of a stair and you will find we can push it around and away from the stair. We do not want this but luckily a teams option can disable collision so this is what we are going to have to do for the horses.
/team add PlayerSeats
The name can be anything but keep it consistent throughout. Then we can add our options:
/team modify PlayerSeats friendlyFire false
/team modify PlayerSeats seeFriendlyInvisibles false
/team modify PlayerSeats collisionRule never
Now it is set up we need to make the horses join, this will need to go in a clock so every newly spawned entity will be joined into the team.
/team join PlayerSeats @e[type=horse]
Now we are ready to automate it as our seat should now work
Note if we want to kill a seat we just need to use a normal kill command
/tp @e[type=horse,limit=1,sort=nearest] ~ ~-999 ~
Using a tp into the void instead of a kill is a very useful tool. This means the kill is instant instead of a death animation as well as it will not drop its drops. With any creation keep in mind this trick and if it is worth doing this instead of a /kill.
I also used limit=1 and sort=nearest so it is the closest horse and not every horse, unless you want every horse to die. Why would you do that?
Now we need to create our spawn egg for the mob. I would also use mcstackers give command generator for this too as it saves a lot of time.
/give @p minecraft:bat_spawn_egg{display:{Name:"{\"text\":\"Create Chair\",\"color\":\"white\",\"italic\":false}"},EntityTag:{CustomName:"{\"text\":\"SeatBuilder\"}"}} 1
Then we just put an execute in front of our summon command in a clock and add a kill or tp on the spawn egg mob (In this case a bat) at the end so it only summons our horse once.
/execute at @e[name=SeatBuilder,type=bat] run summon horse ~ ~-2 ~ {NoGravity:1b,Type:0,Variant:0,Tame:1,Silent:1,ActiveEffects:[{Id:14,Amplifier:1,Duration:20000000,ShowParticles:0b}]}
and
/tp @e[name=SeatBuilder,type=bat] ~ ~-999 ~
Then our spawn egg should be functional! Just place it on a stair and the horse will be there to sit on.
This was quite a confusing topic with a lot of new things but hopefully, you understood most of it and all the clock commands are below!
Your commands should look like this:
 | /give @p minecraft:bat_spawn_egg{display:{Name:"{\"text\":\"Create Chair\",\"color\":\"white\",\"italic\":false}"},EntityTag:{CustomName:"{\"text\":\"SeatBuilder\"}"}} 1 |
 | /tp @e[name=SeatBuilder,type=bat] ~ ~-999 ~ |
 | /execute at @e[name=SeatBuilder,type=bat] run summon horse ~ ~-2 ~ {NoGravity:1b,Type:0,Variant:0,Tame:1,Silent:1,ActiveEffects:[{Id:14,Amplifier:1,Duration:20000000,ShowParticles:0b}]} |
 | /team join PlayerSeats @e |
Randomly Spawning Structures
In this tutorial, I will be showing you the basics of spawning structures randomly. For spawning things randomly every method is quite advanced but this is the simplest one. If you are here for the commands rather than learning they are all at the bottom of the page.
The commands I will be using to achieve this are:
• Scoreboard
• Clone
• Execute
• Tp
• Tag
Method / Explanation:
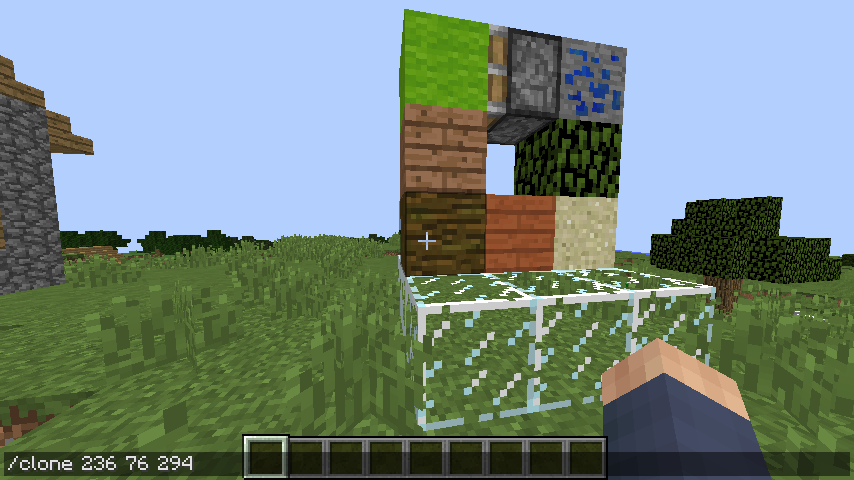
Firstly we need a structure to have in our world. I am going to quickly make a random structure. Yes, I suck at building but whatever.
Then we need to decide how we are going to have our structure spawning, I am going to use a system that involves checking for how many of a certain mob are in the world as I think this is the easiest method.
To do this method, we will first need to create a scoreboard objective. If you do not know much about the /scoreboard command a tutorial can be found here.
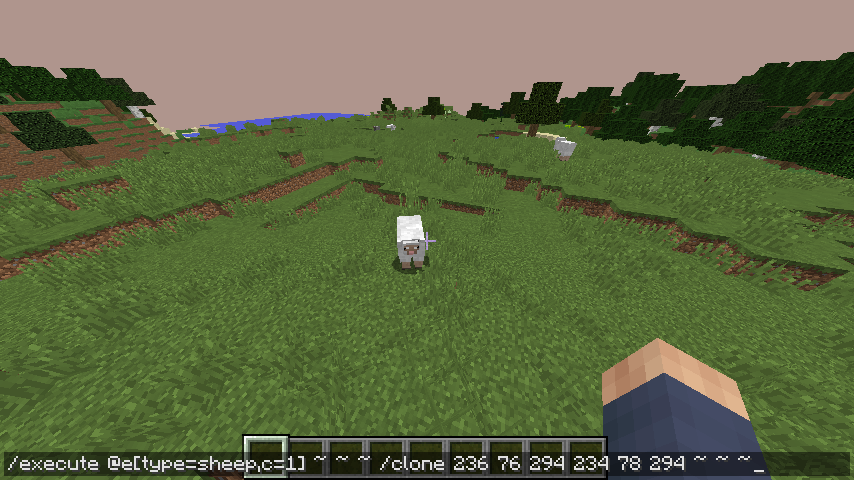
Now we are set up we can start working on the commands that go in a repeating clock. We need to choose an animal to test and how many we are searching for. This system will increase a score by one for every mob you specified that spawns and then when the score reaches a number of your choice, it will spawn a structure at one of the mobs randomly.
I want my structure to spawn on the surface level and be quite common so I am going to have my mob as a cow and it will search for 15 before spawning the structure.
/scoreboard players set @a MobCheck 0
/execute as @e[type=cow,tag=!Checked] run scoreboard players add @p MobCheck 1
We reset the MobCheck score every tick so the score doesn't stack and it is correct for that tick alone. Also, we are testing for cows without a tag because after we reach 15 we will tag them all in order to prevent the score from just staying at 15 constantly.
Our next command will check for a player with a score of 15 and if it finds one, it will tag a random cow with the tag structure:
/execute as @a if score @s MobCheck matches 15.. run tag @e[type=cow,tag=!Checked,limit=1,sort=random] add Structure
And after that, we will add a conditional command that has
/tag @e[type=cow] add Checked
So that it tags the old cows with the tag.
Now we have the system all set up! However, it will not spawn our structure...
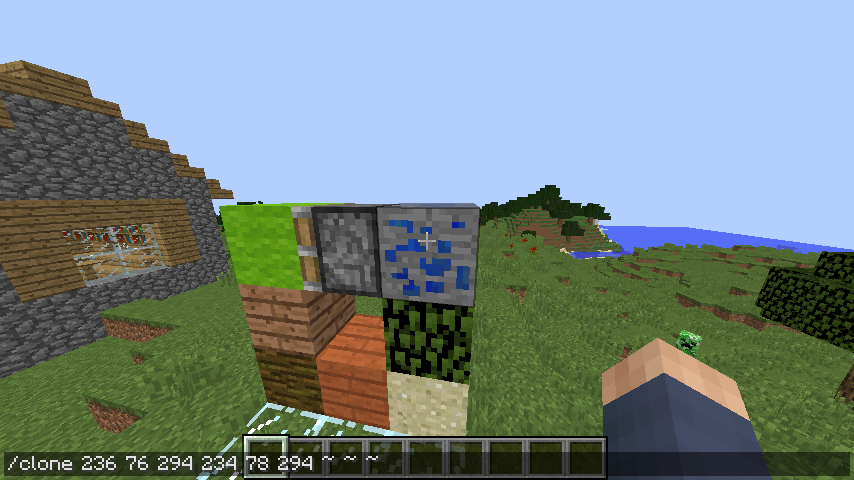
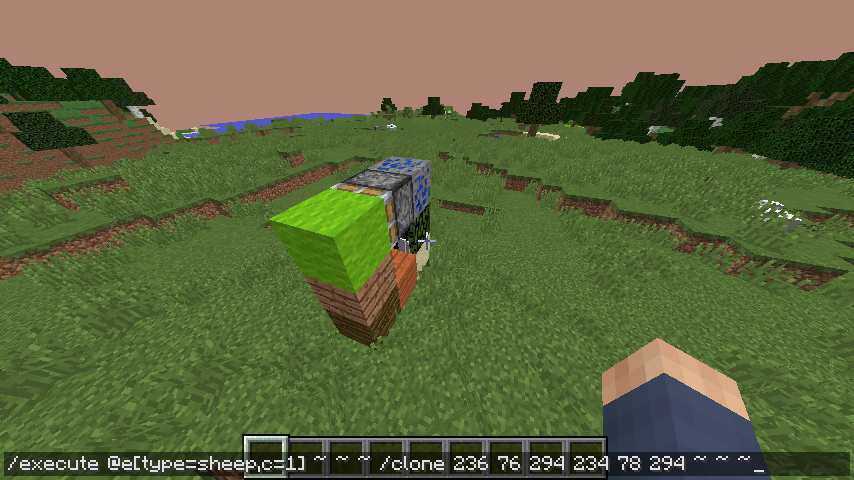
To do this we need to execute from the 'Structure' tagged cow and clone the build we made to the same place the cow is. To do this we just do a clone like normal but the destination will just be relative coordinates:
/execute at @e[tag=Structure,type=cow] run clone <x1> <y1> <z1> <x2> <y2> <z2> ~ ~ ~
Pictures above were for the 1.12 page so ignore the different execute format and the 'c=1' as in 1.13 it was replaced to 'limit=1' but you get the idea!
Then finally we need to kill the 'Structure' tagged cow (or whatever your mob is) in order to prevent it constantly cloning the structure to its location.
/tp @e[tag=Structure] ~ ~-999 ~
We use the tp command to make it not have death animation or mob drops.
I hope you learned something! :)
Your commands should look like this:
The commands I will be using to achieve this are:
• Scoreboard
• Clone
• Execute
• Tp
• Tag
Method / Explanation:
Firstly we need a structure to have in our world. I am going to quickly make a random structure. Yes, I suck at building but whatever.
Then we need to decide how we are going to have our structure spawning, I am going to use a system that involves checking for how many of a certain mob are in the world as I think this is the easiest method.
To do this method, we will first need to create a scoreboard objective. If you do not know much about the /scoreboard command a tutorial can be found here.
 | /scoreboard objectives add MobCheck dummy |
Now we are set up we can start working on the commands that go in a repeating clock. We need to choose an animal to test and how many we are searching for. This system will increase a score by one for every mob you specified that spawns and then when the score reaches a number of your choice, it will spawn a structure at one of the mobs randomly.
I want my structure to spawn on the surface level and be quite common so I am going to have my mob as a cow and it will search for 15 before spawning the structure.
/scoreboard players set @a MobCheck 0
/execute as @e[type=cow,tag=!Checked] run scoreboard players add @p MobCheck 1
We reset the MobCheck score every tick so the score doesn't stack and it is correct for that tick alone. Also, we are testing for cows without a tag because after we reach 15 we will tag them all in order to prevent the score from just staying at 15 constantly.
Our next command will check for a player with a score of 15 and if it finds one, it will tag a random cow with the tag structure:
/execute as @a if score @s MobCheck matches 15.. run tag @e[type=cow,tag=!Checked,limit=1,sort=random] add Structure
And after that, we will add a conditional command that has
/tag @e[type=cow] add Checked
So that it tags the old cows with the tag.
Now we have the system all set up! However, it will not spawn our structure...
To do this we need to execute from the 'Structure' tagged cow and clone the build we made to the same place the cow is. To do this we just do a clone like normal but the destination will just be relative coordinates:
/execute at @e[tag=Structure,type=cow] run clone <x1> <y1> <z1> <x2> <y2> <z2> ~ ~ ~
 |  |
 |  |
Then finally we need to kill the 'Structure' tagged cow (or whatever your mob is) in order to prevent it constantly cloning the structure to its location.
/tp @e[tag=Structure] ~ ~-999 ~
We use the tp command to make it not have death animation or mob drops.
I hope you learned something! :)
Your commands should look like this:
 | /tp @e[tag=Structure] ~ ~-999 ~ |
 | /execute at @e[tag=Structure,type=cow] run clone <x1> <y1> <z1> <x2> <y2> <z2> ~ ~ ~ |
 | /tag @e[type=cow] add Checked |
 | /execute as @a if score @s MobCheck matches 15.. run tag @e[type=cow,tag=!Checked,limit=1,sort=random] add Structure |
 | /execute as @e[type=cow,tag=!Checked] run scoreboard players add @p MobCheck 1 |
 | /scoreboard players set @a MobCheck 0 |
RPG Villagers
In this tutorial, I will be showing you how to have click events with villagers and conversations with them etc using scoreboard objectives. If you are here for the commands rather than learning they are all at the bottom of the page.
The commands I will be using to achieve this are:
• Scoreboard
• Execute
• Tell
• Summon
Method / Explanation:
In this tutorial, I will create various villagers with different events when you click on them. Firstly we are going to have a universal scoreboard for all of our Villagers when we click them.
Now if you set the scoreboard to the sidebar (Just for testing)
/scoreboard objectives setdisplay sidebar VillagerClick
You will see it go up every time you right click on a villager. Next if we want a conversation or an event when we click on the villager we don't want it to open the trade menu. We can remove this by giving it an empty Offers data tag '{Offers:{}}'
I gave it NoAI:1 so it wouldn't move, if you are doing the same, you can change where it is facing with the tp command.
/execute as @e[name=Dan] at @s run tp @s ~ ~ ~ ~LEFT/RIGHT ~UP/DOWN
Then we need to give it a name, I am going to call my first example Dan. In this example, I am just going to make it say the same message every time you click on him.
To do this we are going to execute from Dan and then tell all people who have a score of at least one in the radius of five to him a message:
/execute at @e[type=minecraft:villager,name=Dan] run tell @a[scores={VillagerClick=1},distance=..5,sort=nearest] Hello, Welcome to the forest!
The tell command is like a combination of say and tellraw, you can not choose colors or formatting but you can choose who sees it. You can use /say or /tellraw instead if you want to.
Then we will have a scoreboard command resetting all peoples 'VillagerClick' score so it doesn't spam them:
/scoreboard players set @a VillagerClick 0
Now for our next example we are going to create a new villager called Steve. This one is also going to have an arrow summon above the player. You can have any command you want:
/execute at @e[type=minecraft:villager,name=Steve] at @a[scores={VillagerClick=1},distance=..5,sort=nearest] run summon Arrow ~ ~3 ~
Note you can add as many commands or villagers as you want just make sure your villager click resetter is ALWAYS at the very end.
Now for our final villager, we will create a conversation. I am going to create another villager named Paul. This one is a bit more complicated and will require another scoreboard objective.
/scoreboard objectives add PaulScore dummy
When creating conversations, you will need a new scoreboard objective for every villager so say you had one called Simon to create an objective called 'SimonScore'
This objective will act as a variable to store our progress in the conversation. For conversations, the command you want to execute when they click on it is
/execute at @e[type=minecraft:villager,name=Paul] run scoreboard players add @e[scores={VillagerClick=1},distance=..5] PaulScore 1
In order to raise their PaulScore too.
Then for every part of the conversation we can add a /tell message
/execute at @e[type=minecraft:villager,name=Paul] run tell @a[scores={VillagerClick=1,PaulScore=1},distance=..5,sort=nearest] Hello
/execute at @e[type=minecraft:villager,name=Paul] run tell @a[scores={VillagerClick=1,PaulScore=2},distance=..5,sort=nearest] How Are You?
/execute at @e[type=minecraft:villager,name=Paul] run tell @a[scores={VillagerClick=1,PaulScore=3..},distance=..5,sort=nearest] Ok Byee!
Note that for the last message in the conversation you have a minimum score but not an exact so if they try talk to the villager after the conversation has ended it will repeat the last message rather than doing nothing.
If you ever need to reset the 'PaulScore' or whatever you named yours do (/scoreboard players reset @a PaulScore)
Remember all the commands are below if you want to double-check them!
Commands:
The commands I will be using to achieve this are:
• Scoreboard
• Execute
• Tell
• Summon
Method / Explanation:
In this tutorial, I will create various villagers with different events when you click on them. Firstly we are going to have a universal scoreboard for all of our Villagers when we click them.
 | /scoreboard objectives add VillagerClick minecraft.custom:minecraft.talked_to_villager |
/scoreboard objectives setdisplay sidebar VillagerClick
You will see it go up every time you right click on a villager. Next if we want a conversation or an event when we click on the villager we don't want it to open the trade menu. We can remove this by giving it an empty Offers data tag '{Offers:{}}'
 | /summon villager ~ ~1 ~ {CustomNameVisible:1b,NoAI:1b,CareerLevel:1,CustomName:"{\"text\":\"NAME\"}",Offers:{}} |
/execute as @e[name=Dan] at @s run tp @s ~ ~ ~ ~LEFT/RIGHT ~UP/DOWN
Then we need to give it a name, I am going to call my first example Dan. In this example, I am just going to make it say the same message every time you click on him.
To do this we are going to execute from Dan and then tell all people who have a score of at least one in the radius of five to him a message:
/execute at @e[type=minecraft:villager,name=Dan] run tell @a[scores={VillagerClick=1},distance=..5,sort=nearest] Hello, Welcome to the forest!
The tell command is like a combination of say and tellraw, you can not choose colors or formatting but you can choose who sees it. You can use /say or /tellraw instead if you want to.
Then we will have a scoreboard command resetting all peoples 'VillagerClick' score so it doesn't spam them:
/scoreboard players set @a VillagerClick 0
Now for our next example we are going to create a new villager called Steve. This one is also going to have an arrow summon above the player. You can have any command you want:
/execute at @e[type=minecraft:villager,name=Steve] at @a[scores={VillagerClick=1},distance=..5,sort=nearest] run summon Arrow ~ ~3 ~
Note you can add as many commands or villagers as you want just make sure your villager click resetter is ALWAYS at the very end.
Now for our final villager, we will create a conversation. I am going to create another villager named Paul. This one is a bit more complicated and will require another scoreboard objective.
/scoreboard objectives add PaulScore dummy
When creating conversations, you will need a new scoreboard objective for every villager so say you had one called Simon to create an objective called 'SimonScore'
This objective will act as a variable to store our progress in the conversation. For conversations, the command you want to execute when they click on it is
/execute at @e[type=minecraft:villager,name=Paul] run scoreboard players add @e[scores={VillagerClick=1},distance=..5] PaulScore 1
In order to raise their PaulScore too.
Then for every part of the conversation we can add a /tell message
/execute at @e[type=minecraft:villager,name=Paul] run tell @a[scores={VillagerClick=1,PaulScore=1},distance=..5,sort=nearest] Hello
/execute at @e[type=minecraft:villager,name=Paul] run tell @a[scores={VillagerClick=1,PaulScore=2},distance=..5,sort=nearest] How Are You?
/execute at @e[type=minecraft:villager,name=Paul] run tell @a[scores={VillagerClick=1,PaulScore=3..},distance=..5,sort=nearest] Ok Byee!
Note that for the last message in the conversation you have a minimum score but not an exact so if they try talk to the villager after the conversation has ended it will repeat the last message rather than doing nothing.
If you ever need to reset the 'PaulScore' or whatever you named yours do (/scoreboard players reset @a PaulScore)
Remember all the commands are below if you want to double-check them!
Commands:
 | /scoreboard players set @a VillagerClick 0 |
 | /execute at @e[type=minecraft:villager,name=Paul] run tell @a[scores={VillagerClick=1,PaulScore=1},distance=..5,sort=nearest] Ok Byee! |
 | /execute at @e[type=minecraft:villager,name=Paul] run tell @a[scores={VillagerClick=1,PaulScore=1},distance=..5,sort=nearest] How Are You? |
 | /execute at @e[type=minecraft:villager,name=Paul] run tell @a[scores={VillagerClick=1,PaulScore=1},distance=..5,sort=nearest] Hello |
 | /execute at @e[type=minecraft:villager,name=Paul] run scoreboard players add @e[scores={VillagerClick=1},distance=..5] PaulScore 1 |
 | /execute at @e[type=minecraft:villager,name=Steve] at @a[scores={VillagerClick=1},distance=..5,sort=nearest] run summon Arrow ~ ~3 ~ |
 | /execute at @e[type=minecraft:villager,name=Steve] run tell @a[scores={VillagerClick=1},distance=..5,sort=nearest] Go away, We don't like strangers! |
 | /execute at @e[type=minecraft:villager,name=Dan] run tell @a[scores={VillagerClick=1},distance=..5,sort=nearest] Hello, Welcome to the forest! |
Block Durability (Against TNT)
In this tutorial, I will be showing you how to make TNT have durability using fill and summon commands. If you are here for the commands rather than learning they are all at the bottom of the page.
The commands I will be using to achieve this are:
• Fill
• Summon
• Kill
• Execute
• Tp
• Scoreboard
Method / Explanation:
We need to talk about how we do this. We need some way for certain blocks to be invulnerable to explosions. In survival Minecraft, there is no way to do this, however, there are some blocks that are invulnerable such as bedrock. So if we quickly switch them to bedrock and back again after the explosion we could cause them to not break.
So firstly let's detect for TNTs that are about to explode. The block TNT is not an entity however the exploding one is so let's test for that. I already know that there is a TNT data tag called {Fuse:} however you may not always know all the tags.
So we are going to tag all these about-to-explode TNT's with the tag 'TntOver'
/tag @e[type=tnt,nbt={Fuse:1s}] add TntOver
If you are thinking it will be too visible as it is a whole second don't worry, the fuse tag works in ticks so it is a twentieth of a second before it explodes. Then we are going to execute at all TNTs that are 'TntOver' tagged and summon a creeper to replace it. This is because we can execute at this creeper whereas executing all my commands at the TNT came across unexpected bugs and the creeper is invisible and set to explode instantly so it is unnoticeable.
/execute at @e[tag=TntOver] run summon creeper ~ ~1 ~ {Tags:["Cracked1"],ignited:1,Fuse:0,Invulnerable:1,Silent:1,ActiveEffects:[{Id:14,Amplifier:1,Duration:2000,ShowParticles:0b}]}
Make sure it has a unique tag so you can execute from that and not all Creepers. Like always I used McStacker to create my creeper summon command, McStacker really is the key to learning commands as it makes you way less restricted.
Click here to check out McStacker
I am starting to feel like I'm sponsoring McStacker
And now let's execute from this about-to-explode creeper! I originally said we would use bedrock however in the twentieth of a second you see a flash of black so I will use barriers instead as you can't see them and they are also immune to TNT damage. The thing with command blocks is you constantly need to adapt and if your method isn't working it is usually better to think of a new method instead of trying to fix the one you currently have as there are usually so many different ways to do things.
/execute at @e[type=creeper,tag=Cracked1] run fill ~3 ~3 ~3 ~-3 ~-3 ~-3 barrier replace stone_bricks
Hopefully, you can understand what this command is doing but if not it is replacing all nearby stone brick (Stone brick is my chosen block to have durability).
We need to fill the barriers back after the creeper exploded however it will not be there to execute from so we need to create another entity.
/execute at @e[type=creeper,tag=Cracked1] run summon pig ~ ~1 ~ {Tags:["Cracked2"],Invulnerable:1,Silent:1,ActiveEffects:[{Id:14,Amplifier:1,Duration:2000,ShowParticles:0b}]}
I made it summon a pig but which is invulnerable, silent, and invisible so no one will know it is there and it will not die from the explosion. Make sure it also has a unique tag from the creeper.
Now we can do a fill command on all pigs with that tag:
/execute at @e[type=pig,tag=Cracked2] run fill ~3 ~3 ~3 ~-3 ~-3 ~-3 cracked_stone_bricks replace barrier
If you want it to never explode you would put it back to the same block so the process loops. However, I wanted mine to be resistant to explosions once so I made it cracked bricks after being exploded. Also if you want all blocks to be TNT proof you could use the system with the creepers and turn mobGreifing off, if that is what you wanted to do you would not need to have the pig for the after or have the fill commands.
Note: All executes on the pig must be before the command which summons the pig. Hopefully, you remember from the basics tutorial but if not don't worry, your line of command blocks will always run in order and goes of once a tick. If you made it fill the barriers back in the same tick you summoned it that would mean it was before the TNT exploded as we already know from the tnts {Fuse:1s} that it would explode next tick.
However, if we put it executes before the summon then it will only execute the commands the next tick which would be after the creeper exploded. Hopefully, that makes sense. Check the commands at the bottom of the page if you are confused.
We do have another problem. When a creeper explodes with effects on it in 1.12+ it drops an area affect cloud. This is bad as when our creeper explodes it will drop an invisibility effect cloud
Luckily though we can execute at the pig to easily fix this by just killing all nearby effect clouds:
/execute as @e[type=pig,tag=Cracked2] run kill @e[type=area_effect_cloud,distance=..20]
And finally, we need to kill the pig so it doesn't continuously execute commands.
/tp @e[type=pig,tag=Cracked2] ~ ~-999 ~
We are teleporting the pig down instead of killing if you remember because it means no mob drops. Both of these two commands will need to go before the pig summon as well.
Any way we can now kill the actual TNT:
/kill @e[tag=TntOver]
Hopefully, you learned, and this all made sense!
Your commands should look like this:
 | /kill @e[tag=TntOver] |
 | /execute at @e[type=creeper,tag=Cracked1] run summon pig ~ ~1 ~ {Tags:["Cracked2"],Invulnerable:1,Silent:1,ActiveEffects:[{Id:14,Amplifier:1,Duration:2000,ShowParticles:0b}]} |
 | /tp @e[type=pig,tag=Cracked2] ~ ~-999 ~ |
 | /execute as @e[type=pig,tag=Cracked2] run kill @e[type=area_effect_cloud,distance=..20] |
 | /execute at @e[type=pig,tag=Cracked2] run fill ~3 ~3 ~3 ~-3 ~-3 ~-3 cracked_stone_bricks replace barrier |
 | /execute at @e[type=creeper,tag=Cracked1] run fill ~3 ~3 ~3 ~-3 ~-3 ~-3 barrier replace stone_bricks |
 | /execute at @e[tag=TntOver] run summon creeper ~ ~1 ~ {Tags:["Cracked1"],ignited:1,Fuse:0,Invulnerable:1,Silent:1,ActiveEffects:[{Id:14,Amplifier:1,Duration:2000,ShowParticles:0b}]} |
 | /tag @e[type=tnt,nbt={Fuse:1s}] add TntOver |
Pathfinding AI
In this tutorial, I will be showing you the basics of creating your own pathfinding AI through recreating the miner mob from Clash of Clans and Clash Royale. If you are here for the commands rather than learning they are all at the bottom of the page.
The commands I will be using to achieve this are:
• Execute
• Summon
• Tp
• Kill
• Particle
Method / Explanation:
NOTE: For this tutorial, please note there are so many different ways to pathfind and I am only showing one in this tutorial, so if this feels a lot more direct to my example and not very changeable that is why, although I will try to explain what you might want to change the best I can.
I am going to split it into 3 categories:
-Particle Effects
-Movement
-Targetting
If you watched the video, you would have seen that the pathfinding is a little jumpy. This is because this system works in the main 8 directions only so not 100% accurate. I did this because the Miner from Clash Royale is a bit jumpy but theoretically you should be able to make it more accurate if you wish. I will explain how later. But first, let's start with how it works and how to create it.
Before Anything
Before anything we need the Miner mob or a mob to pathfind. For mine there are two versions of this mob, one is an invisible armor stand underground:
/summon armor_stand ~ ~-1 ~ {NoGravity:1b,Marker:1b,Invisible:1b,PersistenceRequired:1b,CustomName:'{"text":"Miner","italic":false}'}
And one is a zombie with a miner helmet which replaces the invisible one when it reaches its victim. You do not need two mobs you may just want one and then have something else happening when it reaches its victim but for mine I made it kill the invisible and replaced it with something else which could actually damage.
/summon zombie ~ ~-0.5 ~ {CustomNameVisible:1b,IsBaby:0b,CustomName:'{"text":"Miner","italic":false}',ArmorItems:[{id:"minecraft:leather_boots",Count:1b,tag:{display:{color:3546628}}},{id:"minecraft:leather_leggings",Count:1b,tag:{display:{color:4530691}}},{id:"minecraft:leather_chestplate",Count:1b,tag:{display:{color:4004866}}},{id:"minecraft:player_head",Count:1b,tag:{SkullOwner:{Name:"Miner"}}}]}
Both of which I created with, you guessed it! McStacker, the summon generator. I am not going to talk about the second mob much as it just had it for an end to the system but just keep in mind if you want to attack them instead of changing to a zombie-like mine you want to change your event later to:
/effect give @e[distance=..2] minecraft:instant_damage
Or something along those lines but I will remind you when this comes into play, we don't need any of this right now except your first/only mob.
Click here to check out McStacker
Particles
Anyway, I will start with the easiest part. The miner mob is just an invisible armor stand in the ground for me so to give it a look I executed from it (Which I named miner) and added a particle effect. This is obviously entirely optional. However, it can really improve the look of your mob.
/execute at @e[type=armor_stand,name=Miner] run particle item dirt ~ ~ ~ 0.1 0.3 0.1 0.01 10 force @a
This particle effect is called an item and it can have the look of any block. After putting the item just put the block id of the block and it will work.
Alternatively, you may want a different particle effect instead of 'item' or maybe not one at all as your mob is not invisible. If you want a different particle effect, here is the full list of them.
Click here to check out the Particles List
Movement
Now for how it actually pathfinds. As you know armor stands have no pathfinding AI as they don't walk around or chase players etc. However this can be fixed by creating our own AI with commands.
The pathfinding I will be using involves executing from your mob and summoning invisible armor stands on every direction of the armor stand, this is why it only pathfinds in the main 8 directions. It will then execute from the victim and teleport the miner to the armor stand that is closest to it then kill all the armor stands and repeats this process until it reaches the victim.
/execute at @e[type=armor_stand,name=Miner] run summon armor_stand ~-0.2 ~ ~0.2 {CustomName:"{\"text\":\"Locate\"}",Invisible:1}
/execute at @e[type=armor_stand,name=Miner] run summon armor_stand ~0.2 ~ ~-0.2 {CustomName:"{\"text\":\"Locate\"}",Invisible:1}
/execute at @e[type=armor_stand,name=Miner] run summon armor_stand ~-0.2 ~ ~-0.2 {CustomName:"{\"text\":\"Locate\"}",Invisible:1}
etc.
To make it more accurate, here is where you would add more directions or make them summon closer to the mob would also make it be more accurate however make sure your armor stands all have the same name and all be the same distance to the main mob (Our miner)
These armor stand summoning commands should be in a repeating clock so they activate every tick.
HOWEVER WARNING: Don't have them on until the rest of the commands are set up! This is because we have not created the teleporting, killing and repeating process in targeting yet so it will just constantly create armor stands and lag you out.
We are now set up to pathfind! All we need to do is decide who it should target.
Targeting
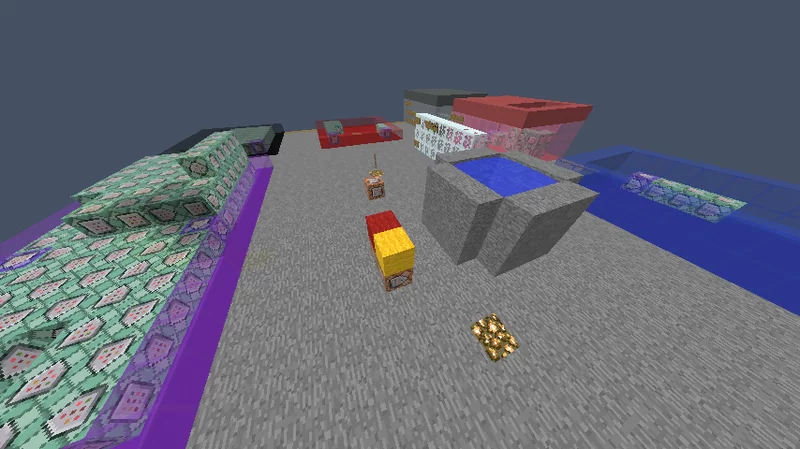
For those who are still confused how this is going to work here is a diagram to help visualize it.
 Imagine our gold block as the miner / your mob and the diamond block to be it's target.
 Imagine these orange wools to be the armor stands from movement. What we have just done is every tick it creates an armor stand on each side of it.
 When we execute from the victim, we want to kill all the armor stands except the closest one.
If we do:
/execute at @p run kill @e[name=Locate,limit=7,sort=furthest]
It will kill the 7 furthest away locate armor stands then if we do:
/execute at @p run tp @e[type=armor_stand,name=Miner] @e[name=Locate,limit=1]
/execute at @p run kill @e[type=armor_stand,name=Locate,limit=1]
It will teleport to it and kill it.Then as we put it all in a repeating clock it will happen every tick therefore it will keep moving / pathfinding. Note that I put '@p' this means I set my target to be players. If you wanted it to be Villagers for example you would do:
/execute at @e[type=villager] run kill @e[name=Locate,limit=7]
/execute at @e[type=villager] run tp @e[type=armor_stand,name=Miner] @e[name=Locate,limit=1]
/execute at @e[type=villager] run kill @e[type=armor_stand,name=Locate,limit=1]
This system has no ending so that's why I made it come out of the ground if you want to do that too, put this command in front of your targeting commands:
/execute at @e[type=armor_stand,name=Miner] if entity @p[distance=..1] run summon zombie ~ ~-0.5 ~ {CustomNameVisible:1b,IsBaby:0b,CustomName:'{"text":"Miner","italic":false}',ArmorItems:[{id:"minecraft:leather_boots",Count:1b,tag:{display:{color:3546628}}},{id:"minecraft:leather_leggings",Count:1b,tag:{display:{color:4530691}}},{id:"minecraft:leather_chestplate",Count:1b,tag:{display:{color:4004866}}},{id:"minecraft:player_head",Count:1b,tag:{SkullOwner:{Name:"Miner"}}}]}
/execute at @e[type=armor_stand,name=Miner] if entity @p[distance=..1] run kill @e[type=armor_stand,name=Miner,limit=1]
Or if you don't want it to come out of the ground but instead hurt them you can do this:
/execute at @e[name=Miner,type=armor_stand] run effect give @e[distance=..2] minecraft:instant_damage
This Tutorial is my most advanced one and was very hard to explain but hopefully, you understood it all! Even if you think you understood it all I recommend checking your commands with mine below in case you missed anything!
Your commands should look something like this:
Particle Effects:
Movement:
Targeting ( Players ) :
Targeting ( Villager ) :
You have completed the course, congratulations! I hope you enjoyed them <3
Be sure to subscribe if you haven't already as this all took ages to make :p
Subscribe!
The commands I will be using to achieve this are:
• Execute
• Summon
• Tp
• Kill
• Particle
Method / Explanation:
NOTE: For this tutorial, please note there are so many different ways to pathfind and I am only showing one in this tutorial, so if this feels a lot more direct to my example and not very changeable that is why, although I will try to explain what you might want to change the best I can.
I am going to split it into 3 categories:
-Particle Effects
-Movement
-Targetting
If you watched the video, you would have seen that the pathfinding is a little jumpy. This is because this system works in the main 8 directions only so not 100% accurate. I did this because the Miner from Clash Royale is a bit jumpy but theoretically you should be able to make it more accurate if you wish. I will explain how later. But first, let's start with how it works and how to create it.
Before Anything
Before anything we need the Miner mob or a mob to pathfind. For mine there are two versions of this mob, one is an invisible armor stand underground:
/summon armor_stand ~ ~-1 ~ {NoGravity:1b,Marker:1b,Invisible:1b,PersistenceRequired:1b,CustomName:'{"text":"Miner","italic":false}'}
And one is a zombie with a miner helmet which replaces the invisible one when it reaches its victim. You do not need two mobs you may just want one and then have something else happening when it reaches its victim but for mine I made it kill the invisible and replaced it with something else which could actually damage.
/summon zombie ~ ~-0.5 ~ {CustomNameVisible:1b,IsBaby:0b,CustomName:'{"text":"Miner","italic":false}',ArmorItems:[{id:"minecraft:leather_boots",Count:1b,tag:{display:{color:3546628}}},{id:"minecraft:leather_leggings",Count:1b,tag:{display:{color:4530691}}},{id:"minecraft:leather_chestplate",Count:1b,tag:{display:{color:4004866}}},{id:"minecraft:player_head",Count:1b,tag:{SkullOwner:{Name:"Miner"}}}]}
Both of which I created with, you guessed it! McStacker, the summon generator. I am not going to talk about the second mob much as it just had it for an end to the system but just keep in mind if you want to attack them instead of changing to a zombie-like mine you want to change your event later to:
/effect give @e[distance=..2] minecraft:instant_damage
Or something along those lines but I will remind you when this comes into play, we don't need any of this right now except your first/only mob.
Click here to check out McStacker
Particles
Anyway, I will start with the easiest part. The miner mob is just an invisible armor stand in the ground for me so to give it a look I executed from it (Which I named miner) and added a particle effect. This is obviously entirely optional. However, it can really improve the look of your mob.
/execute at @e[type=armor_stand,name=Miner] run particle item dirt ~ ~ ~ 0.1 0.3 0.1 0.01 10 force @a
This particle effect is called an item and it can have the look of any block. After putting the item just put the block id of the block and it will work.
Alternatively, you may want a different particle effect instead of 'item' or maybe not one at all as your mob is not invisible. If you want a different particle effect, here is the full list of them.
Click here to check out the Particles List
Movement
Now for how it actually pathfinds. As you know armor stands have no pathfinding AI as they don't walk around or chase players etc. However this can be fixed by creating our own AI with commands.
The pathfinding I will be using involves executing from your mob and summoning invisible armor stands on every direction of the armor stand, this is why it only pathfinds in the main 8 directions. It will then execute from the victim and teleport the miner to the armor stand that is closest to it then kill all the armor stands and repeats this process until it reaches the victim.
/execute at @e[type=armor_stand,name=Miner] run summon armor_stand ~-0.2 ~ ~0.2 {CustomName:"{\"text\":\"Locate\"}",Invisible:1}
/execute at @e[type=armor_stand,name=Miner] run summon armor_stand ~0.2 ~ ~-0.2 {CustomName:"{\"text\":\"Locate\"}",Invisible:1}
/execute at @e[type=armor_stand,name=Miner] run summon armor_stand ~-0.2 ~ ~-0.2 {CustomName:"{\"text\":\"Locate\"}",Invisible:1}
etc.
To make it more accurate, here is where you would add more directions or make them summon closer to the mob would also make it be more accurate however make sure your armor stands all have the same name and all be the same distance to the main mob (Our miner)
These armor stand summoning commands should be in a repeating clock so they activate every tick.
HOWEVER WARNING: Don't have them on until the rest of the commands are set up! This is because we have not created the teleporting, killing and repeating process in targeting yet so it will just constantly create armor stands and lag you out.
We are now set up to pathfind! All we need to do is decide who it should target.
Targeting
For those who are still confused how this is going to work here is a diagram to help visualize it.
Imagine our gold block as the miner / your mob and the diamond block to be it's target.Imagine these orange wools to be the armor stands from movement. What we have just done is every tick it creates an armor stand on each side of it.When we execute from the victim, we want to kill all the armor stands except the closest one.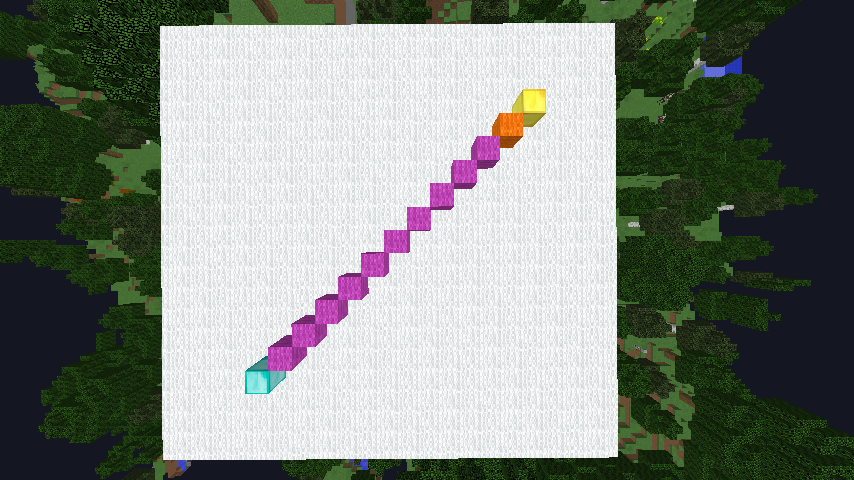 | 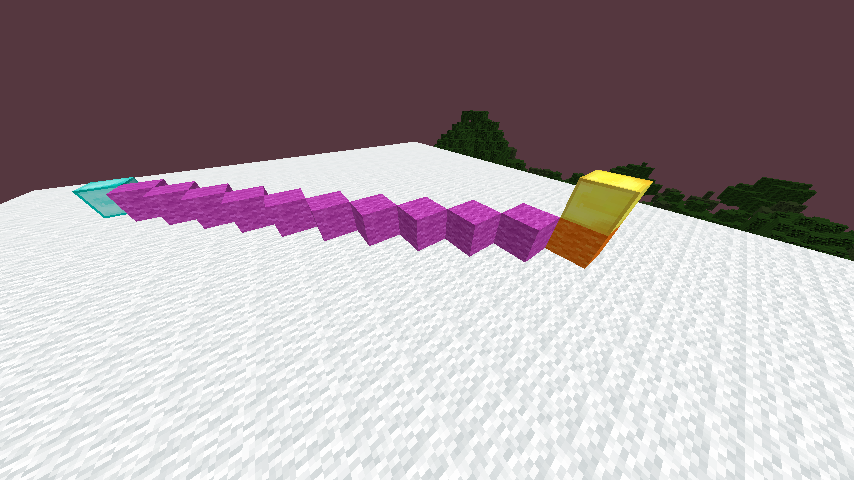 |
/execute at @p run kill @e[name=Locate,limit=7,sort=furthest]
It will kill the 7 furthest away locate armor stands then if we do:
/execute at @p run tp @e[type=armor_stand,name=Miner] @e[name=Locate,limit=1]
/execute at @p run kill @e[type=armor_stand,name=Locate,limit=1]
It will teleport to it and kill it.Then as we put it all in a repeating clock it will happen every tick therefore it will keep moving / pathfinding. Note that I put '@p' this means I set my target to be players. If you wanted it to be Villagers for example you would do:
/execute at @e[type=villager] run kill @e[name=Locate,limit=7]
/execute at @e[type=villager] run tp @e[type=armor_stand,name=Miner] @e[name=Locate,limit=1]
/execute at @e[type=villager] run kill @e[type=armor_stand,name=Locate,limit=1]
This system has no ending so that's why I made it come out of the ground if you want to do that too, put this command in front of your targeting commands:
/execute at @e[type=armor_stand,name=Miner] if entity @p[distance=..1] run summon zombie ~ ~-0.5 ~ {CustomNameVisible:1b,IsBaby:0b,CustomName:'{"text":"Miner","italic":false}',ArmorItems:[{id:"minecraft:leather_boots",Count:1b,tag:{display:{color:3546628}}},{id:"minecraft:leather_leggings",Count:1b,tag:{display:{color:4530691}}},{id:"minecraft:leather_chestplate",Count:1b,tag:{display:{color:4004866}}},{id:"minecraft:player_head",Count:1b,tag:{SkullOwner:{Name:"Miner"}}}]}
/execute at @e[type=armor_stand,name=Miner] if entity @p[distance=..1] run kill @e[type=armor_stand,name=Miner,limit=1]
Or if you don't want it to come out of the ground but instead hurt them you can do this:
/execute at @e[name=Miner,type=armor_stand] run effect give @e[distance=..2] minecraft:instant_damage
This Tutorial is my most advanced one and was very hard to explain but hopefully, you understood it all! Even if you think you understood it all I recommend checking your commands with mine below in case you missed anything!
Your commands should look something like this:
Particle Effects:
 | /execute at @e[type=armor_stand,name=Miner] run particle item dirt ~ ~ ~ 0.1 0.3 0.1 0.01 10 force @a |
Movement:
 | /execute at @e[type=armor_stand,name=Miner] run summon armor_stand ~-0.2 ~ ~0.2 {CustomName:'{"text":"Locate","italic":false}',Invisible:1} |
 | /execute at @e[type=armor_stand,name=Miner] run summon armor_stand ~0.2 ~ ~-0.2 {CustomName:'{"text":"Locate","italic":false}',Invisible:1} |
 | /execute at @e[type=armor_stand,name=Miner] run summon armor_stand ~-0.2 ~ ~-0.2 {CustomName:'{"text":"Locate","italic":false}',Invisible:1} |
 | /execute at @e[type=armor_stand,name=Miner] run summon armor_stand ~0.2 ~ ~0.2 {CustomName:'{"text":"Locate","italic":false}',Invisible:1} |
 | /execute at @e[type=armor_stand,name=Miner] run summon armor_stand ~ ~ ~-0.2 {CustomName:'{"text":"Locate","italic":false}',Invisible:1} |
 | /execute at @e[type=armor_stand,name=Miner] run summon armor_stand ~ ~ ~0.2 {CustomName:'{"text":"Locate","italic":false}',Invisible:1} |
 | /execute at @e[type=armor_stand,name=Miner] run summon armor_stand ~-0.2 ~ ~ {CustomName:'{"text":"Locate","italic":false}',Invisible:1} |
 | /execute at @e[type=armor_stand,name=Miner] run summon armor_stand ~0.2 ~ ~ {CustomName:'{"text":"Locate","italic":false}',Invisible:1} |
Targeting ( Players ) :
 | /execute at @p run tp @e[type=zombie,name=Miner,limit=1] ~ ~1 ~ |
 | /execute at @p run kill @e[type=armor_stand,name=Locate,limit=1] |
 | /execute at @p run tp @e[type=armor_stand,name=Miner] @e[name=Locate,limit=1] |
 | /execute at @p run kill @e[name=Locate,limit=7] |
 | /execute at @e[type=armor_stand,name=Miner] if entity @p[distance=..1] run kill @e[type=armor_stand,name=Miner,limit=1] |
 | /execute at @e[type=armor_stand,name=Miner] if entity @p[distance=..1] run summon zombie ~ ~-0.5 ~ {CustomNameVisible:1b,IsBaby:0b,CustomName:'{"text":"Miner","italic":false}',ArmorItems:[{id:"minecraft:leather_boots",Count:1b,tag:{display:{color:3546628}}},{id:"minecraft:leather_leggings",Count:1b,tag:{display:{color:4530691}}},{id:"minecraft:leather_chestplate",Count:1b,tag:{display:{color:4004866}}},{id:"minecraft:player_head",Count:1b,tag:{SkullOwner:{Name:"Miner"}}}]} |
Targeting ( Villager ) :
 | /execute at @e[type=villager] run tp @e[type=zombie,name=Miner,limit=1] ~ ~1 ~ |
 | /execute at @e[type=villager] run kill @e[type=armor_stand,name=Locate,limit=1] |
 | /execute at @e[type=villager] run tp @e[type=armor_stand,name=Miner] @e[name=Locate,limit=1] |
 | /execute at @e[type=villager] run kill @e[name=Locate,limit=7] |
 | /execute at @e[type=armor_stand,name=Miner] if entity @e[type=villager,distance=..1] run kill @e[type=armor_stand,name=Miner,limit=1] |
 | /execute at @e[type=armor_stand,name=Miner] if entity @e[type=villager,distance=..1] run summon zombie ~ ~-0.5 ~ {CustomNameVisible:1b,IsBaby:0b,CustomName:'{"text":"Miner","italic":false}',ArmorItems:[{id:"minecraft:leather_boots",Count:1b,tag:{display:{color:3546628}}},{id:"minecraft:leather_leggings",Count:1b,tag:{display:{color:4530691}}},{id:"minecraft:leather_chestplate",Count:1b,tag:{display:{color:4004866}}},{id:"minecraft:player_head",Count:1b,tag:{SkullOwner:{Name:"Miner"}}}]} |
Be sure to subscribe if you haven't already as this all took ages to make :p
Subscribe!
I hope you like the tutorial! You can check out my full series here!
Thank you Alex for helping me with the commands. Please subscribe because it really helps me!
Curated in their collections


5009889
6


 Adamic39

 FoxshyBunny


Have something to say?