

• 8/23/25 12:07 pm
- 291 views • 1 today
Added Creditmr. sun for guiding me all the way through ♥︎
- 19
- 8
- 5

64
haii everyone! this would be my very late entry for the recipe rivals competition, (in addition to Agatha's scrumptious curry). :3
there are several ways to enjoy this; not necessarily as a meal of its own, but more of a complementary side to a main dish. great for dipping into curries, baba ghanoush, or even something as simple as soup! you could even just spread across some cottage cheese and drizzle with honey for a sweet, but light breakfast!
. s t e p o n e .
pour 1 cup of warm water (your water must be warm, otherwise the yeast won't activate) in to your bowl containing the dried yeast and sugar, and let sit for 5-10 minutes, or until the yeast begins to look foamy! (that way you can tell it's done.)
. (this image up here is the before the yeast sets! so this is how your bowl should look,, nothing too special.) .
in the meantime, you can whisk up that flour, salt and oil sitting in your kitchen-aid until thoroughly combined. (if you don't have a kitchen-aid, that's totally okay! you can simply combine the ingredients by hand for now. don't worry about all the kneading; that'll be introduced later!*):3
once combined, and the yeast has set, (it should look something like this) you can go ahead and pour it into your bowl of dry ingredients. (things are gonna get sticky now!)
If using a kitchen-aid, start mixing on low-medium speed.
don't worry about it looking all lumpy and sticky for now, mine did too; you just have to keep mixing! mix for 8-12 minutes and check back in!
your dough should start to look smooth and elastic-y after the suggested amount of time, and that's when you can tell it's done! don't expect it to be too resilient though, because this dough in particular tends to be sticky even after kneaded and properly portioned.
now juuuust barely brush olive oil on your dough and set it back into the bowl of which it was originally mixed in.
now, last but not least, cover your bowl in a cloth and set it in that oven we talked about, so your dough can begin rising! but don't let it sit too long, otherwise your bread will taste a lot like yeast, and we don't want that! I'd recommend 30-35 minutes, or until you know your dough has doubled in size. c:
slap (yes, slap) that dough out on your bench (not before coating your hands in flour, though!) and give it a quick knead.
we'll be using a pan to cook them, so grab a decently-sized pan and pop it on your stove! turn your stove on low-medium-ish heat (they cook very quickly so you'll need to monitor them carefully here) and just touch the pan up with a teensy, tiny bit of olive oil.
once your bread begins to bubble up, (like shown in the image), it should be good to flip! you'll know it's done if it's firm enough to poke with your spatula without sticking, (dough gets a little clingy sometimes ╯︿╰) and the spots shown are dark brown. (but not black- you've overdone it then!)
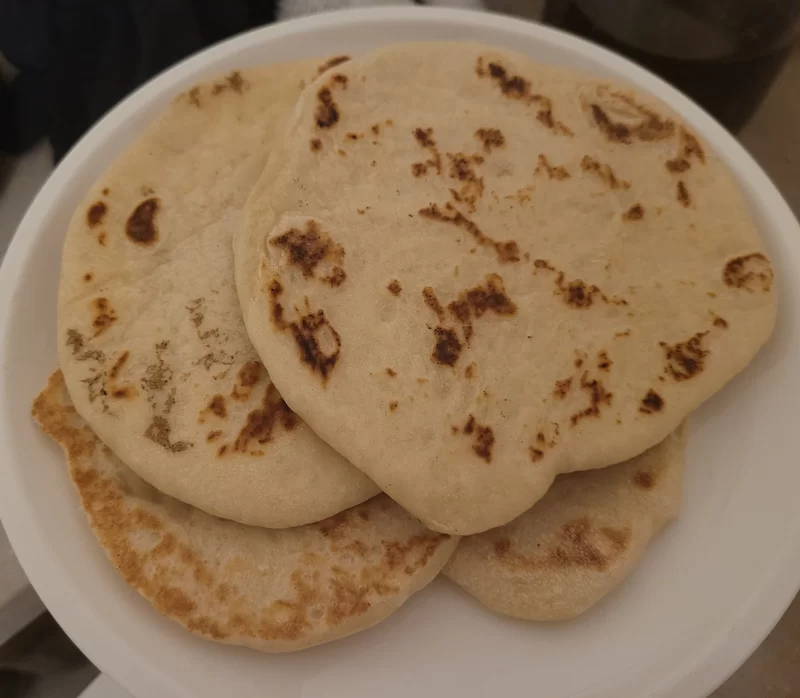
flip and let cook until you have both sides an even colour, then it's ready!

there are several ways to enjoy this; not necessarily as a meal of its own, but more of a complementary side to a main dish. great for dipping into curries, baba ghanoush, or even something as simple as soup! you could even just spread across some cottage cheese and drizzle with honey for a sweet, but light breakfast!
now let's get into it!
. i n g r e d i e n t s .
white sugar x 2 tbsp
instant dried yeast x 2 tsp
salt x 1 tsp
oil x 2 tbsp
flour x 1 ¼ cups
. water x 1 cup .
white sugar x 2 tbsp
instant dried yeast x 2 tsp
salt x 1 tsp
oil x 2 tbsp
flour x 1 ¼ cups
. water x 1 cup .
note* //
if you don't have a kitchen-aid, you can simply knead by hand! it's certainly a longer process but it surely gets the job done in the same manner. :3
. s t e p o n e .
add 1 ¼ cups flour, (or even just a little less than recommended, simply because you might want to use this later when it starts to get really sticky. :3) one teaspoon salt, and two tablespoons of oil in your kitchen-aid. in a seperate bowl, add two teaspoons dried yeast and two tablespoons of sugar.
 |
pour 1 cup of warm water (your water must be warm, otherwise the yeast won't activate) in to your bowl containing the dried yeast and sugar, and let sit for 5-10 minutes, or until the yeast begins to look foamy! (that way you can tell it's done.)
 |
. (this image up here is the before the yeast sets! so this is how your bowl should look,, nothing too special.) .
in the meantime, you can whisk up that flour, salt and oil sitting in your kitchen-aid until thoroughly combined. (if you don't have a kitchen-aid, that's totally okay! you can simply combine the ingredients by hand for now. don't worry about all the kneading; that'll be introduced later!*):3
once combined, and the yeast has set, (it should look something like this) you can go ahead and pour it into your bowl of dry ingredients. (things are gonna get sticky now!)
 |
If using a kitchen-aid, start mixing on low-medium speed.
don't worry about it looking all lumpy and sticky for now, mine did too; you just have to keep mixing! mix for 8-12 minutes and check back in!
 |  |
your dough should start to look smooth and elastic-y after the suggested amount of time, and that's when you can tell it's done! don't expect it to be too resilient though, because this dough in particular tends to be sticky even after kneaded and properly portioned.
 |  |
lightly coat your hands in oil or flour, (your choice! although I found oil more effective for keeping the sticky-ness off your hands.., for the most part, that is. :3) and sprinkle a touch of flour onto your bench. transfer your dough from the bowl onto your bench and roll it into a ball, pinching the ends to keep it nice and tight.
(you can go ahead and pre-heat your oven to 100°C now for a snuggly spot to rest your dough.)
(you can go ahead and pre-heat your oven to 100°C now for a snuggly spot to rest your dough.)
 |
now juuuust barely brush olive oil on your dough and set it back into the bowl of which it was originally mixed in.
 |
now, last but not least, cover your bowl in a cloth and set it in that oven we talked about, so your dough can begin rising! but don't let it sit too long, otherwise your bread will taste a lot like yeast, and we don't want that! I'd recommend 30-35 minutes, or until you know your dough has doubled in size. c:
. s t e p t w o .
slap (yes, slap) that dough out on your bench (not before coating your hands in flour, though!) and give it a quick knead.
 |
( casual pic of me slapping the dough )
split the dough into 8 equal parts and roll them out thinly.
(mr. sun is enjoying his time as a chef here <3)
(mr. sun is enjoying his time as a chef here <3)
 |  |
. s t e p t h r e e .
now, we're all done prepping. :3
we'll be using a pan to cook them, so grab a decently-sized pan and pop it on your stove! turn your stove on low-medium-ish heat (they cook very quickly so you'll need to monitor them carefully here) and just touch the pan up with a teensy, tiny bit of olive oil.
once your bread begins to bubble up, (like shown in the image), it should be good to flip! you'll know it's done if it's firm enough to poke with your spatula without sticking, (dough gets a little clingy sometimes ╯︿╰) and the spots shown are dark brown. (but not black- you've overdone it then!)
flip and let cook until you have both sides an even colour, then it's ready!
 |
. repeat the same process with the other pieces of dough and enjoy! .
 |  |
 |
More like this
 Agatha
 yellowcheese
6709296
6



 Omnibot2


 CarrotNoRanch

 bonkpixil
Have something to say?