

- 12,248 views, 21 today

290
Welcome to my blog! If you have any questions, leave them in the comments! Does anyone have a way of doing this on MacOS? If so, please tell me in the comments! I'll update the blog when/if that happens. <3
Difficulty: Medium
Note: This tutorial is for Windows 10, on Java Edition only!
1. Extract the pack that you want to convert.
This can be done using WinRAR, or 7Zip.
I'm using WinRAR, so here's how to do it with WinRAR.
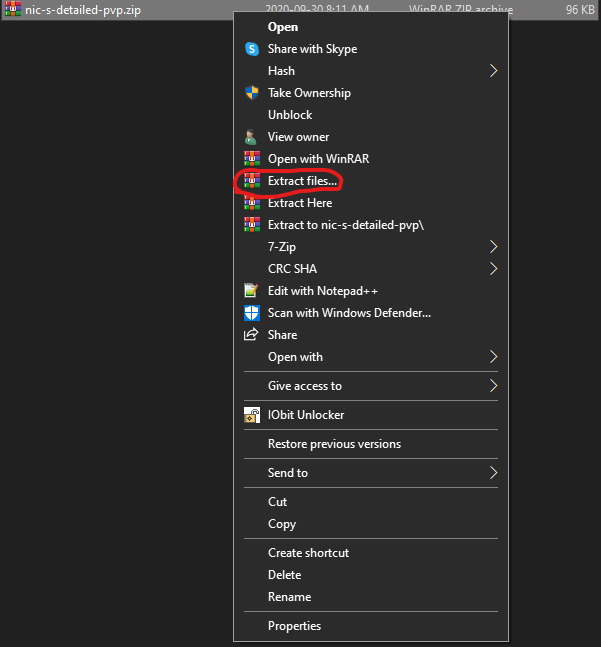
a) Right click on the pack
b) Select 'Extract files...'
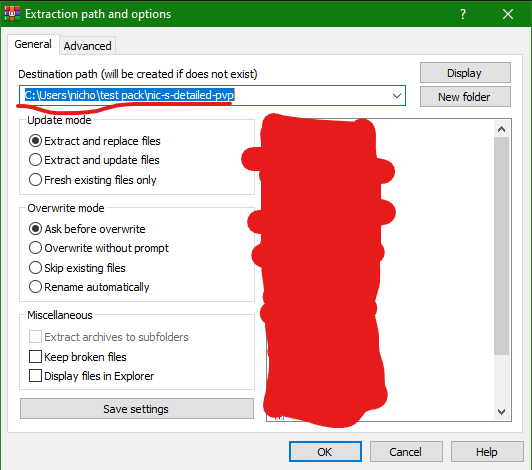
c) In the window that opens up, go to the text box at the top, and type in the location you would like to extract the pack to.
For me, this would be: 'C:/users/nicho/Pack tutorial', and then, at the end, add /<resource pack name, without the brackets>. This is so that the files don't get jumbled up into the root folder.
2. Converting the pack
a) Go to '.../<resource pack name, without the brackets>', then double click on 'pack.mcmeta'. If a box shows up asking you to open it with something, just open it with Notepad.
b) In the file that just opened up (pack.mcmeta), navigate to 'pack_format', and delete the number that follows.
Now, here's where things might get complicated.
2.1. Formatting the pack
a) Choose which version you want to convert your pack to. I want to convert this pack to 1.16.2/3, but you can choose any number, from 1 to 6.
1 - 1.6.1 to 1.8.9
2. - 1.9 to 1.10.2
3 - 1.11 to 1.12.2
4 - 1.13 to 1.14.4
5 - 1.15 to 1.16.1
6 - 1.16.2 to 1.16.5
7 - 1.17
(Source: https://minecraft.gamepedia.com/Tutorials/Creating_a_resource_pack)
So, I'll choose Pack Format 6, for 1.16.2 and 1.16.3.
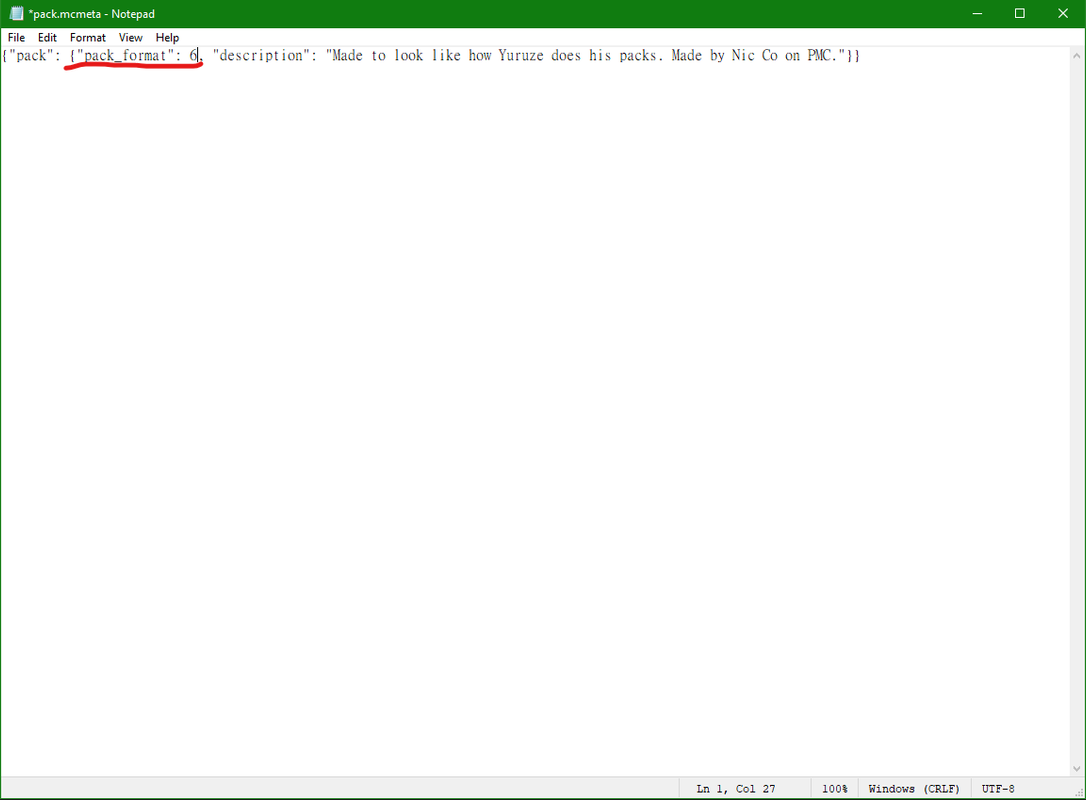
b) Go to the area where it had the original number, and insert the number of your choice.
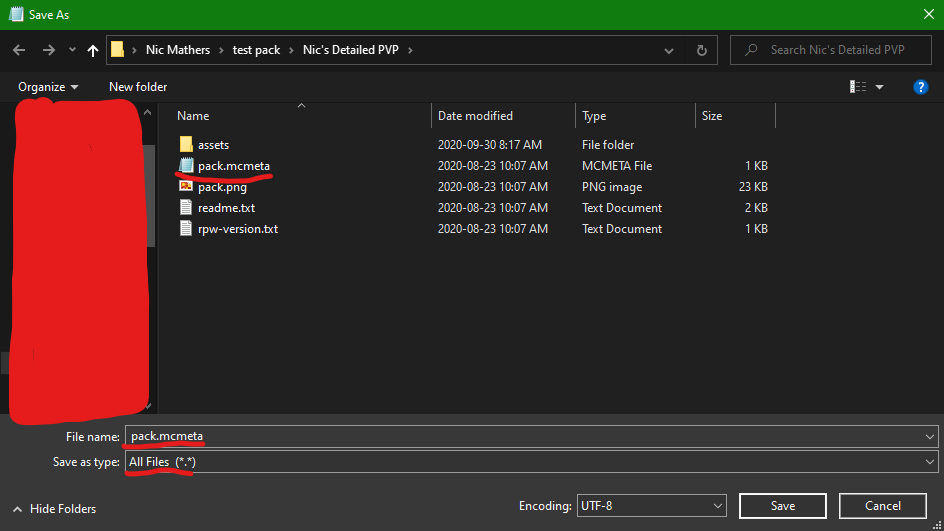
c) Press [CTRL] + [S] to save, and if it asks you where to save it to, save it to the location of pack.mcmeta, and make sure the file extention is NOT '.txt'. Make it 'pack.mcmeta' instead. THE FILE NAME IS CAPS SENSITIVE!
 And there you go! Your pack of choice is now compatable with ANY VERSION through 1.6.1 to 1.17! For any version below that, it gets way more complicated
But wait! There's more...
3. Perfecting the conversion
Do some textures come up as a pink and black checkerboard pattern? Well, you can fix it easily!
Let's say the grass block texture is a checkerboard pattern instead of the texture in your pack. Now, there are 2 ways of going about this.
One is easier, but removes the custom texture, and one is harder, but keeps the custom texture.
3.1. The easier way
So, navigate to '.../<pack name, without the brackets> /assets/minecraft/textures/block/' and delete the following: 'grass_top.png', 'grass_side_overlay.png', and 'grass_side.png'. This will revert the grass textures to their normal counterparts. This also applies to any other block that has an overlay. For single-texture blocks, just delete the texture that corresponds.
3.2. The harder way
Let's say you really don't want to have a specific texture not incorporated. This is the way for you!
a) Create a new texture pack. You can out how to do there at https://minecraft.gamepedia.com/Tutorials/Creating_a_resource_pack
b) Before you delete the non-functional textures in your pack of choice, copy them.
c) Paste the non-functional textures at the location of the original textures, in the new pack. An example would be '.../old pack/assets/minecraft/textures/block/grass.png' to '.../new pack/assets/minecraft/textures/block/grass.png'. Make sure the pack format is correct before inserting into Minecraft!
If the textures still don't work, then you need to follow the easier way, seen above.
For custom models that don't work: just remove them. There is no way to port them to new versions, without having to completely re-create the model.
As always, a diamond and a sub is always appreciated! <3
Difficulty: Medium
Note: This tutorial is for Windows 10, on Java Edition only!
1. Extract the pack that you want to convert.
This can be done using WinRAR, or 7Zip.
I'm using WinRAR, so here's how to do it with WinRAR.
a) Right click on the pack
b) Select 'Extract files...'
c) In the window that opens up, go to the text box at the top, and type in the location you would like to extract the pack to.
For me, this would be: 'C:/users/nicho/Pack tutorial', and then, at the end, add /<resource pack name, without the brackets>. This is so that the files don't get jumbled up into the root folder.
2. Converting the pack
a) Go to '.../<resource pack name, without the brackets>', then double click on 'pack.mcmeta'. If a box shows up asking you to open it with something, just open it with Notepad.
b) In the file that just opened up (pack.mcmeta), navigate to 'pack_format', and delete the number that follows.
Now, here's where things might get complicated.
2.1. Formatting the pack
a) Choose which version you want to convert your pack to. I want to convert this pack to 1.16.2/3, but you can choose any number, from 1 to 6.
1 - 1.6.1 to 1.8.9
2. - 1.9 to 1.10.2
3 - 1.11 to 1.12.2
4 - 1.13 to 1.14.4
5 - 1.15 to 1.16.1
6 - 1.16.2 to 1.16.5
7 - 1.17
(Source: https://minecraft.gamepedia.com/Tutorials/Creating_a_resource_pack)
So, I'll choose Pack Format 6, for 1.16.2 and 1.16.3.
b) Go to the area where it had the original number, and insert the number of your choice.
c) Press [CTRL] + [S] to save, and if it asks you where to save it to, save it to the location of pack.mcmeta, and make sure the file extention is NOT '.txt'. Make it 'pack.mcmeta' instead. THE FILE NAME IS CAPS SENSITIVE!
And there you go! Your pack of choice is now compatable with ANY VERSION through 1.6.1 to 1.17! For any version below that, it gets way more complicatedBut wait! There's more...
3. Perfecting the conversion
Do some textures come up as a pink and black checkerboard pattern? Well, you can fix it easily!
Let's say the grass block texture is a checkerboard pattern instead of the texture in your pack. Now, there are 2 ways of going about this.
One is easier, but removes the custom texture, and one is harder, but keeps the custom texture.
3.1. The easier way
So, navigate to '.../<pack name, without the brackets> /assets/minecraft/textures/block/' and delete the following: 'grass_top.png', 'grass_side_overlay.png', and 'grass_side.png'. This will revert the grass textures to their normal counterparts. This also applies to any other block that has an overlay. For single-texture blocks, just delete the texture that corresponds.
3.2. The harder way
Let's say you really don't want to have a specific texture not incorporated. This is the way for you!
a) Create a new texture pack. You can out how to do there at https://minecraft.gamepedia.com/Tutorials/Creating_a_resource_pack
b) Before you delete the non-functional textures in your pack of choice, copy them.
c) Paste the non-functional textures at the location of the original textures, in the new pack. An example would be '.../old pack/assets/minecraft/textures/block/grass.png' to '.../new pack/assets/minecraft/textures/block/grass.png'. Make sure the pack format is correct before inserting into Minecraft!
If the textures still don't work, then you need to follow the easier way, seen above.
For custom models that don't work: just remove them. There is no way to port them to new versions, without having to completely re-create the model.
As always, a diamond and a sub is always appreciated! <3
| Credit | Source for pack formats: https://minecraft.gamepedia.com/Tutorials/Creating_a_resource_pack |
| Tags |
2 Update Logs
Updated versions : by Pixelgon 06/14/2021 12:42:44 amJun 14th, 2021
Changed versions and pack formats to be more recent and include the latest updates.
LOAD MORE LOGS
tools/tracking
4659020
6
how-to-convert-minecraft-texture-packs-to-almost-any-version


 ScotsMiser
 sniffercraft34
 PythPale
 ConcreteMan
 ItzOrangey
 Anime Gril

 WYHA-Storm
Create an account or sign in to comment.
If my pack was originally 3, can I covert it directly to 6?