
• 4/2/12 4:12 am
- 7.8k views • 0 today
Added CreditDesuMotoko
- 10
- 4
- 3

238
Ok, well I have been trying out making heightmaps from scratch (no specialised editors at all) to make maps for Minecraft. As such, I thought I'd give some tips on creating them in image editors such as Photoshop.
So, to start off - what is a heightmap? Basically, it is a spectrum of the grey scale that shows the low and high points of a map. Normally, the darker an area, the lower it is, and the lighter an area, the higher it is. Of course, you can do the opposite and if a program gives an option to invert the map for this, then you don't need to manually invert it.
How does this relate to Minecraft? Well, there are programs that use heightmaps for world creation, such as WorldPainter. I use it to start off all my maps. You can import heightmaps and use them as a base for creating a map. You could export as is, or edit it further first.
Now, let's take a look at some technical aspects with Minecraft...
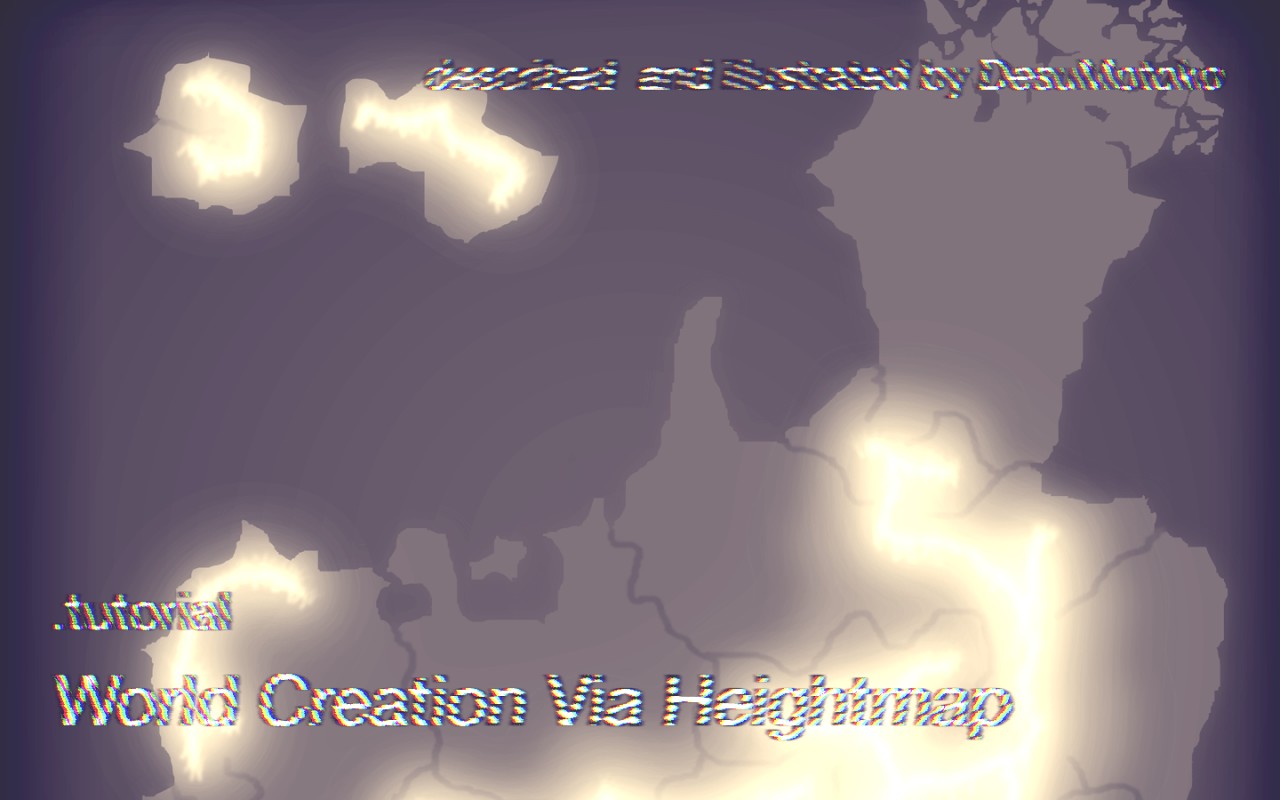
One thing to note, with the current world height of 256 blocks with sea level at 62, using a grey level at 35% (if white as a low) or 65% (with black as a low) will act as a land mass just above sea level. Grey 30% and 70% will act as a shallow sea base for white and black depths, respectively. In my latest test, I am editing it with white as a low level and then did an inversion, so the image shows black as a low level. For further citation, my grey levels will go by WHITE BASE % (BLACK BASE %). The image in the example is a black base, but I created it using a white base; it's simply a matter of personal taste.
Also, using lots of gaussian blur on your mountains will make them very smooth. For realistic mountains, less blur is better. The map I have in the example will probably have rather smooth mountains, so I will probably have to remove some of the blur layers I have.
On the opposite side of the matter, a little blur is good! Otherwise, if you just have straight brightness edges, they will give sheer cliffs in the game. This may be used to your advantage, however.
If editing a heightmap in Photoshop or other image editor, keep it greyscale!
Some other tactics I am using in this example are inland lakes. Basically, the low land level started off with 35% (65%) grey, the inland base level was 50% grey (with a good amount of blur for a smooth elevation increase), and then selected the lakes and made a new layer with them as 45% (55%) grey. This puts them above the sea level, but the higher area around them keeps the water inside.
The next area of concern is rivers... How I did the rivers was taking the same grey level as the sea level and then drawing out the rivers (I had priorly done this while making a sketch of what I wanted it to look like, so it was just a matter of recolouring them). I then added a bit of blur to them (for smooth banks), and then I put them between the blurred mountain layers and the base land layers. This way, they make the land a bit deeper so water can flow in, yet as the elevation increases, the indent of the river is still there.
If I can think of more, I will add to this blog!
This heightmap has not been tested in WorldPainter yet, so it may not be ideal. I will add in the final version of the heightmap I use. Keep posted however, because I will be using this for a new map with many settlements.


So, to start off - what is a heightmap? Basically, it is a spectrum of the grey scale that shows the low and high points of a map. Normally, the darker an area, the lower it is, and the lighter an area, the higher it is. Of course, you can do the opposite and if a program gives an option to invert the map for this, then you don't need to manually invert it.
How does this relate to Minecraft? Well, there are programs that use heightmaps for world creation, such as WorldPainter. I use it to start off all my maps. You can import heightmaps and use them as a base for creating a map. You could export as is, or edit it further first.
Now, let's take a look at some technical aspects with Minecraft...
One thing to note, with the current world height of 256 blocks with sea level at 62, using a grey level at 35% (if white as a low) or 65% (with black as a low) will act as a land mass just above sea level. Grey 30% and 70% will act as a shallow sea base for white and black depths, respectively. In my latest test, I am editing it with white as a low level and then did an inversion, so the image shows black as a low level. For further citation, my grey levels will go by WHITE BASE % (BLACK BASE %). The image in the example is a black base, but I created it using a white base; it's simply a matter of personal taste.
Also, using lots of gaussian blur on your mountains will make them very smooth. For realistic mountains, less blur is better. The map I have in the example will probably have rather smooth mountains, so I will probably have to remove some of the blur layers I have.
On the opposite side of the matter, a little blur is good! Otherwise, if you just have straight brightness edges, they will give sheer cliffs in the game. This may be used to your advantage, however.
If editing a heightmap in Photoshop or other image editor, keep it greyscale!
Some other tactics I am using in this example are inland lakes. Basically, the low land level started off with 35% (65%) grey, the inland base level was 50% grey (with a good amount of blur for a smooth elevation increase), and then selected the lakes and made a new layer with them as 45% (55%) grey. This puts them above the sea level, but the higher area around them keeps the water inside.
The next area of concern is rivers... How I did the rivers was taking the same grey level as the sea level and then drawing out the rivers (I had priorly done this while making a sketch of what I wanted it to look like, so it was just a matter of recolouring them). I then added a bit of blur to them (for smooth banks), and then I put them between the blurred mountain layers and the base land layers. This way, they make the land a bit deeper so water can flow in, yet as the elevation increases, the indent of the river is still there.
If I can think of more, I will add to this blog!
This heightmap has not been tested in WorldPainter yet, so it may not be ideal. I will add in the final version of the heightmap I use. Keep posted however, because I will be using this for a new map with many settlements.
1 Update Logs
World Creation Via Heightmap | 1.0.0 : by DesuMotoko 04/02/2012 12:28:30 amApril 2, 2012 @ 4:28 am UTC
¦ Blog posted.
More like this
 EpicGusta
 Jetthebuizel
734903
6
![[Tutorial] World Creation Via Heightmap | 1.0.0 Minecraft Blog](https://static.planetminecraft.com/files/resource_media/screenshot/1219/hm_1864625_thumb.jpg)
![[Future Project] Entire Map Of Middle-earth | 0.1.2 Minecraft Blog](https://static.planetminecraft.com/files/resource_media/screenshot/1219/LOTR_2233160_thumb.jpg)



 ldfmz1618


 Adventures of WildGoat
 Xeno_X1
 princess tratinczica
 Aedan5
 uzvarua
Have something to say?