


Published Aug 19th, 2014, 8/19/14 2:04 pm
- 554 views, 2 today
- 47 downloads, 0 today

17
Just a little something I pasted together to test out new mountain patterns. Thought I would go ahead and share it for your adventuring pleasure. This includes some of my own custom trees as well as rocks and bushes.
You and a pair of explorers have washed up onto the beach of a small mountain island, surrounded by several crates of supplies. You can make the most of what you have, make an attempt to find the mainland, or breach the small forest of tall pines ahead of you. The choice is yours, I suppose. This is a first for me, honestly.
I'd also like to mention a few things about the trees: they don't decay; the leaves hang around until you do something about them. You'll also notice that they don't have rings on the inside. This is because, during coding, it was a lot more convenient to set them all to bark on all sides instead of determining which direction each end of the log faced, whether it was up and down or east and west or north and south.
I figured that I wouldn't have to post too many pictures of it, as I don't want to spoil anything. The 3D map above should be enough of a demonstration, I hope.
Like it? Feedback is revered.
| Progress | 100% complete |
| Tags |
tools/tracking
3043459
2
a-survival-island-819


 Antique
 MistFaller
 Christ8Pizza
 Riseabove089
 HeyThisGuyVapes
 _Blanc__
 TravisaInc
 Danesto

 MegaMinerDL
![Random Item Skywars (No mods) [1.20.4] Minecraft Map & Project](https://static.planetminecraft.com/files/image/minecraft/project/2024/910/17739723_s.jpg)

 SimonDMC
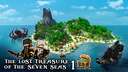
 DreamDuo
 NgafDur
Create an account or sign in to comment.
Oh, and thank you very much for the response on Alerak's project; I'm flattered. Like I mentioned, this is a new technique, which from a distance looks fairly attractive, but I also want to emulate the experience in game, as well as close up, as if to give the player the feeling that they're truly climbing up a mountain. My older technique actually used the "raise mountain" function rather than the normal raise/lower tool, which created some awfully conical mountains.
If you'd like some more examples, please visit Imbilio on YouTube for some great timelapses of WorldPainter builds, much of which are mountains based terrains. In the future, as soon as I find an appropriate computer, I'll be able to export a 8400x7200 blcok project that I've been working on for the past few years. It might be scrapped because it used a mountain style that wasn't as fine as this. I'll post pictures down the line and hopefully there'll be enough people to give an opinion of whether they want it or not.
Now, when you want to emulate detailed mountains such as these, you're going to have to go to the source: nature itself. The appearance and structure of mountains, simply put, can be narrowed down to whether it's folded (like much of the appalachians), upwarped (i.e. the Matterhorn), fault block (like what's in Yosemite), or volcanic (mount fuji). What brush and approach we use and how we use it will often determine which kind of mountain it mirrors. The following technique is the latest one that I have been using lately. It emulates folded mountains the best. The next big factor is erosion. Water travelling down the sides of mountains form the smaller, downward sloping ridges that make the mountain have an appearance of a wrinkled napkin. On my survival island, the mountains only have a few scars from erosion, but typically they can be everywhere, as if the mountain itself is wrinkled. To do this, I used the normal raise/lower tool with a spike brush (circular) at 100% intensity. I would hold it on the desired area for a few seconds to create a sort of basic mountain, that is, nothing too different from a normal cone. Make sure it's tall enough to be called a mountain, of course. You can repeat this across a landscape to designate where you want various peaks across a range. Connect the peaks with the same brush (we use the same brush until the "craggy" step), raising it to create the ridge connecting the peaks that you would find appropriate. You can also leave the mountain freestanding, like a volcano. After that, I would decrease the brush size (same brush, same shape, same intensity) and move from the peak to the base, going outward until I would have a nice, transitioning ridge. Don't go back over it, just go straight from peak to base, or you'll get an awfully vertically wavy ridge. I would continue with this wherever I could until the mountain looked something like a starfish from a bird's-eye view. I would continue like this until I achiever the aformentioned "wrinkle" effect. After the desired shape is achieved, I would go over the mountain with a rough brush just to add a "craggy" effect, as if it is truly rocky. Now we take advantage of the "above" or "below" degree option, found under the "above" or "below" level number selector and the intensity slider. What this does is manipulate only the terrain that would form at a certain angle. For instance, a mountain could be about 45 degrees while flatlands would be 0 degrees. Think of slope and y/x, because the y and x are two different points on any terrain. For any snowy mountain, we need to keep in mind that the snow typically doesn't remain on steep slopes, only settling where it's flatter. We can recreate this here by, firstly, coating our mountain with stone where we want it, and secondly, checking "everything below 45 degrees". When you choose the frost or deep snow layer and begin painting, you'll discover that it will only apply to slopes that are a lot more gradual or flat. And since we already went over the mountain with a brush to make the "craggy" effect, the snow will often form in little pockets and artful strains that look close to identical to their real-world counterparts. That's just about everything.
Again, this is my latest technique, and I didn't really go all out on these mountains. All you need at this point really is the time and will to go into details that you would expect in the real world. Again, much of my approach is based on von Imbilio on youtube. He doesn't do any tutorials, but if you're careful and look closely, you can inherit is technique quickly, like I did. If you haven't heard of it already, you can look into World Machine for an alternate and more technical approach to MC terrain design.