


Published Mar 23rd, 2012, 3/23/12 5:40 pm
- 15,762 views • 1 today
- 987 downloads • 0 today

631
A friend requested that I teach them how to use Forester in MCEdit to create epic trees. I don't have the ability to make videos, so I made a step by step picture guide of how its done. I know that this is in the wrong section, but blogs only let you have one picture, so :p
I have included the tree I made as a schematic file as well for people to use :)
The first step is to download MCEdit from here:
github.com/mcedit/mcedit/downloads
Follow along using the slideshow to get an idea of what it all looks like.
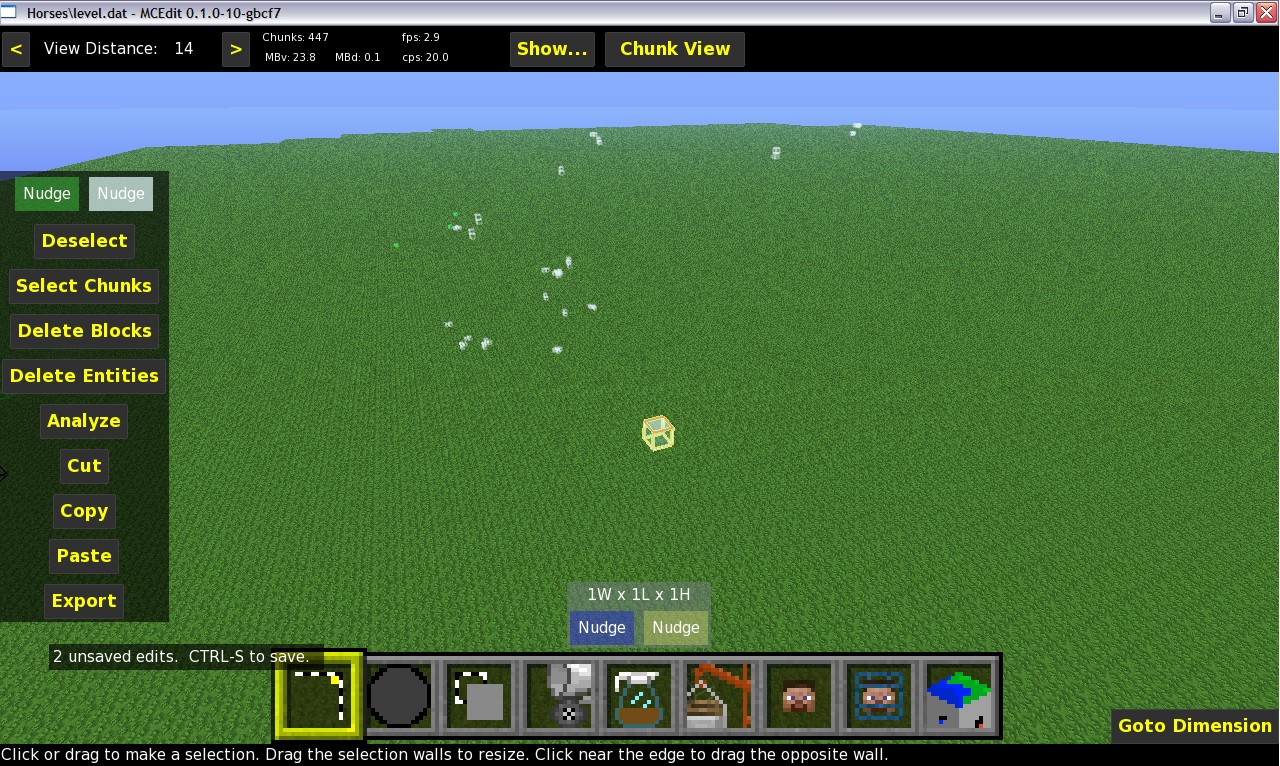
1. Start MCEdit by clicking on the .exe file. Open a map you want to work on. I have choosen a flat map for ease as well as for the reason that if MCEdit crashes, it will not destroy a valuable save. Place a 1X1X1 block of a material not found nearby. This is done by selecting a single block and using the fill tool or with the paint tool. I have used white wool in the picture so that you can see it, but I would advise against using wool due to issues I've had in the past with it. I used Mossstone bricks for the actual run of the filter.
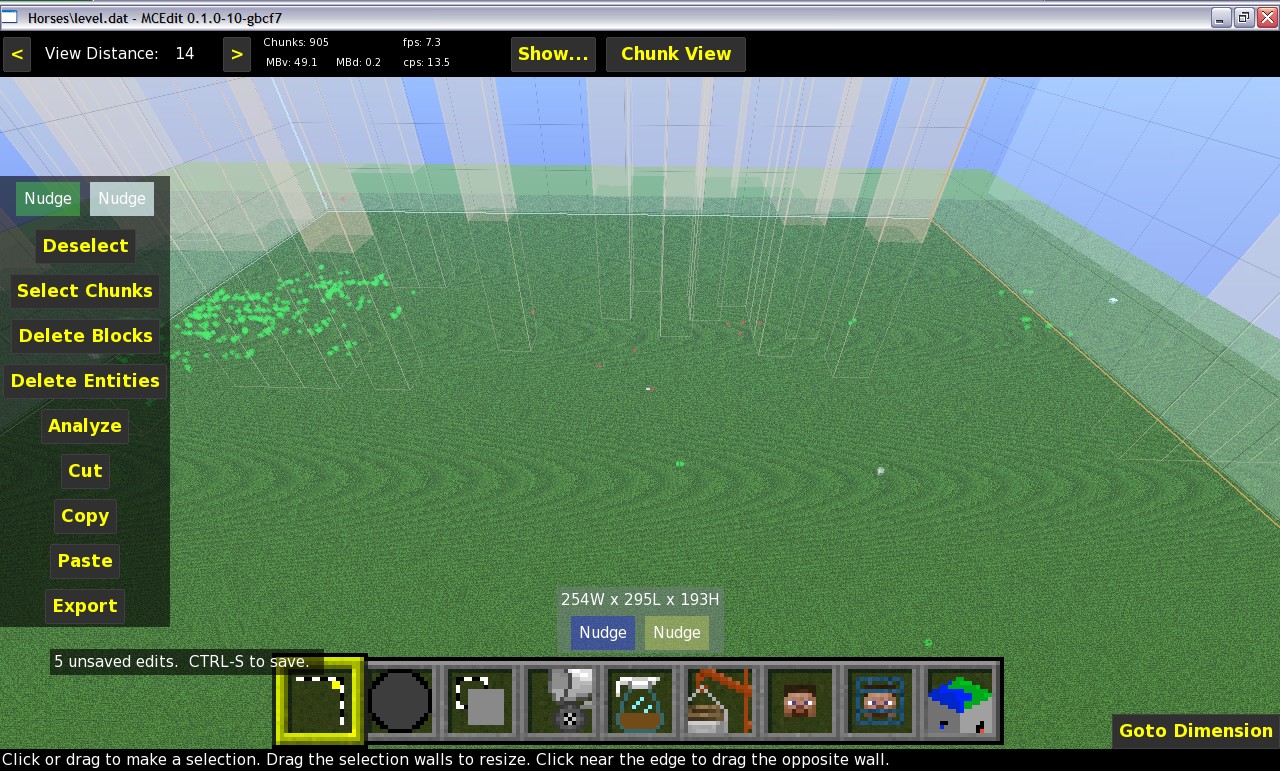
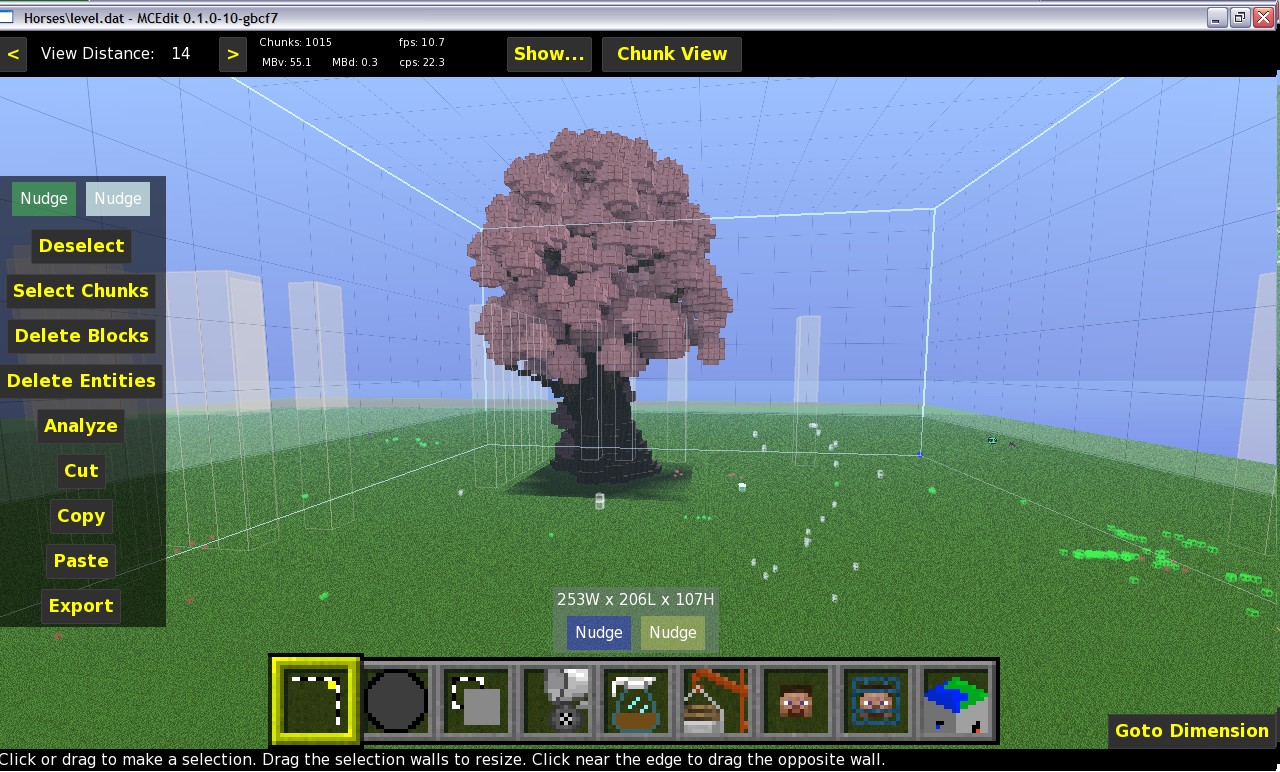
2. Use the select tool to select a large area around your block, the bigger the better, but don't go outside of where your map has rendered. Now its time to filter :)
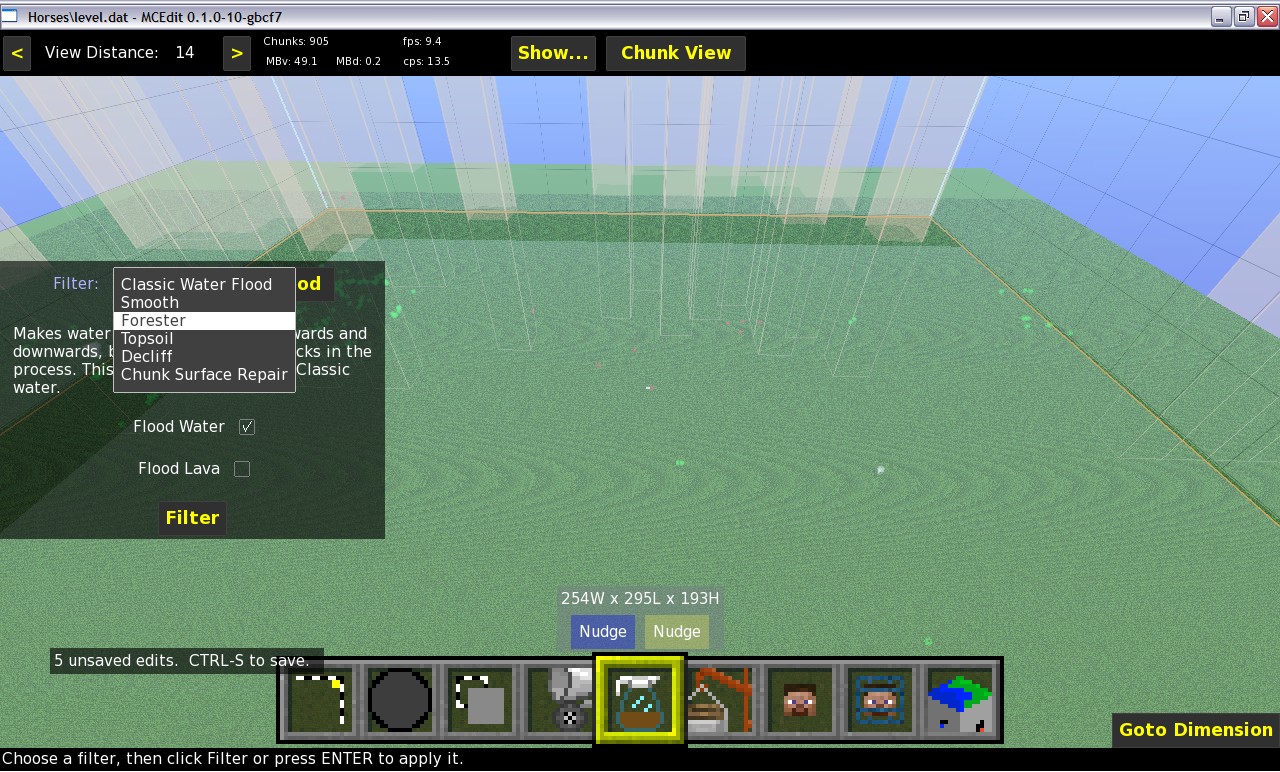
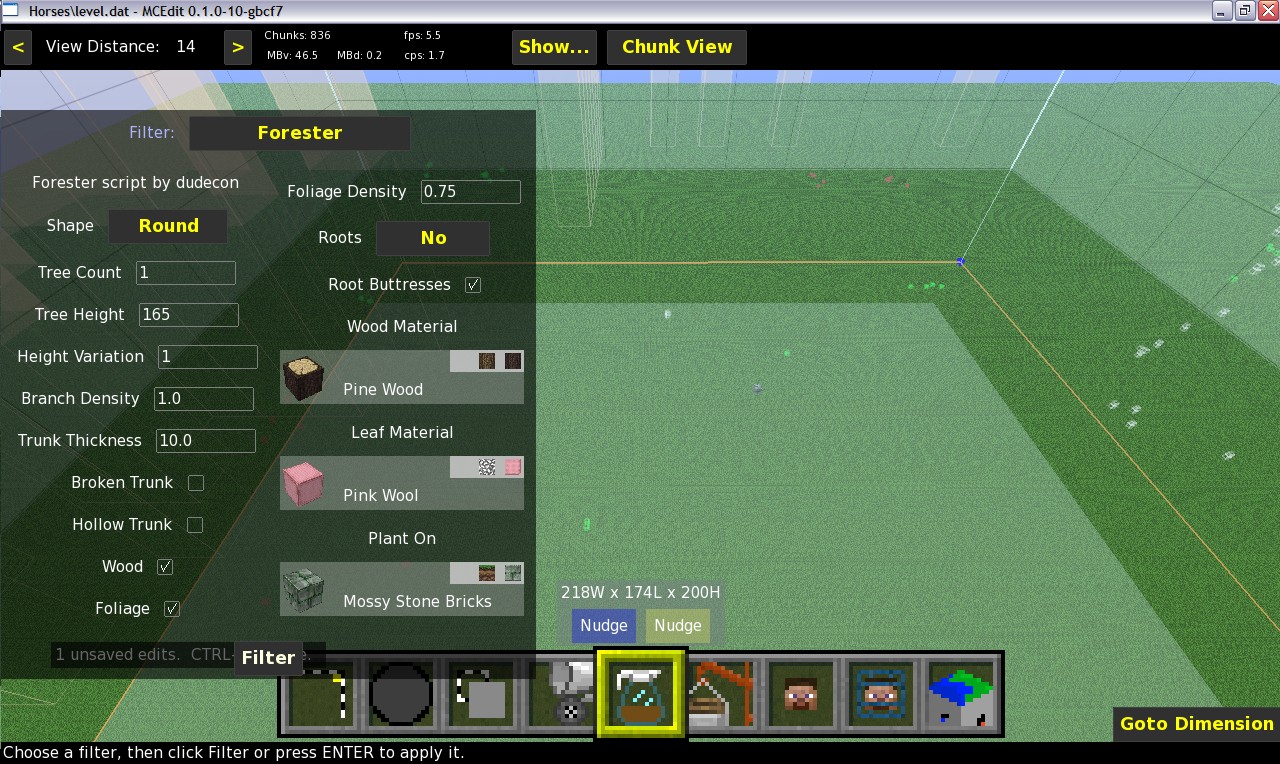
3. Click on the filter tool (Coffee decanter) and click on the selection menu at the top to change to the forester filter. In the picture it shows the option box for how you want your tree/s to be. I tried to make a giant tree, but it didn't work, so eventually settled on a tree around 60 blocks high. I have chosen redwood for the trunk and pink wool for the leaves and most importantly I have chosen to place the tree on a moss stone brick. If you wish for the tree/s to sprout randomly then chose to plant on grass, lily pads for mangrove, or on top of other trees if you like by choosing wood. I have to try and plant one tree, but this is generally unwise because with more tree possibilities, Forester has less of a chance to screw it up and not produce a tree. There are also other options to change such as the shape, branch density and foliage thickness as well as whether you want roots and stuff like that.
4. Click on the Filter option to begin the process. give it a minute, especially if you are planting lots of trees, this could take a while. Its a good time to take a break. Once the filtering is done, save (ctrl+s) and then admire your new tree. If it didn't work, try it again.
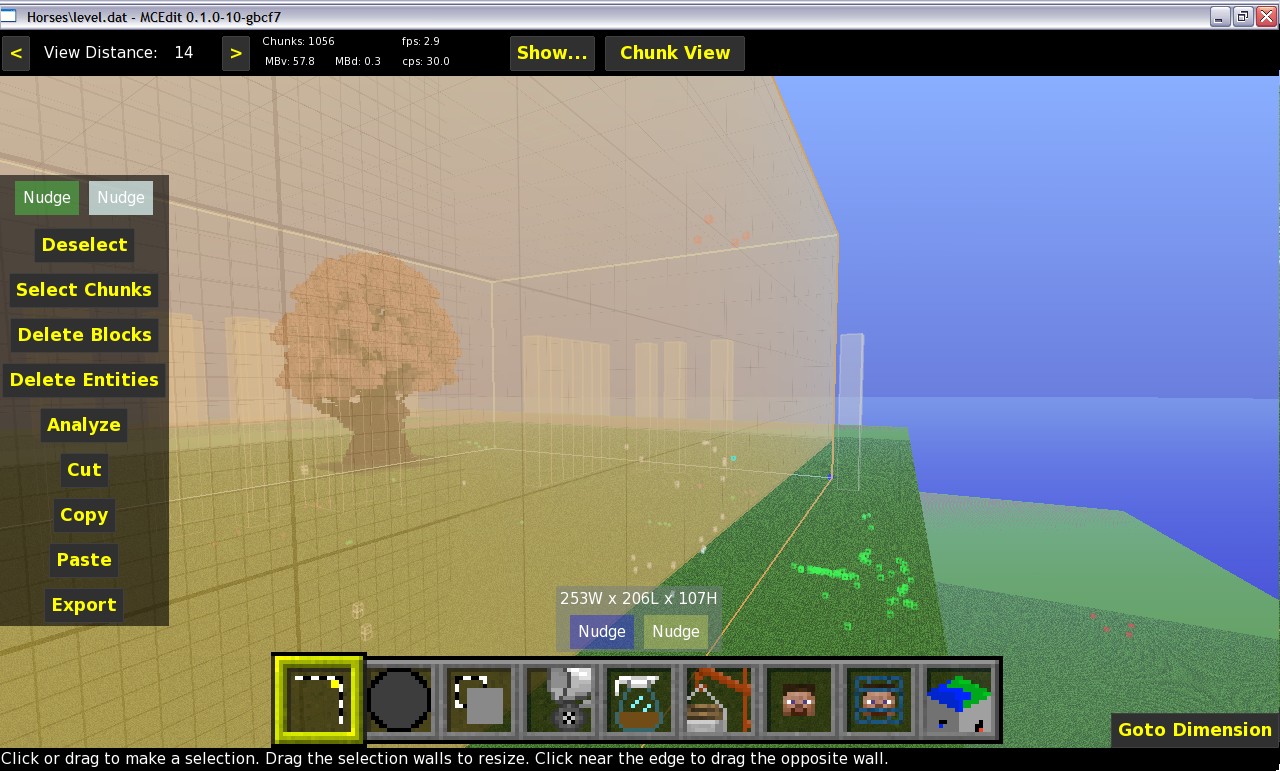
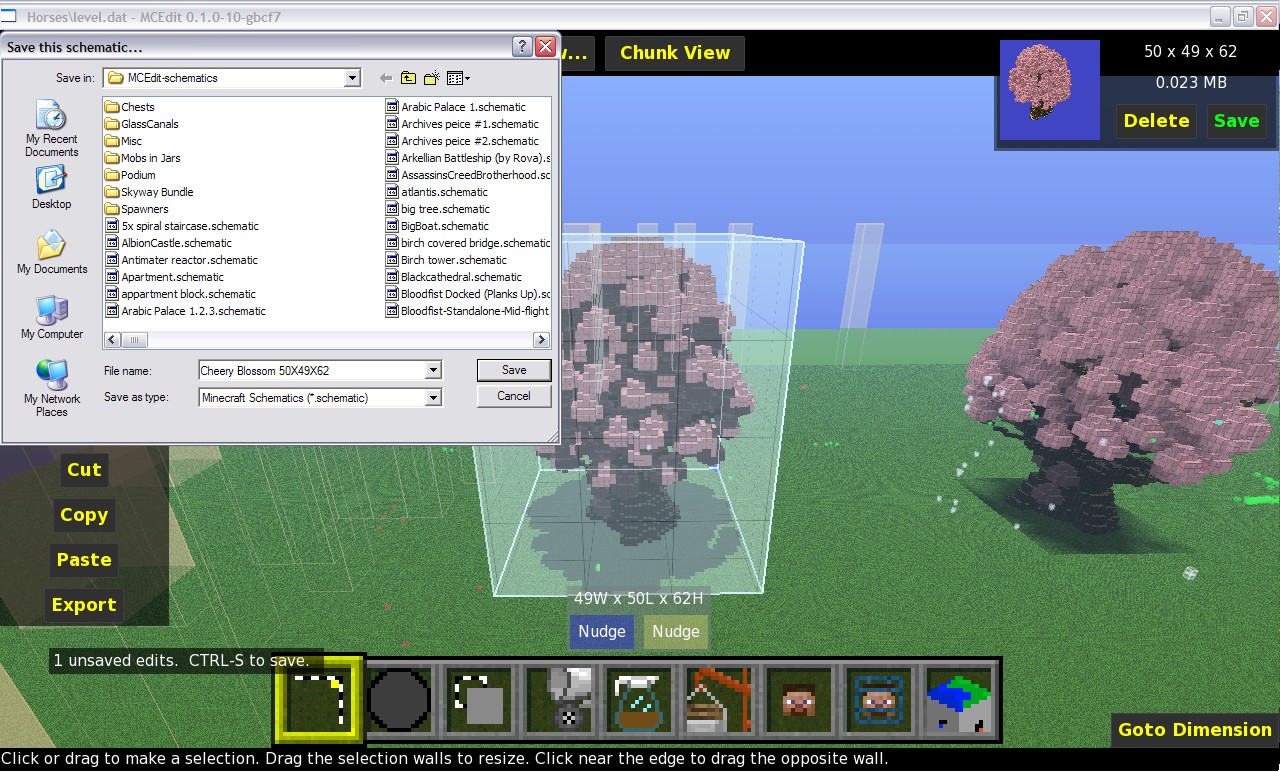
5. The box of selected material around your new tree is unneeded in the next step, so select the walls of the area and pull them in tight to the object. Once only the tree is selected its time to use your new tree. select the Copy option on the left of your screen. Once copied the schematic can be used by selecting the image of the object in the right upper part of your screen. You can also save the schematic to your Schematics folder for future use.
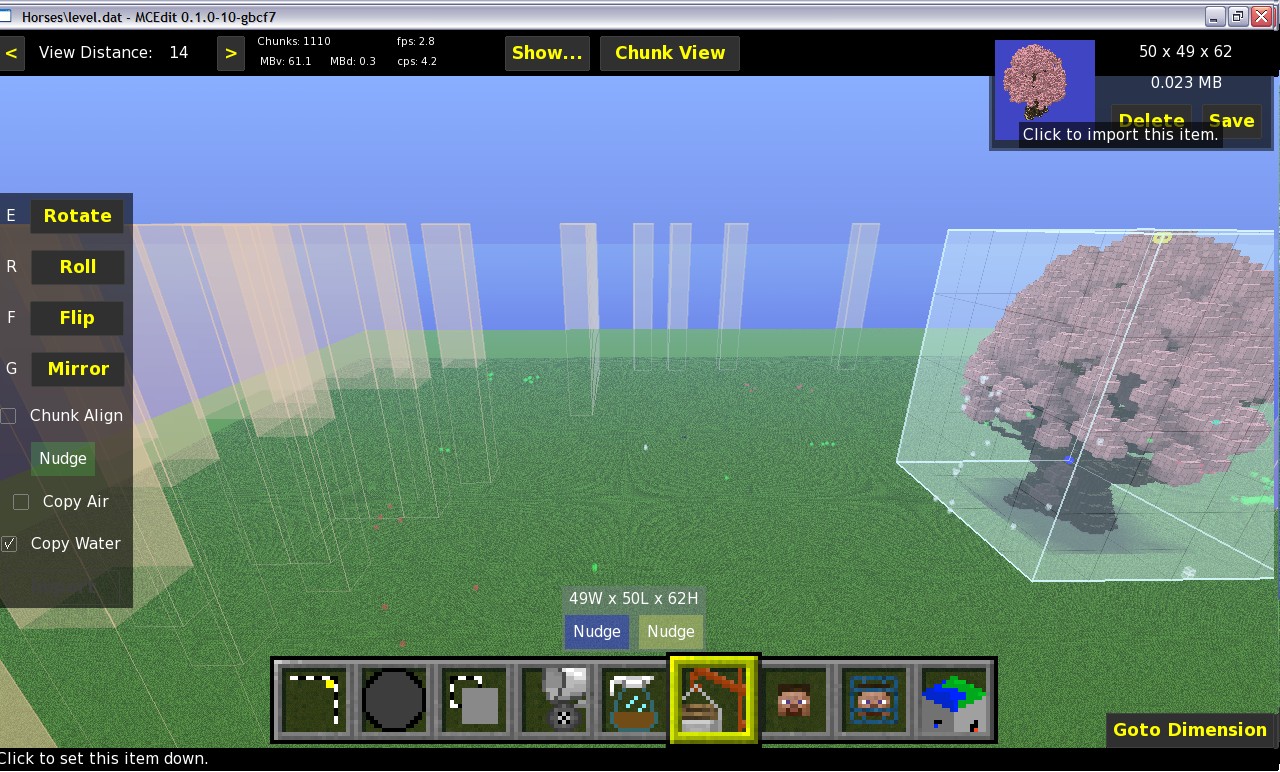
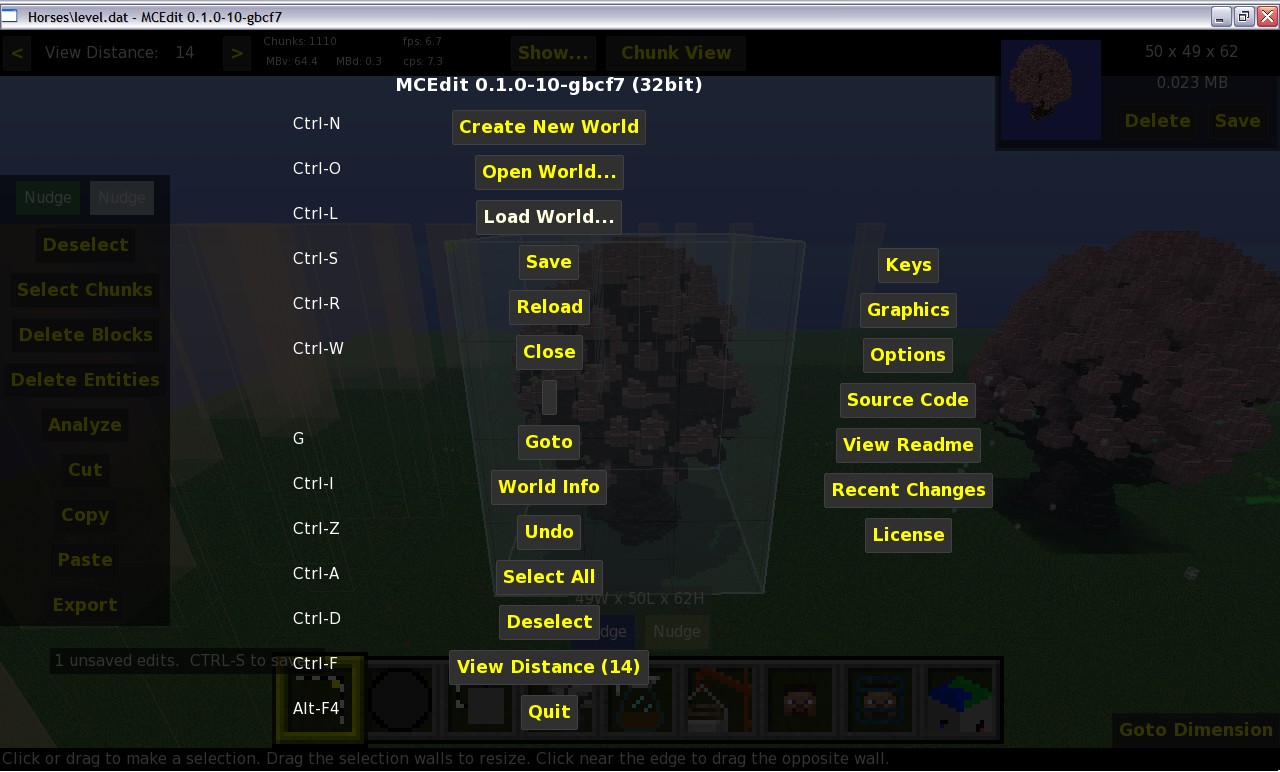
6. Once saved you can open another map and place our new tree by clicking on the image of the item (if you are in the same MCEdit session), or by choosing the import tool on the bottom of the screen and choosing the file.
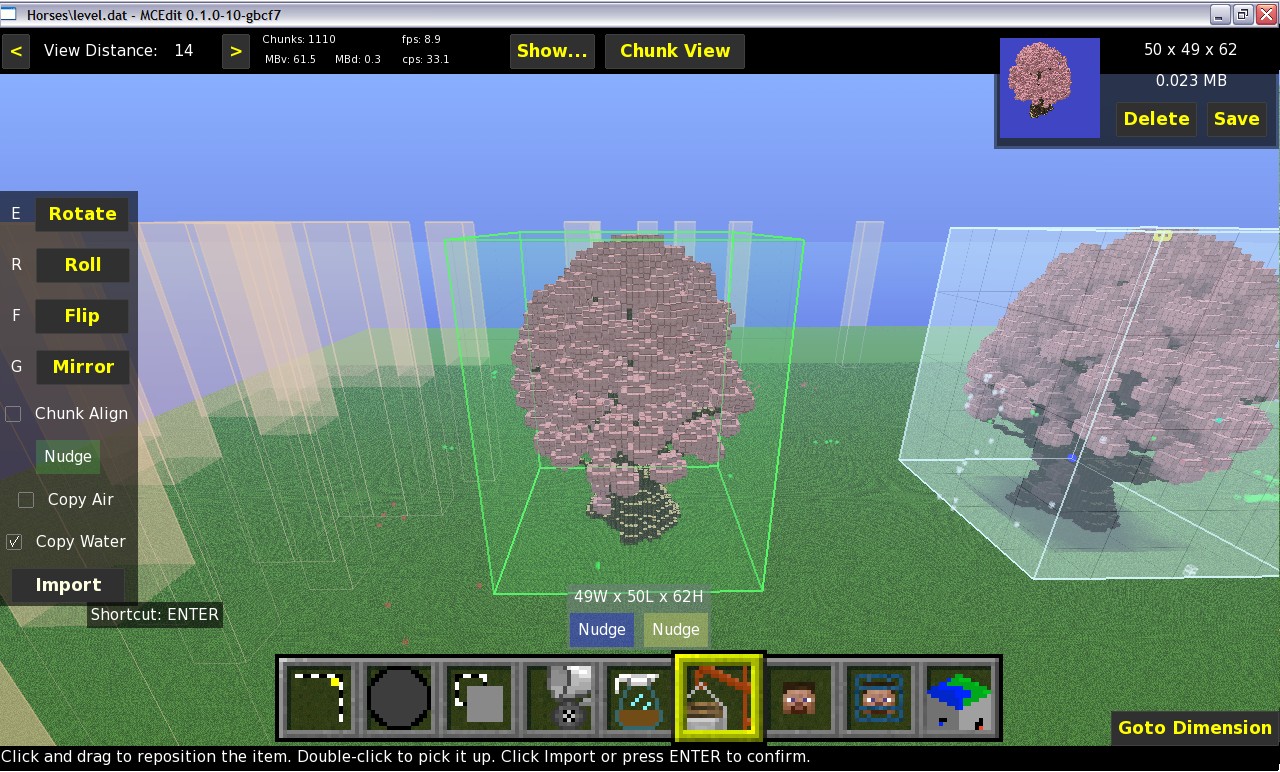
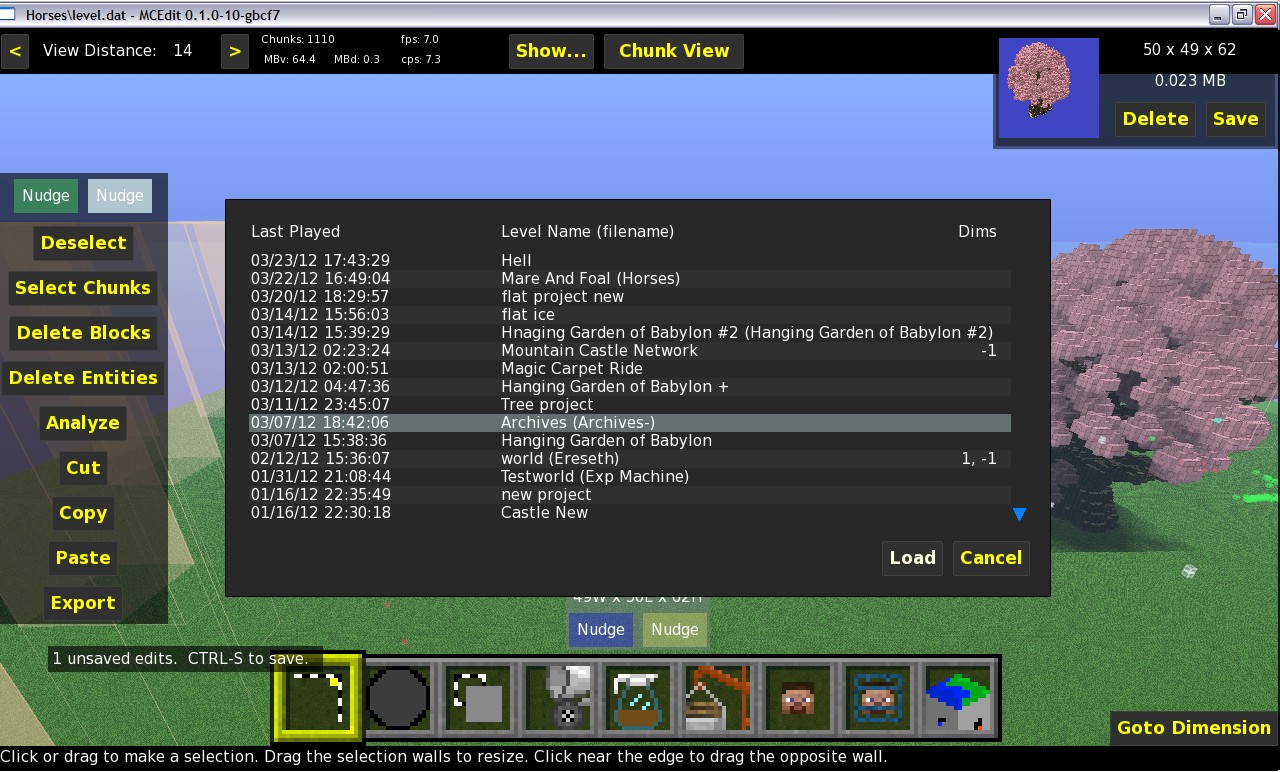
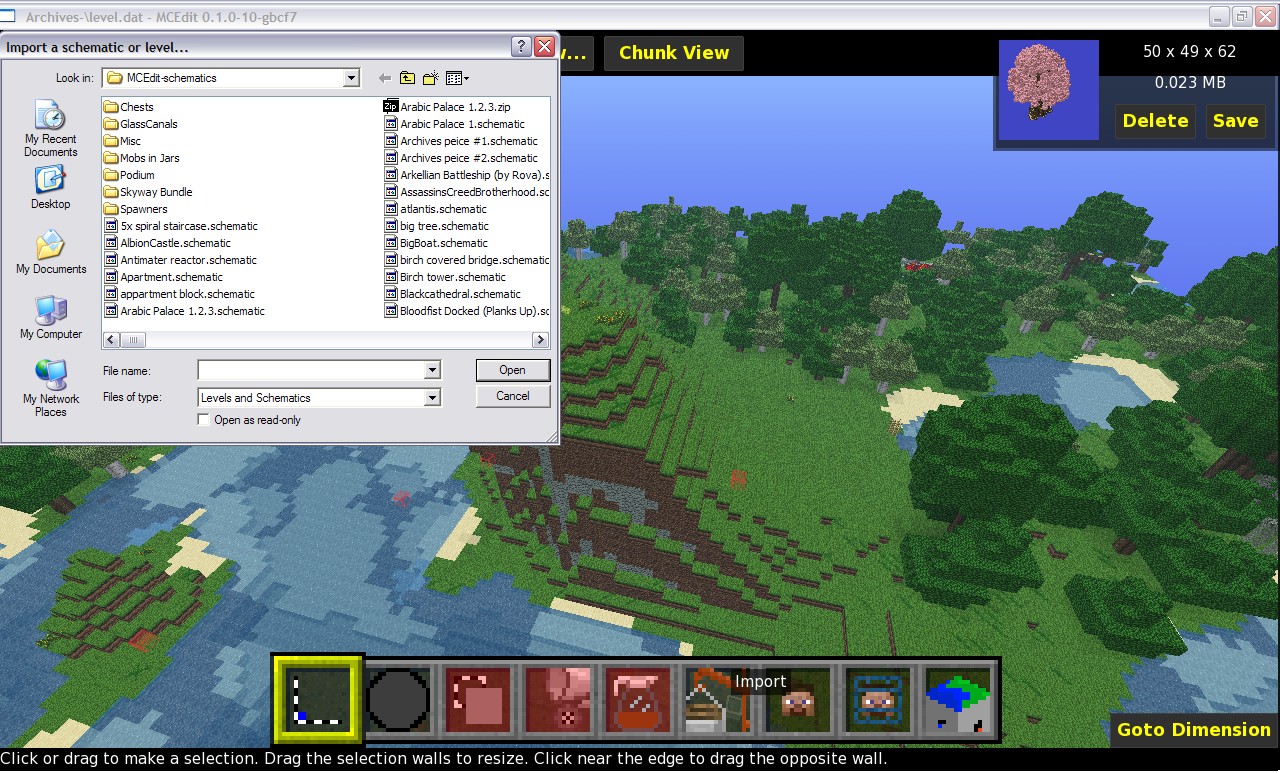
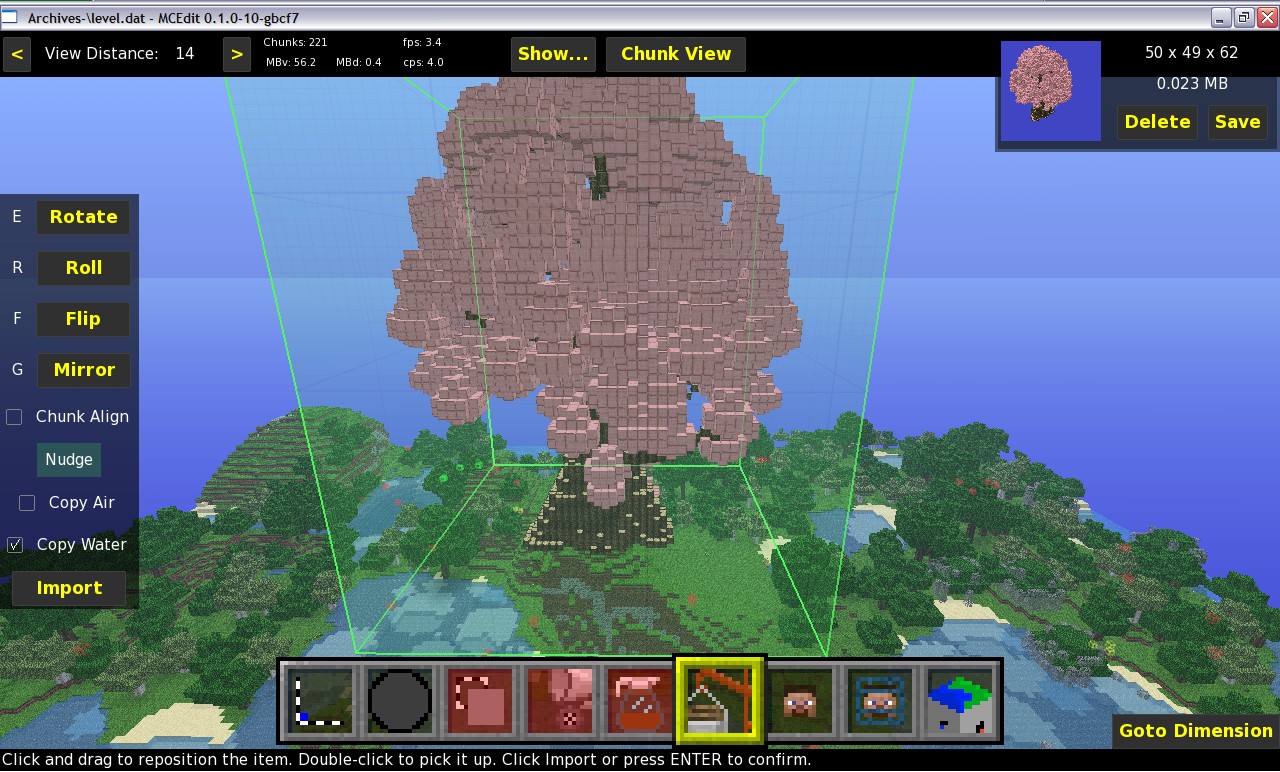
7. In the pictures it shows me pressing ctrl to bring up the options screen, choosing to load a new map and selecting "Archives" to place the tree in. I imported the schematic and placed it on top of a little hill. Once the spot was selected, I used the nudge option to push the object down into place and placed it. Before I did this I made sure that the "import air" option was NOT selected. otherwise the air around the tree would have been imported with it causing the top of the hill to be cut off.
8. Make sure to save and exit MCEdit before opening your map.
Troubleshooting:
DO NOT RUN MCEDIT AND MINECRAFT AT THE SAME TIME.
In fact, if you want everything to run smoothly, have MCEdit be the only program open.
MCEdit is fickle and finicky, so when in doubt save and quit, start it up again and do it over.
Forester is unable to make trees of a specific height (no matter how much I yell at my screen), so try and make batches of several trees in order to get a few that are suitable.
I have included the tree I made as a schematic file as well for people to use :)
The first step is to download MCEdit from here:
github.com/mcedit/mcedit/downloads
Follow along using the slideshow to get an idea of what it all looks like.
1. Start MCEdit by clicking on the .exe file. Open a map you want to work on. I have choosen a flat map for ease as well as for the reason that if MCEdit crashes, it will not destroy a valuable save. Place a 1X1X1 block of a material not found nearby. This is done by selecting a single block and using the fill tool or with the paint tool. I have used white wool in the picture so that you can see it, but I would advise against using wool due to issues I've had in the past with it. I used Mossstone bricks for the actual run of the filter.
2. Use the select tool to select a large area around your block, the bigger the better, but don't go outside of where your map has rendered. Now its time to filter :)
3. Click on the filter tool (Coffee decanter) and click on the selection menu at the top to change to the forester filter. In the picture it shows the option box for how you want your tree/s to be. I tried to make a giant tree, but it didn't work, so eventually settled on a tree around 60 blocks high. I have chosen redwood for the trunk and pink wool for the leaves and most importantly I have chosen to place the tree on a moss stone brick. If you wish for the tree/s to sprout randomly then chose to plant on grass, lily pads for mangrove, or on top of other trees if you like by choosing wood. I have to try and plant one tree, but this is generally unwise because with more tree possibilities, Forester has less of a chance to screw it up and not produce a tree. There are also other options to change such as the shape, branch density and foliage thickness as well as whether you want roots and stuff like that.
4. Click on the Filter option to begin the process. give it a minute, especially if you are planting lots of trees, this could take a while. Its a good time to take a break. Once the filtering is done, save (ctrl+s) and then admire your new tree. If it didn't work, try it again.
5. The box of selected material around your new tree is unneeded in the next step, so select the walls of the area and pull them in tight to the object. Once only the tree is selected its time to use your new tree. select the Copy option on the left of your screen. Once copied the schematic can be used by selecting the image of the object in the right upper part of your screen. You can also save the schematic to your Schematics folder for future use.
6. Once saved you can open another map and place our new tree by clicking on the image of the item (if you are in the same MCEdit session), or by choosing the import tool on the bottom of the screen and choosing the file.
7. In the pictures it shows me pressing ctrl to bring up the options screen, choosing to load a new map and selecting "Archives" to place the tree in. I imported the schematic and placed it on top of a little hill. Once the spot was selected, I used the nudge option to push the object down into place and placed it. Before I did this I made sure that the "import air" option was NOT selected. otherwise the air around the tree would have been imported with it causing the top of the hill to be cut off.
8. Make sure to save and exit MCEdit before opening your map.
Additional Notes
Troubleshooting:
DO NOT RUN MCEDIT AND MINECRAFT AT THE SAME TIME.
In fact, if you want everything to run smoothly, have MCEdit be the only program open.
MCEdit is fickle and finicky, so when in doubt save and quit, start it up again and do it over.
Forester is unable to make trees of a specific height (no matter how much I yell at my screen), so try and make batches of several trees in order to get a few that are suitable.
| Progress | 100% complete |
| Tags |
701286
2


 TryzzMC

 Reer123
 Ultim4teRuffles
 kintsukuroi
Have something to say?