


Updated on Jul 3rd, 2019, 7/3/19 3:14 pm
Published Jun 9th, 2019, 6/9/19 3:21 pm
Published Jun 9th, 2019, 6/9/19 3:21 pm
- 832 views, 1 today
- 0 server score
- 0 Votes this month

5
 | |
| Status | Offline Pinged: 09/14/23 |
| Location | United Kingdom |
| Game Version | Minecraft Java |
| MOTD | §b§lWorld of Nexus |
| Connect With | |
| Players | 0/75 |
| RID | 4321593 |
Official Minecraft Server Guide
Welcome to the official Guide of our Minecraft Server. This guide will explain the philosophy of the server and all its systems. If you are a new member of the community it is highly recommended to read this guide in its fullest.
Prerequisites
To play on this server you have to apply for membership. It is a very easy process with a predefined form to fill out. You can still connect to the server as a Guest without build rights. However, if you sign up we will add you as a member so you get full permissions. To signup please submit a topic here by clicking on

The Spawn
Starting Area | 243 / 68 / -1626
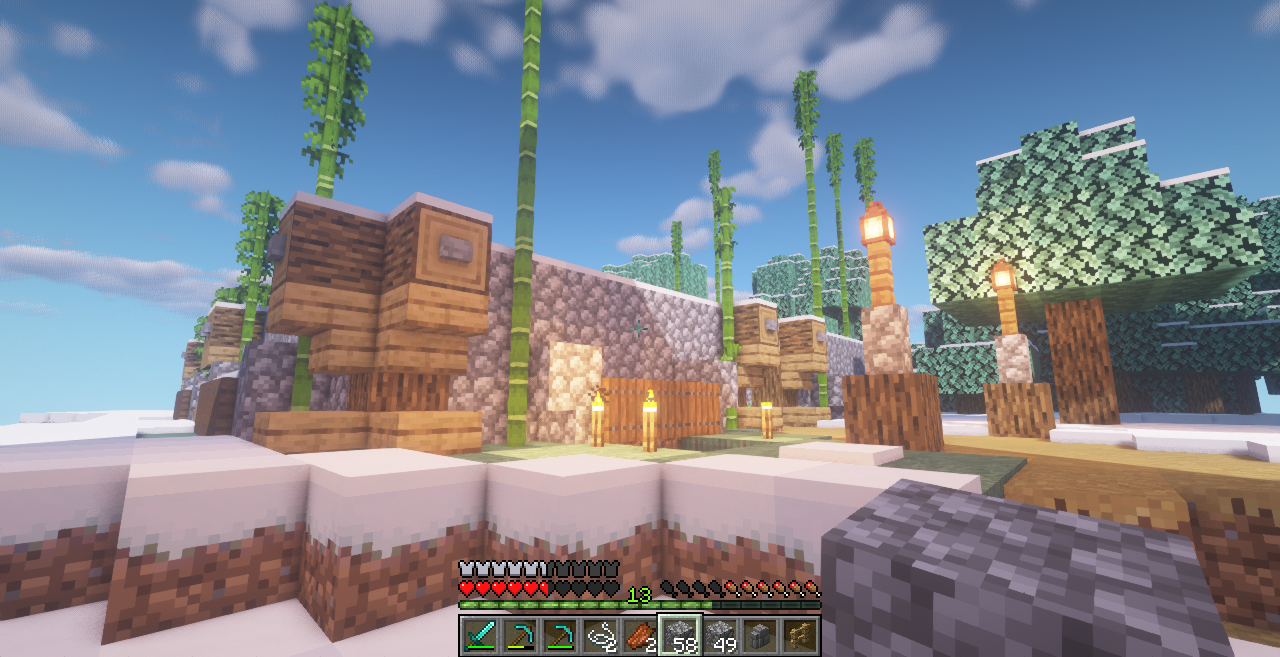
When joining for the first time you will be spawned on the harbor connected to the spawn area. The spawn area consist of snowy beaches, snowy mountains, snowy tiaga, frozen river and snowy tiaga hill biomes. Cold ocean and regular ocean is surrounding it. While walking around spawn you may get a message saying [WoN] Best of luck on your adventure!. This message is sent to the player if they leave the spawn area. However, sometimes when walking over rivers it will also say that you are leaving spawn. For that reason the best rule of thumb is that the spawn area is all land covered in snow. When entering the spawn you get the message [WoN] You are inside the spawn area, only build inside plots..
Map showing spawn (white, yellow and green area) as well as surrounding water (dark blue). Light blue area is part of other continents (no snow). | Harbor and world spawn built by @missjoley. |
Building Inside Spawn
| The starting area or spawn is supposed to be built by the community itself. To make sure there is some sort of order maintained our Game Hosts will setup plots that you can build your houses or stores in. Members may expand the current paths of the spawn, but may not build their own plots. If you can't find a free plot you may contact a Game Host or other online Staff. |
You may only build up to two houses on two free (available) plots. Available house plots will have signs with the text "free house plot" in capital letters. You may also setup a maximum of two different store locations in free (available) shop plots. Shop plots will have signs on them saying "free shop plot" in capital letters. To claim a plot for a house or store you simply remove the signs and start building. You may also replace the signs but this time with your IGN (In-Game Username).
Setting up a store
World of Nexus have its very own custom built plugin for stores. To setup a store you first need to place a sign.
Once a sign is placed you may look at it and type /store create. This will setup the store and the sign will soon be updated with the text [Open Store] followed by your username and then the text trading followed by the last line.If you want to at this stage you can write on the last line what type of items you will trade in the store for example Building Blocks. You may also dye the sign at this stage if you want to.
Updating the store
To update the store you need to enter it by right or left clicking. As the store owner you will first see the row of item slots. These will be empty by default. You will then see a corresponding row of deposit as well as withdraw buttons. To add an item to your store that you want to either sell to other people or let people sell to you, you simply click one of the empty slots. Once you have clicked an empty slot you can click on the "Set sold item to item in hand" button. This will make the item you currently hold in your hand to be the item sold/bought @ your store. You will then see the item in the store if you click on "Go back to store". By clicking on the item slot again you will now see an edit menu. In this menu you can change the following by increasing (green wool) or decreasing (red wool):
- Item selling price (the amount of nexian you get from someone selling to you)
- Item selling amount (the amount they get from each transaction)
- Item buy price (the amount of nexian you are willing to pay for this item)
- Item buy amount (the amount you get from the person selling to your store)
- Item buy limit (this is how much you will buy, if your in stock is higher than this people won't be able to sell more to your store)
Buying from a store and/or selling to a store
To buy from a store you will need some money. Our currency is called nexian or short NEX. To see your current amount of NEX as well as amount of hours you have played you can do /stats.
There are a few different ways to get nexian on the server:
- By playing the game (you get 0.3 nex per minute)
- Making someone /pay you
- Participating in community builds
Gathering Resources
The Community Farm is a Community Building built to give our new and current members a steady supply of fresh food. The coordinates to
the farm is X: 243 and Z: -1626. When exiting spawn harbor you go right and follow the path to find the farm, as shown on the pictures below.
Please replant and take only what you need. Make sure any tree you cut down in the world is fully cut down. We use the plugin called FastLeafDecay by StarTux which will remove all leaves if the surrounding logs are cut.

You are allowed to kill any animals you see that aren't fenced in. Please consider giving the animals some love so they can reproduce.

The Public Mine is a Community Building and is the only mine allowed to be used while in the spawn area. if you want to mine for the first time or while in spawn you have to find the entrance to this mine which is at X: 243 and Z: -1626. To get to the public mine from spawn harbor you exit the harbor and take the first left. You then have to take a right at the statue and take the first left as shown on the pictures below.
The train station is the number one way to escape the spawn to build your own bases or claim villages. It is strongly encouraged to connect your base to one of our railroads going North, South, East and West. We use the plugin called Easy Carts so you can ride faster and also start/stop travelling using left mouse button. You may purchase a minecart at the train station.

Map of Spawn, Community Farm, Public Mine, Train Station and Plots.
Outside spawn
Bases
| You may of course setup a base outside the spawn area. There are certain restrictions to this. The server use a world border that will gradually increase as the server progress. The border will expand 1000 blocks every 500 hours in /totalhours. The /totalhours command display all the playtime from all members of the community. When claiming a base area you should firstly place a block and then post your base coordinates (would be cool if you added screenshots too) in Minecraft Bases. Do not spawn more animals then necessary to prevent lag. Keep the redstone usage at a minimum. No duplicating of objects. Doing the opposite is considering abusing the server's resources and is punishable.  |
Villages
| On this server you are allowed to claim villages. You claim a village by posting the coordinates here. You are not allowed to claim villages inside spawn area. Claimed villages belong to you, and other members are not allowed to raid them. You may only claim one village. | VILLAGES  |
Railroad connection
We strongly encourage you to connect your bases and villages to our railroad so the community may come visit you and also to make it easier for you to come back to spawn and the stores.
Other
Playtime (hours played) will be displayed in TAB as well as amount of players online.
We also have a datapack installed that removes the requirement for everyone on the server to sleep. Just one player is required to sleep, after about 20 seconds the night will turn into day. This will prevent those annoying phantoms from raiding us too much!
We use a lock plugin for chests, furnaces and similar. To use it type /lock. This will activate the locking mode. You may then click the chest/block you're trying to lock. If you want to remove a lock simply do /unlock and click the chest/block you want to unlock. You may use /trust [username] and then click a chest/block to add a user to it. Or alternatively use /untrust [username] to remove a user from your protected chests/blocks.
Read it all? Go ahead and add a like/reaction below so we know you've taken part of the information. Best of luck - and have fun
~ Team behind World of Nexus
| Tags |
tools/tracking
4321593
3
world-of-nexus-survival-server
 ScotsMiser
 prabhath2
 Mr_Chibi
 Hippopotamoss
 Panda_Iceberg
 SculkwolfContent
 Wagnerbaum

 DreamWanderer
 SimAndi
 Krysot
 PaleoTech
 NAD Shipyard
Create an account or sign in to comment.