


0
Welcome again everyone, today I'm going to give you instructions to set up an OpenComputers computer. Most of my work with OpenComputers has been with the "Compact Claustrophobia" modpack, so I'm going to focus on interactions with the other mods available in that ModPack.
The good news is that the basic components of OpenComputers are all made from readily available Minecraft resources, and require nothing more than a Minecraft furnace to build. The bad news is that there are quite a few intermediate components to make, and if you really want to get into OpenComputer, you'll want to work with a mod that provides auto-crafting, and set up all the recipes for transistors and microchips and disk platters and such. Compact Claustrophobia provides both Refined Storage and its mass-storage assistant Reborn Storage, which work excellently.
The other thing you'll need is a source of Redstone Flux (RF) or equivalent power. Compact Claustrophobia comes with both Immersive Engineering (including quests to get you started on using the Thermoelectric Generator) and NuclearCraft (both fission and fusion reactors) The computers don't require a lot of power, I haven't needed anything more than a Thermal Dynamics "leadstone fluxduct" to feed my computers.
So, to the details!
This first set of items you only really need to build once; an external Disk Drive, with a Floppy Disk (OpenOS) install disk, and another blank Floppy Disk for transferring files around. This build will require 11 Iron Ingot, 4 Redstone, 2 Gold Ingot, 10 Paper, 5 Wood Planks, 6 Cobblestone, 1 Clay (Block), 1 Cactus Green (or green dye), and 1 Leather.
The absolute minimum stand-alone computer has the following parts (you'll probably be making quite a few of these)
Computer Case (Tier 1)
Screen (Tier 1)
Keyboard
CPU (Tier 1)
2x Memory (Tier 1)
Hard Disk Drive (Tier 1)
Graphics Card (Tier 1)
EEPROM (Lua BIOS)
This will require you 29 Iron Ingot, 13 Wood Planks, 18 Redstone, 7 Gold Ingot, 7 Paper, 1 Clay (Block), 1 Cactus Green, 1 Glass (Block), 41 Cobblestone, and 1 Leather.
While this Tier 1 computer is just fine for running most programs, the Tier 1 screen is a little bit small, and you can't use your mouse in the editor window.
I recommend that you build at least one of these:
Computer Case (Tier 2)
Screen (Tier 2)
Keyboard
CPU (Tier 2)
2x Memory (Tier 2)
Hard Disk Drive (Tier 1)
Graphics Card (Tier 2)
EEPROM (Lua BIOS)
The Tier 1 Hard Disk Drive gives you 1MB of disk storage, and your OS only takes up 450k or so of that...I haven't needed a Tier 2 disk drive in any of my setups...yet
The Tier 2 computer requires the following resources: 19 Iron Ingot, 17 Gold Ingot, 13 Wood Planks, 1 Clay (Block), 17 Redstone, 7 Paper, 1 Glass (Block), 2 Cactus Green, 1 Lapis Lazuli, 1 Rose Red, 41 Cobblestone, and 1 Leather.
Now that you have all your parts built, let's make your first computer!
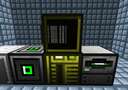
Place the Case block on the ground so that a power source touches the back. Place the Screen block on top of it, attach the Keyboard to the side of the Screen, and place the (Floppy) Disk Drive to the left or right of the Case.
Right click on the Disk Drive to open its GUI, and place the OpenOS floppy in the slot.
Right-click on the case to enter its GUI. Lua BIOS EEPROM goes in the space to the left of the power button, and the Graphics Card, CPU, Memory, and Hard Disk Drive all go into the slots to the right with the corresponding images on them. (Also note, for future builds, that the slot will also show you the maximum Tier that can be placed there)
That's it for construction, press the power button and exit the GUI...after some beeping and gronking, the screen should soon show the "OpenOS 1.7.5" message of the day, and your command prompt. Right-Click on the screen to focus to the window and activate the (virtual) keyboard.
The first command you'll want to type is "install" -- this will install the OS onto the internal Hard Disk Drive of your computer. After installation is complete, press 'Y' to reboot the computer, which will then reboot from the HDD, and then you can break and store the external Disk Drive.
Now you can make, and run, your first program, the illustrious "Hello World": Type into the command line "edit hello.lua" to bring up the editor.
Type 'print("Hello World!")' into the editor, and press ctrl-S to save and ctrl-W to exit.
Typing "hello" into the command line will execute the hello.lua program you just wrote, which should print "Hello World!" to the screen!
Yay! Your first OpenComputer computer and program! May it be the first of many for you!
In my next blog post, I'll be doing a quick overview of the Lua programming language. See you then!
The good news is that the basic components of OpenComputers are all made from readily available Minecraft resources, and require nothing more than a Minecraft furnace to build. The bad news is that there are quite a few intermediate components to make, and if you really want to get into OpenComputer, you'll want to work with a mod that provides auto-crafting, and set up all the recipes for transistors and microchips and disk platters and such. Compact Claustrophobia provides both Refined Storage and its mass-storage assistant Reborn Storage, which work excellently.
The other thing you'll need is a source of Redstone Flux (RF) or equivalent power. Compact Claustrophobia comes with both Immersive Engineering (including quests to get you started on using the Thermoelectric Generator) and NuclearCraft (both fission and fusion reactors) The computers don't require a lot of power, I haven't needed anything more than a Thermal Dynamics "leadstone fluxduct" to feed my computers.
So, to the details!
This first set of items you only really need to build once; an external Disk Drive, with a Floppy Disk (OpenOS) install disk, and another blank Floppy Disk for transferring files around. This build will require 11 Iron Ingot, 4 Redstone, 2 Gold Ingot, 10 Paper, 5 Wood Planks, 6 Cobblestone, 1 Clay (Block), 1 Cactus Green (or green dye), and 1 Leather.
The absolute minimum stand-alone computer has the following parts (you'll probably be making quite a few of these)
Computer Case (Tier 1)
Screen (Tier 1)
Keyboard
CPU (Tier 1)
2x Memory (Tier 1)
Hard Disk Drive (Tier 1)
Graphics Card (Tier 1)
EEPROM (Lua BIOS)
This will require you 29 Iron Ingot, 13 Wood Planks, 18 Redstone, 7 Gold Ingot, 7 Paper, 1 Clay (Block), 1 Cactus Green, 1 Glass (Block), 41 Cobblestone, and 1 Leather.
While this Tier 1 computer is just fine for running most programs, the Tier 1 screen is a little bit small, and you can't use your mouse in the editor window.
I recommend that you build at least one of these:
Computer Case (Tier 2)
Screen (Tier 2)
Keyboard
CPU (Tier 2)
2x Memory (Tier 2)
Hard Disk Drive (Tier 1)
Graphics Card (Tier 2)
EEPROM (Lua BIOS)
The Tier 1 Hard Disk Drive gives you 1MB of disk storage, and your OS only takes up 450k or so of that...I haven't needed a Tier 2 disk drive in any of my setups...yet
The Tier 2 computer requires the following resources: 19 Iron Ingot, 17 Gold Ingot, 13 Wood Planks, 1 Clay (Block), 17 Redstone, 7 Paper, 1 Glass (Block), 2 Cactus Green, 1 Lapis Lazuli, 1 Rose Red, 41 Cobblestone, and 1 Leather.
Now that you have all your parts built, let's make your first computer!
Place the Case block on the ground so that a power source touches the back. Place the Screen block on top of it, attach the Keyboard to the side of the Screen, and place the (Floppy) Disk Drive to the left or right of the Case.
Right click on the Disk Drive to open its GUI, and place the OpenOS floppy in the slot.
Right-click on the case to enter its GUI. Lua BIOS EEPROM goes in the space to the left of the power button, and the Graphics Card, CPU, Memory, and Hard Disk Drive all go into the slots to the right with the corresponding images on them. (Also note, for future builds, that the slot will also show you the maximum Tier that can be placed there)
That's it for construction, press the power button and exit the GUI...after some beeping and gronking, the screen should soon show the "OpenOS 1.7.5" message of the day, and your command prompt. Right-Click on the screen to focus to the window and activate the (virtual) keyboard.
The first command you'll want to type is "install" -- this will install the OS onto the internal Hard Disk Drive of your computer. After installation is complete, press 'Y' to reboot the computer, which will then reboot from the HDD, and then you can break and store the external Disk Drive.
Now you can make, and run, your first program, the illustrious "Hello World": Type into the command line "edit hello.lua" to bring up the editor.
Type 'print("Hello World!")' into the editor, and press ctrl-S to save and ctrl-W to exit.
Typing "hello" into the command line will execute the hello.lua program you just wrote, which should print "Hello World!" to the screen!
Yay! Your first OpenComputer computer and program! May it be the first of many for you!
In my next blog post, I'll be doing a quick overview of the Lua programming language. See you then!
| Tags |
tools/tracking
5791688
6
basics-of-opencomputers-construction-and-operation


 ExtremeGames
 Hazem-chan
 Escapazition
 Sofia Silenttree
 BlissyMissy
 VersedRhyme41
Create an account or sign in to comment.