


Published Jul 28th, 2019, 7/28/19 2:23 pm
- 6,769 views, 7 today
- 52
- 32
- 13

171


First of all, we are going to take dimensions of the actual aicraft and measure it. I'm going to take the KLM 787-9 which can be seen in my profile.
- How to Scale?
- Applying the dimensions
Example:

*Note: for getting more accurate shapes, you can use the spritecraft program, take the blueprint (exactly cut from where the nose starts till the tail ends), insert in the gap of "max width" the width of blocks you want the picture to be, which is the total length of the aircraft in blocks, in this case, 94 blocks.
Checklist for planning
---->From above:
-Fuselage shape
-Wings
-Engine position
-Horizontal stabilizers
-Landing gear(s) position
---->From a side:
-Fuselage shape
-Doors
-Vertical stabilizer
-Wingbox (optional)
-Engine height (optional)
---->From the front:
-Fuselage shape from the front (circle or oval)

What is layering?
This is basically building the plane nose and tail by layers (looking from the front).
The layers and blocks have to be smooth, and dont colide with eachother, just like a curve but in minecraft. This is how the final result should be:

How do I know if my layering is good?
You simply have to see if it flows and it's smooth, for example you should follow a pattern in which the amount of blocks increases or decreases.
Example:


The "hardest" part for some people...
This might be the hardest part of building a plane for some people, because wings have a lifting shape, with a lot of curves included and seem to be very difficult to properly make by most of people which don't use a specific method. The technique I'm going to show you is pretty easy and effective, almost erfotless when you already dominate layering.
What's the method for the wings?
My method is very simple. It consists of basically making a front plan of the wing and then stacking it over the above-plan I made in the first step. After this, we just manually cut the wing to the shape of this plan, following it. Finally, we modify our result adding layering effects to it.
1) Front plan

2) Cut the shape

3) Layering and details

---> Repeat same process with horizontal stabilizers

How to make the engines?
Layering, layering, layering... It's all about that. Once you get the dimensions of the engine, (width, height, length), you can start building it following those dimensions so you get it accurate. After getting the shape of it you can add some details to make it look better.
Don't forget to look to the real engines from different angles while building, you don't want to get the shape of the pylon wrong (there are many types of them) or the engine itself.


How shall I start? How do I know how it is?
If you decide to make an interior on your aircraft (which most people don't lol) the first thing to do is pick an airline, since every single airline puts the seats and organises their interiors however they want.
After that, you have to look up the seatplan from the respective airline and aicraft, and real pictures of each class (business, first, economy) so you know what to actually build.
1) Seat plan
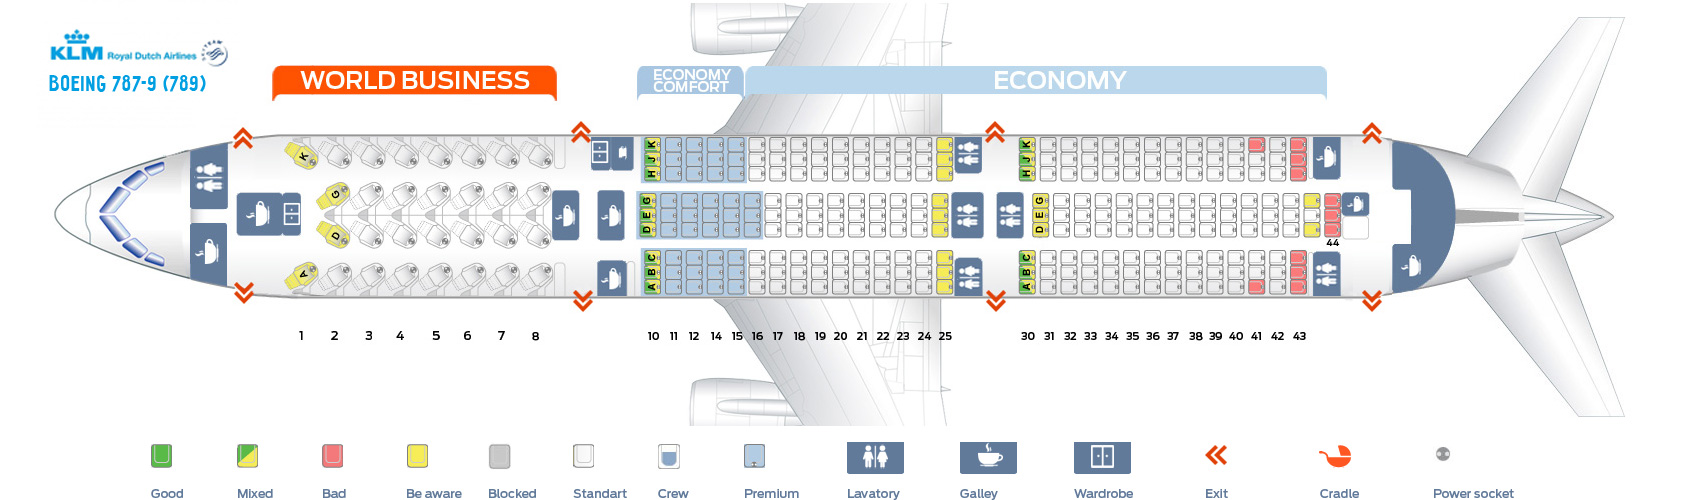
2) Real pictures of each class (First, Business, Economy)
*In this case, with the KLM 787-9 there's only Business and Economy.

3) Start building

4 - Optional) Landing gear bay
This is optional, because whenever the plane is in flight or not, the door will be closed, but you can do it if you wish.

5) Cockpit
I normally use fence doors as yokes, and banners for the seat's rearmost


In this part you basically have to add details, buttons, levers, wires, antennas on top of the fuselage, lights, etc...


Special thanks to Pilot, for helping me with the aircraft.
| Credit | Pilot, Fidi |
| Tags |
4343757
6


 MaximusPrime23
 8ez404
 ScotsMiser
 MegaMinerDL

Create an account or sign in to comment.
Might actually make planes now lmao