

• 2/10/14 9:58 pm
- 1.2k views • 0 today
- 10
- 1
- 4

198
Hello there, I'm Rihawk and today I am addressing the questions many people, friends and acquaintances alike, have asked me...
..."How are skins going to be different in 1.8?" and "How do you make them?"
Well, to be quite honest the answers are rather simple. Lets start with the former question:
How are skins changing in 1.8?
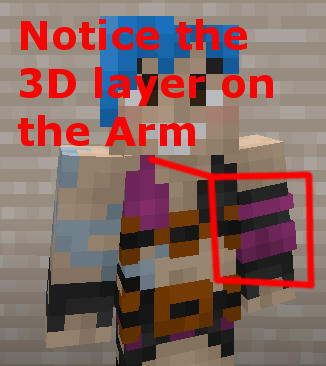
To start off, as of the current snapshots, each skin now has the capability to have an extra, 3D layer for each and every body part, which acts the same as the "hat" layer on the head, as seen in the following image:
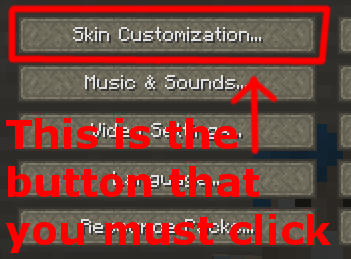
Each player will also have the ability ingame to turn off (or on) said layers whenever they want and these options will be exclusive to the player's skin. This opens up opportunities for great roleplay, for example, now you can throw off your gloves before you get into a fist fight during a hockey game without removing your entire team's gloves from your perspective. These options can be accessed from the options menu, shown in the image below:
...The final addition being made to skins which you may or may not have noticed in the first picture above is now each limb will be have to be textured seperately. Prior to the 1.8 snapshots, only one arm and one leg needed to be textured and they would just be mirrored ingame. Now each limb has its own designated spot in the skin file, which then segways us into our second question:
How does one go about making a skin for 1.8?
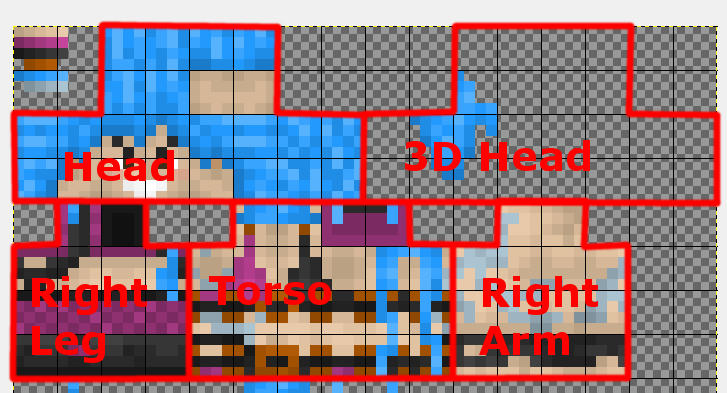
First things first, correct me in the comments if i'm wrong, but i'm pretty positive that there are no skin programs out yet which work for 1.8 skin formats so if thats what you use to make skins, you may be out of luck. I however, use Gimp, a free program which is similar to Photoshop. If you have either of these programs, or something similar, then you can start creating your new skin for 1.8. To begin, you need to make make a new file that is 64 by 64 pixels, or if you updating an old skin, just resize the canvas size to 64 by 64 pixels. Now that we have the image size correct, we can get to the fun part. The top half of the skin is the same as any 1.7.x or lower formatted skin, which is divided up like so:
The bottom half is a little more tricky as it contains the left arm and leg, whose textures are a not completely opposite to the right ones. But before we get to those here is the layout:
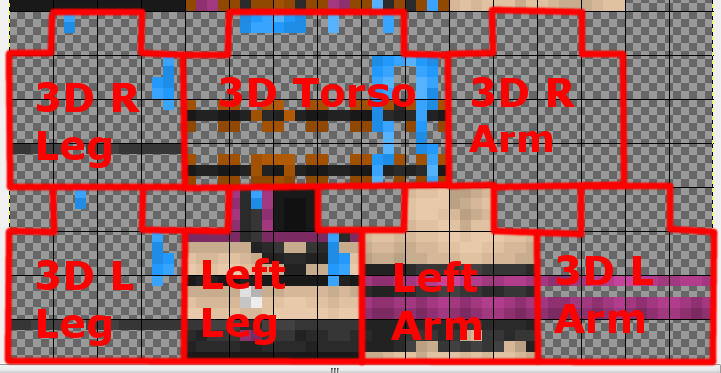
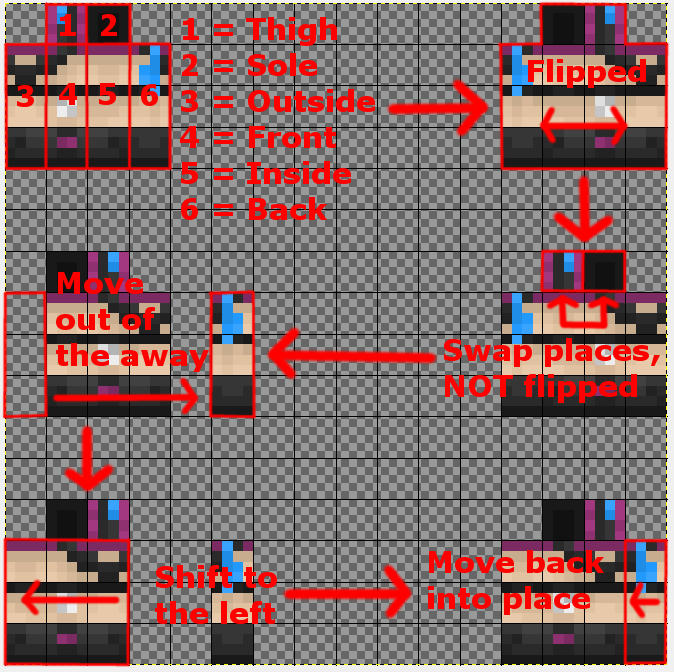
So the 3D parts of the right arm, leg and the torso, are easy as the just go directly beneath their corresponding non-3D parts. But the Left limbs are a little trickier. The mapping for them isn't just a flipped right arm or leg, there are more steps to it. I dont know about you guys as skinning may be new to you so this may all be confusing, but I see this as the easiest way to texture them. You begin by just making the texture for the left leg or arm just like you would for the right sides, in order from left to right, make the texture for the outside of the limb, then the front, then the inside, then finally the back in a way that looks like it could wrap around into which ever limb you are making. Once you are done making the texture, select it all, including the sole and thigh or palm and shoulder(or whatever you wish to call them, the little 4 by 4 pixel squares above the limb) and use a flip tool to flip the selection horizontally. Next you want to cut and paste the palm and shoulder so they are in their original places but now they will have their textures flipped. Now you only have three more steps, select the limb's back 12 by 4 pixel texture (which is now on the far left), and cut and paste it into an empty space on the skin, select the rest of the three sides and shift them over the the left four pixels, then cut the back texture you moved earlier and paste it directly on the right side of the three others sides which were just shifted over.
Whew! Much long, Very wall, Such text. Here is an image showing the procedure:
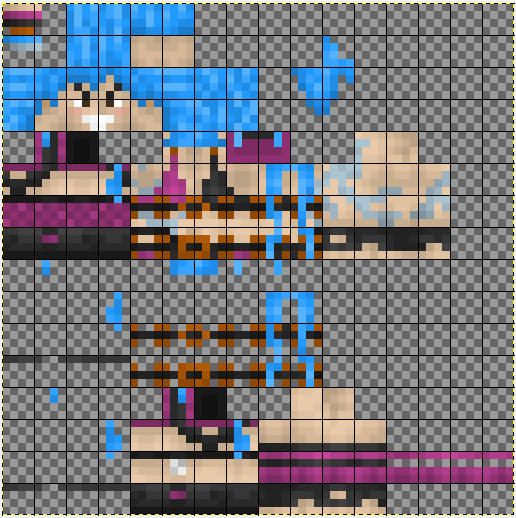
And hopefully your skin should look like this now:
Well, there you go guys, you are now officially done creating your new minecraft 1.8 skin! If you have any questions about something that I did not explain, then please ask donw below, as I know for a fact I most likely missed something.
Thanks Guys.
..."How are skins going to be different in 1.8?" and "How do you make them?"
Well, to be quite honest the answers are rather simple. Lets start with the former question:
How are skins changing in 1.8?
To start off, as of the current snapshots, each skin now has the capability to have an extra, 3D layer for each and every body part, which acts the same as the "hat" layer on the head, as seen in the following image:
Example of 3D Layer
Each player will also have the ability ingame to turn off (or on) said layers whenever they want and these options will be exclusive to the player's skin. This opens up opportunities for great roleplay, for example, now you can throw off your gloves before you get into a fist fight during a hockey game without removing your entire team's gloves from your perspective. These options can be accessed from the options menu, shown in the image below:
Menu Location
...The final addition being made to skins which you may or may not have noticed in the first picture above is now each limb will be have to be textured seperately. Prior to the 1.8 snapshots, only one arm and one leg needed to be textured and they would just be mirrored ingame. Now each limb has its own designated spot in the skin file, which then segways us into our second question:
How does one go about making a skin for 1.8?
First things first, correct me in the comments if i'm wrong, but i'm pretty positive that there are no skin programs out yet which work for 1.8 skin formats so if thats what you use to make skins, you may be out of luck. I however, use Gimp, a free program which is similar to Photoshop. If you have either of these programs, or something similar, then you can start creating your new skin for 1.8. To begin, you need to make make a new file that is 64 by 64 pixels, or if you updating an old skin, just resize the canvas size to 64 by 64 pixels. Now that we have the image size correct, we can get to the fun part. The top half of the skin is the same as any 1.7.x or lower formatted skin, which is divided up like so:
Prior 1.8 Skin
The bottom half is a little more tricky as it contains the left arm and leg, whose textures are a not completely opposite to the right ones. But before we get to those here is the layout:
1.8 Skin New
So the 3D parts of the right arm, leg and the torso, are easy as the just go directly beneath their corresponding non-3D parts. But the Left limbs are a little trickier. The mapping for them isn't just a flipped right arm or leg, there are more steps to it. I dont know about you guys as skinning may be new to you so this may all be confusing, but I see this as the easiest way to texture them. You begin by just making the texture for the left leg or arm just like you would for the right sides, in order from left to right, make the texture for the outside of the limb, then the front, then the inside, then finally the back in a way that looks like it could wrap around into which ever limb you are making. Once you are done making the texture, select it all, including the sole and thigh or palm and shoulder(or whatever you wish to call them, the little 4 by 4 pixel squares above the limb) and use a flip tool to flip the selection horizontally. Next you want to cut and paste the palm and shoulder so they are in their original places but now they will have their textures flipped. Now you only have three more steps, select the limb's back 12 by 4 pixel texture (which is now on the far left), and cut and paste it into an empty space on the skin, select the rest of the three sides and shift them over the the left four pixels, then cut the back texture you moved earlier and paste it directly on the right side of the three others sides which were just shifted over.
Whew! Much long, Very wall, Such text. Here is an image showing the procedure:
Left limb Procedure
And hopefully your skin should look like this now:
Full 1.8 Skin
Well, there you go guys, you are now officially done creating your new minecraft 1.8 skin! If you have any questions about something that I did not explain, then please ask donw below, as I know for a fact I most likely missed something.
Thanks Guys.
1 Update Logs
Update #1 : by Rihawk 02/10/2014 10:09:27 pmFebruary 11, 2014 @ 3:09 am UTC
added a title picture
More like this

 VGDoesMC
 GoldBat18
 KingNorfe
![Everything In 1.8 [Tutorial] Minecraft Blog](https://static.planetminecraft.com/files/resource_media/screenshot/1433/yummysnapshotphoto8013219_thumb.jpg)
 DboyGaming
 TheMinerFromHell
1905759
6
![Skinning for 1.8? How does one do? [Tutorial] Minecraft Blog](https://static.planetminecraft.com/files/resource_media/screenshot/1407/title975_thumb.jpg)





Have something to say?