


- check_circle Advancements
- check_circle Functions
- 3,781 views, 4 today
- 360 downloads, 0 today

23
ML Block Editor For Minecraft 1.20.4+
The ML Block Editor provides tools to make building in Minecraft easier.
Features:
Here are the steps to install the data pack and the resource pack (contained in the zip file download):
- Step 1: Unzip the MLBlock.zip file in your downloads folder.
- Step 2: Place the ml_block and ml_ces folders into your Minecraft world's datapacks folder.
- Step 3: Place the resources.zip file into the main directory of your Minecraft world if you want textured items, but the resource pack is not required.
***
# Editor Setup: First Steps
- You must first run this function to be an editor for the Block Editor System:
/function ml_block:editor
- Once you receive the MLBlock System item, place it in a safe 1-wide by 3-high space to initialize the system.
- After you receive the editor items, you can select an area that you want to edit, or use the Block Painter item.
***
- To access the main settings for the Block Editor system, select the Block Editor Settings item and right-click. From the menu, you can edit the main settings, as well as access the Block Editor and and Paint Settings menus.
***
# Editor Actions:
- Fill: The fill action will fill the selection area with the set block type.
- Clone: The clone action will copy the selection area to a target area.
- Rotate: The rotate action will rotate the selection area around a pivot point.
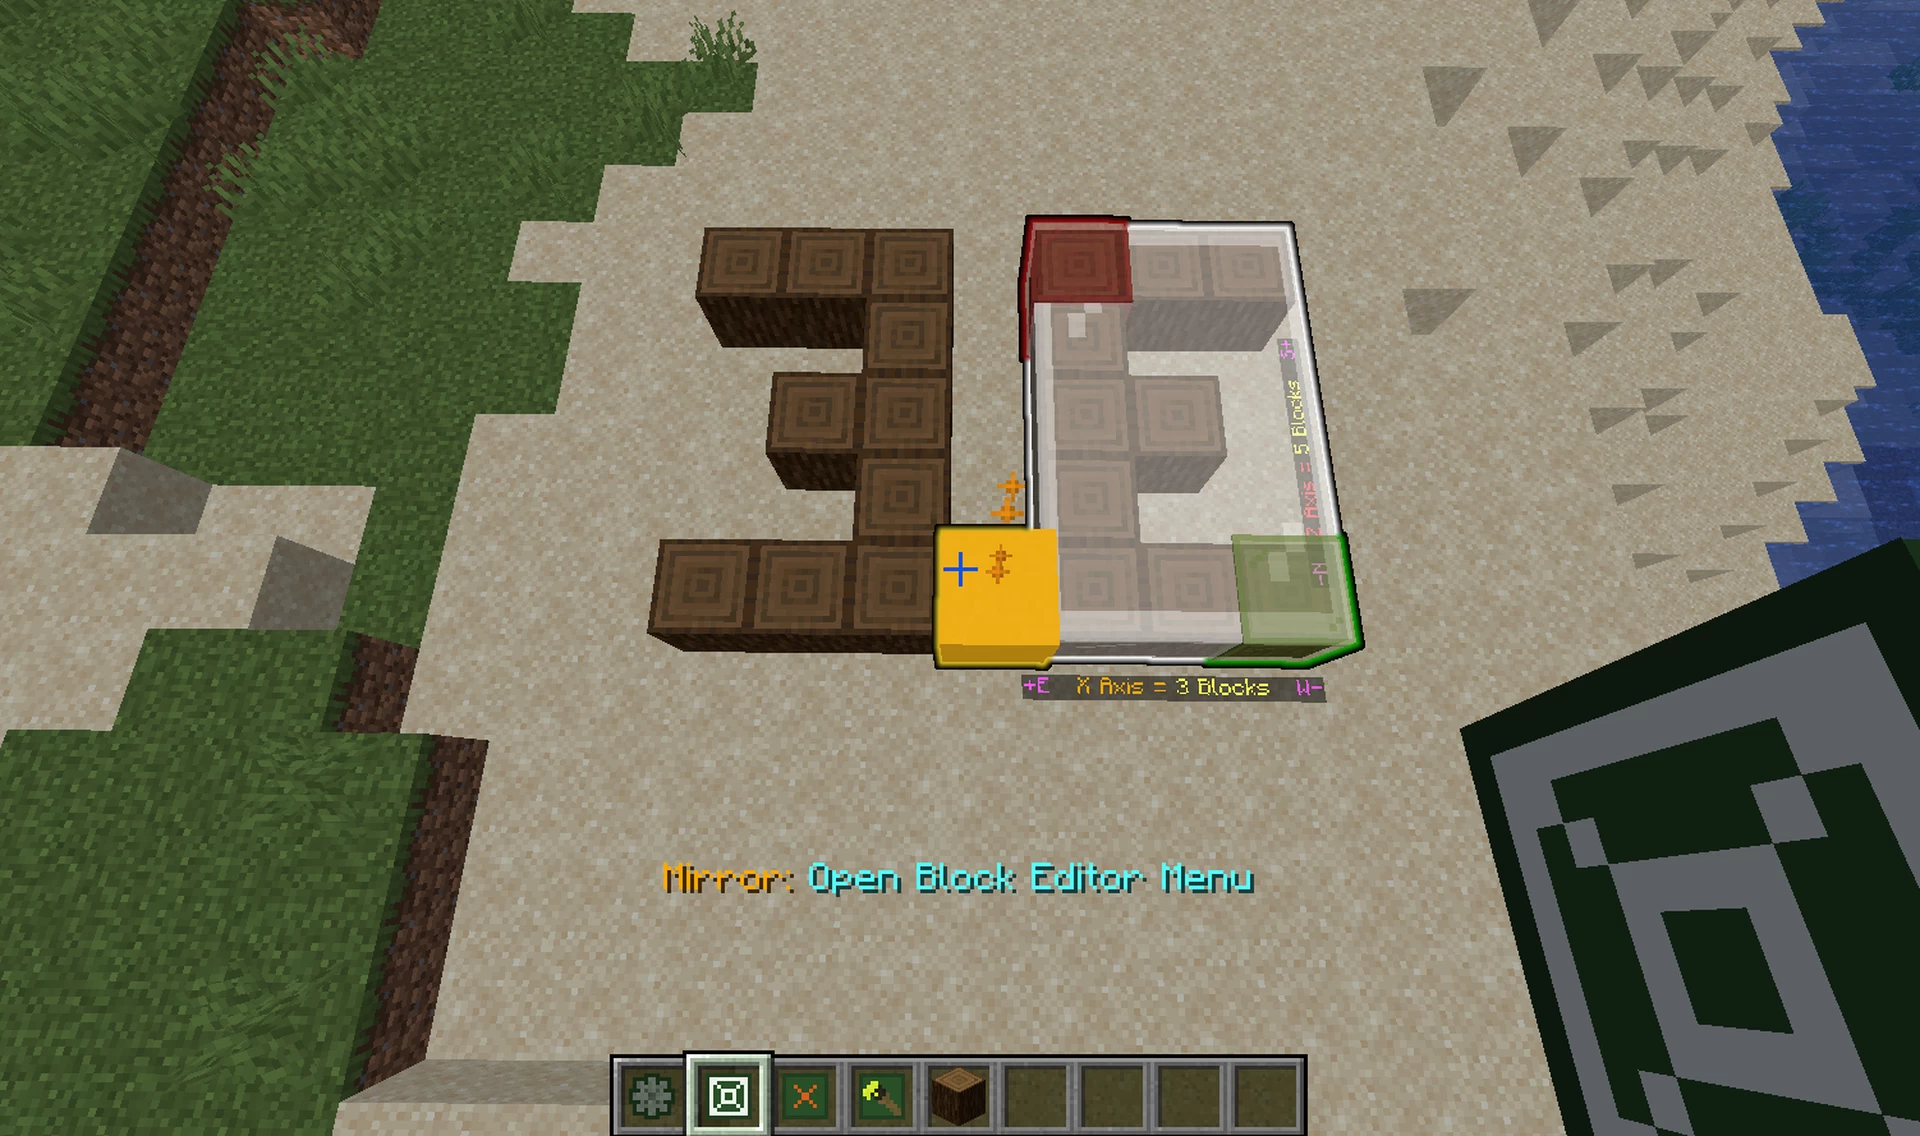
- Mirror: The mirror action will mirror the selection area along an edge.
- Stack: The stack option will duplicate the selection area 1 or more times along an axis.
***
# Selection Area:
- Click the [Selection] option from the Block Editor menu to edit the size and position of the selection area. You can manually decrease or increase each axis separately, or expand/contract the selection area. You can also hide the selection display, and see the total block count within the selection area.
***
# Commands:
- Click the [Commands] option from the Block Editor menu to get various commands that you can run on the selection or target areas.
***
# Shift:
- Click the [Shift] option from the Block Editor menu to shift all the blocks in the selection area in a certain direction.
- Select the Shift Amount, which determines how many blocks to shift the entire selection area by.
- Then click a left or right arrow for the desired Axis to execute the shift.
***
# Painting:
- The Block Painter item allows you to paint with a certain block type to change the blocks in an area.
- One way of setting the block to paint with is to place it in your off-hand (the F key by default), then select the Block Painter item which will grab the item's block name and put it back into your inventory.
- To view the Paint Settings menu, hold Sneak and right-click the Block Painter item. Within the menu, you can:
***
# Undo/Redo:
- For most actions you execute, there will be an [Undo] option in the Block Editor menu towards the top next to the [Shift] option. When you click undo, the system will undo the most recent action and give you the [Redo] option in case you want to redo the last action again. The undo and redo options can also be found in the main Block Editor Settings menu.
***
# Important Notes:
- This datapack can cause unintended results if not used carefully. The author of this datapack (MichaelsLife) assumes no responsibility for any damages done to your world. (Always make a backup copy of your world!).
- This datapack force loads the chunk where you place the MLBlock System item.
- This datapack uses the MLCES datapack.
- This datapack sets the game rule commandBlockOutput to false.
- To unload the datapack, run this function:
/function ml_block:system/unload
- Add the tag debug to yourself if you want to receive debug warnings or error messages for this datapack.
The ML Block Editor provides tools to make building in Minecraft easier.
Features:
- Tools such as Fill, Clone, Rotate, Mirror, and Stack.
- Set the selection area by right-clicking two points, with the ability to right-click and drag points around to edit the selection, or use the menu for precise adjustment.
- Provides a single use Undo and Redo option in most cases.
- Easily set up walls with the fill tool, stack a pattern along an axis, rotate or mirror a structure along a pivot point, or quickly clear an area with the Block Clear item by selecting two points and confirming.
- Use the Block Painter item to easily replace blocks with another type, controlling brush size, rate, flow, offset, and rounded corners.
- Use a random set of blocks for the fill or paint tool by placing blocks in your hotbar and adjusting the weights through the menu.
Here are the steps to install the data pack and the resource pack (contained in the zip file download):
- Step 1: Unzip the MLBlock.zip file in your downloads folder.
- Step 2: Place the ml_block and ml_ces folders into your Minecraft world's datapacks folder.
- Step 3: Place the resources.zip file into the main directory of your Minecraft world if you want textured items, but the resource pack is not required.
***
# Editor Setup: First Steps
- You must first run this function to be an editor for the Block Editor System:
/function ml_block:editor
- Once you receive the MLBlock System item, place it in a safe 1-wide by 3-high space to initialize the system.
- After you receive the editor items, you can select an area that you want to edit, or use the Block Painter item.
- First, select the Block Selector item, then look at the block you want to use as the first point, and right-click. Then do the same on another block to set the second point of the selection.
- When the menu shows up in your chat, choose which action you would like to execute: Fill, Clone, Rotate, Mirror, or Stack. See details below for more information on the editor actions.
- Once you've selected your action and settings, click the [Execute] option. If the option is not available, it's most likely because you have not selected enough points to create the selection or target area.
***
- To access the main settings for the Block Editor system, select the Block Editor Settings item and right-click. From the menu, you can edit the main settings, as well as access the Block Editor and and Paint Settings menus.
***
# Editor Actions:
- Fill: The fill action will fill the selection area with the set block type.
- You can click the Block Type to edit the block string manually, or click the [Select] option next to it for more ways of selecting the desired block type.
- You can also enable the Random Fill option to randomly use different block items in your hotbar as the blocks to fill within the selection.
- There are different Fill Actions to choose from: Replace will replace only the target blocks. Hollow will create an outline inside the selection area and hollow out the center. Keep will only fill the air blocks within the selection area. Outline will create an outline inside the selection area, but keep the inner blocks intact. Walls will create 4 walls at the edges of the selection area.
- Clone: The clone action will copy the selection area to a target area.
- The primary action will determine how the clone will work. Replace is the default and replaces all blocks in the target area. Filtered will only replace the blocks that match the filter. Masked will clone all blocks except the air blocks from the selection area.
- The secondary action will also determine how the clone will work. Force makes sure the clone will succeed even if the selection area overlaps with the target area. Normal will attempt to clone but fail if the selection and target areas overlap. Move will move the selection area to the target area, even if they overlap.
- Rotate: The rotate action will rotate the selection area around a pivot point.
- The Amount & Direction can either be 90 degree clockwise, 180 degrees, or 90 degrees counter-clockwise.
- The Move & Replace option will move the selection area to the new rotation, replacing all blocks in its path.
- The Ignore Air Blocks option will ignore all the air blocks in the selection area when rotating, which may preserve some blocks in the new rotation area.
- The Pivot Point Editor will allow you to move the pivot point, which will determine which point the selection area will rotate around.
- Mirror: The mirror action will mirror the selection area along an edge.
- The Direction will determine which axis the mirror will take place along.
- The Move & Replace option will move the selection area to the new mirrored position, replacing all blocks in its path.
- The Ignore Air Blocks option will ignore all the air blocks in the selection area when mirroring, which may preserve some blocks in the new rotation area.
- The Pivot Point Editor will allow you to move the pivot point, which will determine which point the selection area will mirror at.
- Stack: The stack option will duplicate the selection area 1 or more times along an axis.
- The Axis option will select which axis to stack along.
- The Count option will determine how many times to duplicate the selection area.
- The Action will determine the behavior of the stack action. Replace will replace all blocks in the target area. Filtered will only duplicate certain types of blocks from the selection area. Masked will duplicate all blocks except air from the selection area.
***
# Selection Area:
- Click the [Selection] option from the Block Editor menu to edit the size and position of the selection area. You can manually decrease or increase each axis separately, or expand/contract the selection area. You can also hide the selection display, and see the total block count within the selection area.
***
# Commands:
- Click the [Commands] option from the Block Editor menu to get various commands that you can run on the selection or target areas.
- The Kill Entities command will kill a certain entity that is within the selection area.
- The Fill command will fill the selection area with a certain block type.
- The Clone command will clone the blocks in the selection area to a specified target area.
- The Block Count command will count the number of a block type within the selection area.
- The Random Point command will execute a command at a random point position within the selection area.
***
# Shift:
- Click the [Shift] option from the Block Editor menu to shift all the blocks in the selection area in a certain direction.
- Select the Shift Amount, which determines how many blocks to shift the entire selection area by.
- Then click a left or right arrow for the desired Axis to execute the shift.
***
# Painting:
- The Block Painter item allows you to paint with a certain block type to change the blocks in an area.
- One way of setting the block to paint with is to place it in your off-hand (the F key by default), then select the Block Painter item which will grab the item's block name and put it back into your inventory.
- To view the Paint Settings menu, hold Sneak and right-click the Block Painter item. Within the menu, you can:
- Select the block type manually or using the sub-menu.
- Set the paint Action. Normal will simply paint by replacing the target block you are looking at. Filter will only paint on certain types of blocks that you specify.
- Enable or disable the Random paint which will use items in your hotbar with certain weights to paint with random blocks.
- Set an Offset which will paint at an offset position from the block you are targeting.
- Set an Interval, which means how often your brush will paint. If you set a max value, it will choose a random number between min and max.
- Set the Brush Size which determines how many blocks are affected on a single paint action.
- Set if the brush is Rounded, which means the corners will be removed. This option only works if at least two of the axis sizes are a size of 3 or more.
- Set the Brush Flow which will determine the percent chance of the brush replacing any blocks on each paint action.
***
# Undo/Redo:
- For most actions you execute, there will be an [Undo] option in the Block Editor menu towards the top next to the [Shift] option. When you click undo, the system will undo the most recent action and give you the [Redo] option in case you want to redo the last action again. The undo and redo options can also be found in the main Block Editor Settings menu.
***
# Important Notes:
- This datapack can cause unintended results if not used carefully. The author of this datapack (MichaelsLife) assumes no responsibility for any damages done to your world. (Always make a backup copy of your world!).
- This datapack force loads the chunk where you place the MLBlock System item.
- This datapack uses the MLCES datapack.
- This datapack sets the game rule commandBlockOutput to false.
- To unload the datapack, run this function:
/function ml_block:system/unload
- Add the tag debug to yourself if you want to receive debug warnings or error messages for this datapack.
| Compatibility | Minecraft 1.20 |
| Tags |
2 Update Logs
Update #2 : by michaelslife 02/25/2024 10:50:23 amFeb 25th
The MLCES datapack was updated to fix an issue that prevented other datapacks from checking interactions/attacks on interaction entities.
If updating to this datapack from an older version, just run the /reload command if you have block selection points already set when you open your world.
If updating to this datapack from an older version, just run the /reload command if you have block selection points already set when you open your world.
LOAD MORE LOGS
tools/tracking
6171011
119
ml-block-editor-minecraft-1-20-4


![Terralith [Now 1.20!]](https://static.planetminecraft.com/files/image/minecraft/data-pack/2022/187/15771926-terralithpmccopy_s.jpg)


 Papa Enny
 VocalMC
 Panda_Tyger
 Christ8Pizza
 Molitoola
 sniffercraft34
 ingridguerci94
 Noncommercial
 MoonAstraea

 Samster6868
![[1.20.4] Countdown Timer Minecraft Data Pack](https://static.planetminecraft.com/files/image/minecraft/data-pack/2024/715/17735404-screenshot_s.jpg)
 FlexNiko
 regfunkid
Create an account or sign in to comment.
Well done!
/function ml_block:editor
This is just Worldedit but better(ft. Obvious Flaws) and easier to manipulate the outcomes
Tysm