


Published Dec 17th, 2011, 12/17/11 8:42 pm
- 4,470 views, 1 today
- 15
- 9
- 11

418
Since it will be awhile before Paril can work out an "official" tutorial on how to use MCskin3D, I'll make an unofficial one instead! This will simply be a basic rundown of the Color and Brush tools and some of the features. Nothing more. Also: Yes I AM the artist of MCskin3D. so I dunno maybe this is half-offical o_o?
I am gonna try and keep the images down to the minimum... I know how slow the Internets can be!
BEFORE WE BEGIN:
Here is the link to MCskin3D
It is currently WINDOWS ONLY until Paril can work out the kinks for the Mac/Linux versions. He has no idea on a proper date as of yet. The same goes for both mob and custom model characters as well as texture packs. No proper date AS OF YET.
How to install:
Simply run the EXE file. If you have any problems during installation or when running the program, ask paril. I am the artist of MCskin3D, I'm not tech support, and I'm not a programmer.
Now for the fun stuff!
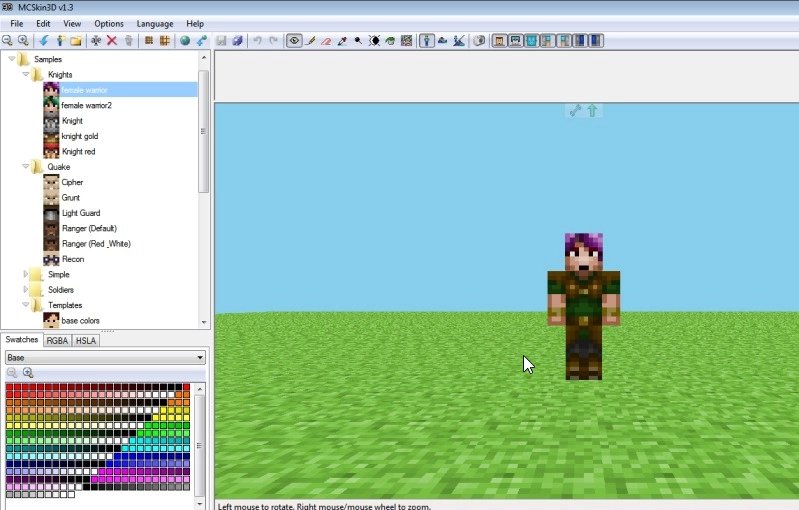
Open up your Mcskin3D and you should get a little something like this:
in the lower left corner you'll see swatches! Most of the swatches here where handpicked by me owo; especially the skintones, and both warm and cold color swatches, so I hope you like them. In case you don't want to use swatches though there are the two tabs RGBA and HSLA you can click on to switch over to them.

While in those views you can also see your primary and secondary colors shown in the two boxes there. Primary is your main color for your brushes. When you hold down the left button, that will be the color you place down. If you hold Shift, you'll temporarily use the secondary color instead. You may switch them around at any time by clicking on the boxes.
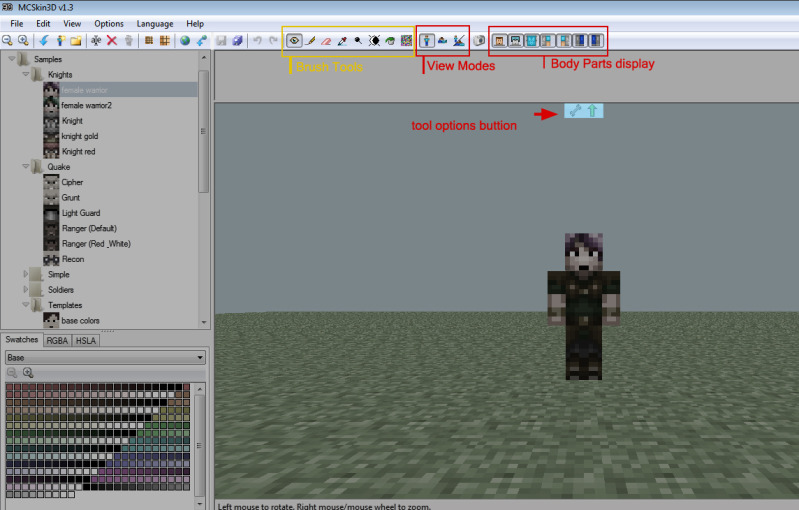
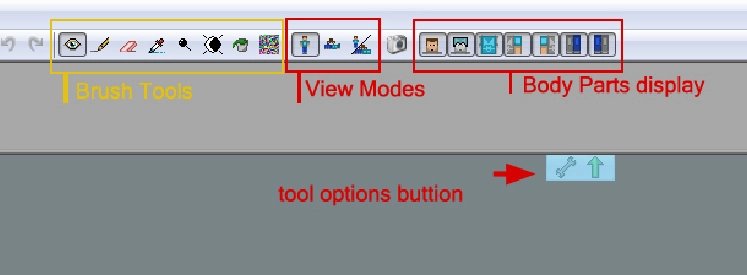
Now then, right above the character you will see a whole bunch of interesting looking buttons highlighted here
We're only going to look at the brush tools right now in this post!
Brush Tools
These are the tools you will be using to do most of your skin making with. You can erase mistakes, or shade in with them. There's even a noise tool for all your noisy needs!
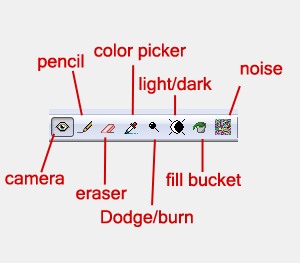
Camera: Used to view your current skin model. Left mouse button to rotate, right mouse button for camera. (scroll wheel will also work)
Pencil: Used to draw on your skin. Left mouse button to draw, right mouse button to rotate. Hold shift to use secondary color.
Eraser: Erases away anything you made. be warned though! it goes right to transparency, so be sure to fill out those empty spots too! Left mouse button to erase, right mouse button for camera.
Color Picker: Used to pick up any colors currently on the skin. Left click to pick up colors, right click for camera. Holding down shift will pick up that color for your secondary color box.
Dodge/Burn: Used to Darken and lighten colors on the skin giving the colors a dullish tone. Left click to use dodge/burn, hold down shift to temporarily swap between the two.
Light/Dark: Similar to dodge/burn except the colors can be more vibrant in their shading. Left click to use lighten/darken, hold down shift to temporarily swap between the two.
Fill Bucket: Used to fill in entire skins, or just part of them. Left click to fill whole pixels full of colors, shift to use secondary color instead. Holding Ctrl and hovering over a side of your skin will fill in for just that part of the whole body!
Noise: In MCskin3D, noise is a brush unlike most programs out there. drag it like any other brush to create random, pixelated noise. Left click to add the noise, right click to move camera.
One more thing!
Right below the toolbar, but above the skin view is a button called Tool options! It maybe hidden from you, but click on the button with a wrench on it to display extra options for your tools They're very helpful!
Alright that's all for now! I think I caused enough damage here zoz if anyone has any questions about the tutorial or has complaints about the images or the tutorial itself, lemme know okay?
I am gonna try and keep the images down to the minimum... I know how slow the Internets can be!
BEFORE WE BEGIN:
Here is the link to MCskin3D
It is currently WINDOWS ONLY until Paril can work out the kinks for the Mac/Linux versions. He has no idea on a proper date as of yet. The same goes for both mob and custom model characters as well as texture packs. No proper date AS OF YET.
How to install:
Simply run the EXE file. If you have any problems during installation or when running the program, ask paril. I am the artist of MCskin3D, I'm not tech support, and I'm not a programmer.
Now for the fun stuff!
Open up your Mcskin3D and you should get a little something like this:
in the lower left corner you'll see swatches! Most of the swatches here where handpicked by me owo; especially the skintones, and both warm and cold color swatches, so I hope you like them. In case you don't want to use swatches though there are the two tabs RGBA and HSLA you can click on to switch over to them.
While in those views you can also see your primary and secondary colors shown in the two boxes there. Primary is your main color for your brushes. When you hold down the left button, that will be the color you place down. If you hold Shift, you'll temporarily use the secondary color instead. You may switch them around at any time by clicking on the boxes.
Now then, right above the character you will see a whole bunch of interesting looking buttons highlighted here
We're only going to look at the brush tools right now in this post!
Brush Tools
These are the tools you will be using to do most of your skin making with. You can erase mistakes, or shade in with them. There's even a noise tool for all your noisy needs!
Camera: Used to view your current skin model. Left mouse button to rotate, right mouse button for camera. (scroll wheel will also work)
Pencil: Used to draw on your skin. Left mouse button to draw, right mouse button to rotate. Hold shift to use secondary color.
Eraser: Erases away anything you made. be warned though! it goes right to transparency, so be sure to fill out those empty spots too! Left mouse button to erase, right mouse button for camera.
Color Picker: Used to pick up any colors currently on the skin. Left click to pick up colors, right click for camera. Holding down shift will pick up that color for your secondary color box.
Dodge/Burn: Used to Darken and lighten colors on the skin giving the colors a dullish tone. Left click to use dodge/burn, hold down shift to temporarily swap between the two.
Light/Dark: Similar to dodge/burn except the colors can be more vibrant in their shading. Left click to use lighten/darken, hold down shift to temporarily swap between the two.
Fill Bucket: Used to fill in entire skins, or just part of them. Left click to fill whole pixels full of colors, shift to use secondary color instead. Holding Ctrl and hovering over a side of your skin will fill in for just that part of the whole body!
Noise: In MCskin3D, noise is a brush unlike most programs out there. drag it like any other brush to create random, pixelated noise. Left click to add the noise, right click to move camera.
One more thing!
Right below the toolbar, but above the skin view is a button called Tool options! It maybe hidden from you, but click on the button with a wrench on it to display extra options for your tools They're very helpful!
Alright that's all for now! I think I caused enough damage here zoz if anyone has any questions about the tutorial or has complaints about the images or the tutorial itself, lemme know okay?
| Tags |
414258
6


 WYATTiscool7065
 PowderM3
 OrderWithoutBorders
 proventhesheep
 sweaterduck
 Raptop
 Unstable_
 michaelo
 ericbarbwire

 ajthepeach
 insert___text
 Ayanoaishi

 Boarrito MCBoar
Create an account or sign in to comment.
-P
-P