


189
I've recently found another way to shade hair, so I'll make a tutorial about it.
1. Find your favorite skin making website/program. I'll be using MinecraftSkins the Skindex. Here's a link: www.minecraftskins.com/skin-editor/
2. Fill your left, back, and right hair the color you are using for your skin. I'm using the color black.
3. Start to make your hair color lighter. If you're hair color is light already, make it dark. Click your lighter button ( ), and start to make a diagonal line from right to left in the top to the bottom.
4. Repeat step 3.
5. Keep repeating step 3 and 4, then you should get something that looks like this: It might look like the hair color is white/gray, so you might want to view my other tutorial, www.planetminecraft.com/blog/hair-shading-tutorial-2528374/ (Copy and paste)
Here, you've completed the tutorial for the left, back, and right part of the hair. Do the EXACT same thing for the front, front where the hair drops, neck, front of the neck, back where hair drops, and fringes.
1. This is for the front of the face. Fill the color the color you're using for your hair. Since I'm using black, I'll make the eyebrows a different color.
2. Click the light color, and do the exact same thing for front, just like what you did with your left, back, and right.
3. Repeat step 2. Keep doing this until the end and you should get something like this:
4. Now color your eyebrows black.
Finished!
1. This is for the fringes. This time, you do do the exact same thing, but except you come from right to left, instead of left to right. Now click the lighter button. Make it light from right to left.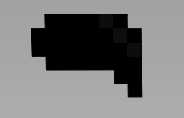
2. Repeat step one. Keep repeating step one and you should end up with something like this: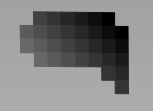
Dluh dlun dluh dlun dluh dlun dluh! Finished! Basically, you do the exact same thing for.. everything, but the top.
1. This is for the top. Make the top lighter, slanting form the top to bottom on BOTH sides.
2. Keep repeating step 1.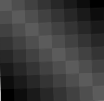
I had to rush kinda, so it's not very descriptive as my first one :/ Oh weeeeeelllll!
1. Find your favorite skin making website/program. I'll be using MinecraftSkins the Skindex. Here's a link: www.minecraftskins.com/skin-editor/
2. Fill your left, back, and right hair the color you are using for your skin. I'm using the color black.
3. Start to make your hair color lighter. If you're hair color is light already, make it dark. Click your lighter button (
), and start to make a diagonal line from right to left in the top to the bottom. 4. Repeat step 3.
5. Keep repeating step 3 and 4, then you should get something that looks like this:
It might look like the hair color is white/gray, so you might want to view my other tutorial, www.planetminecraft.com/blog/hair-shading-tutorial-2528374/ (Copy and paste)Here, you've completed the tutorial for the left, back, and right part of the hair. Do the EXACT same thing for the front, front where the hair drops, neck, front of the neck, back where hair drops, and fringes.
1. This is for the front of the face. Fill the color the color you're using for your hair. Since I'm using black, I'll make the eyebrows a different color.
2. Click the light color, and do the exact same thing for front, just like what you did with your left, back, and right.
3. Repeat step 2. Keep doing this until the end and you should get something like this:
4. Now color your eyebrows black.
Finished!
1. This is for the fringes. This time, you do do the exact same thing, but except you come from right to left, instead of left to right. Now click the lighter button. Make it light from right to left.
2. Repeat step one. Keep repeating step one and you should end up with something like this:
Dluh dlun dluh dlun dluh dlun dluh! Finished! Basically, you do the exact same thing for.. everything, but the top.
1. This is for the top. Make the top lighter, slanting form the top to bottom on BOTH sides.
2. Keep repeating step 1.
I had to rush kinda, so it's not very descriptive as my first one :/ Oh weeeeeelllll!
| Tags |
tools/tracking
2686890
6
hair-shading-tutorial-2-not-finished


 mrpixel140
 Yuzukodo
 Ender Sparkle
 Apro87
 JoelHacker
 Molitoola
 ChristalWolf

 MegaMinerDL
 ItsAlexHimself_
Create an account or sign in to comment.