- 248,918 views, 5 today
2,206
Hey,
Before beginning, please excuse me for my approximate English, i am a french builder.
(With an edit for English clarity by DutchGuard)
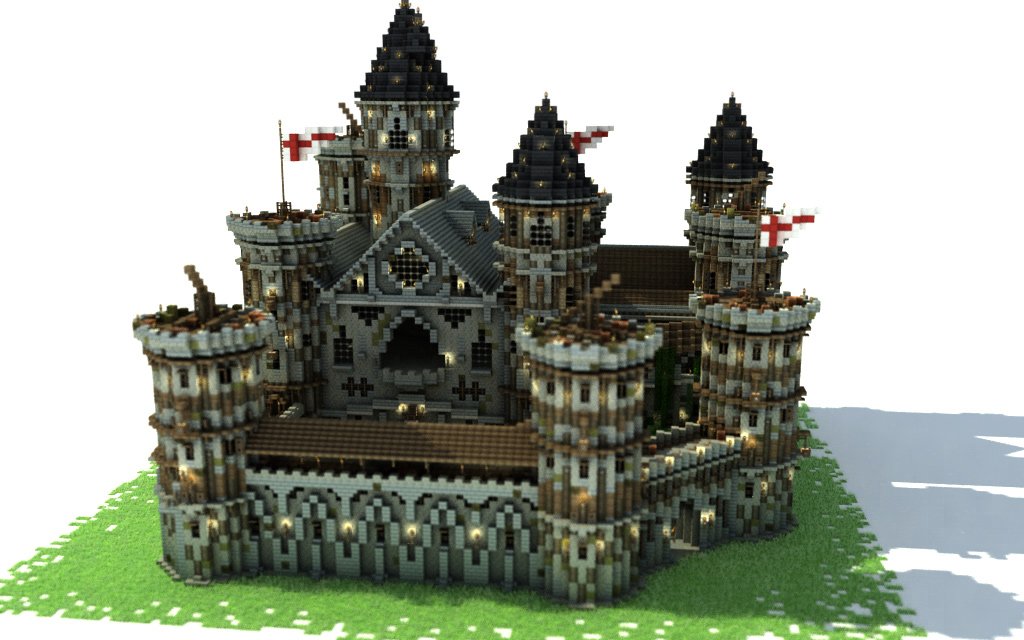
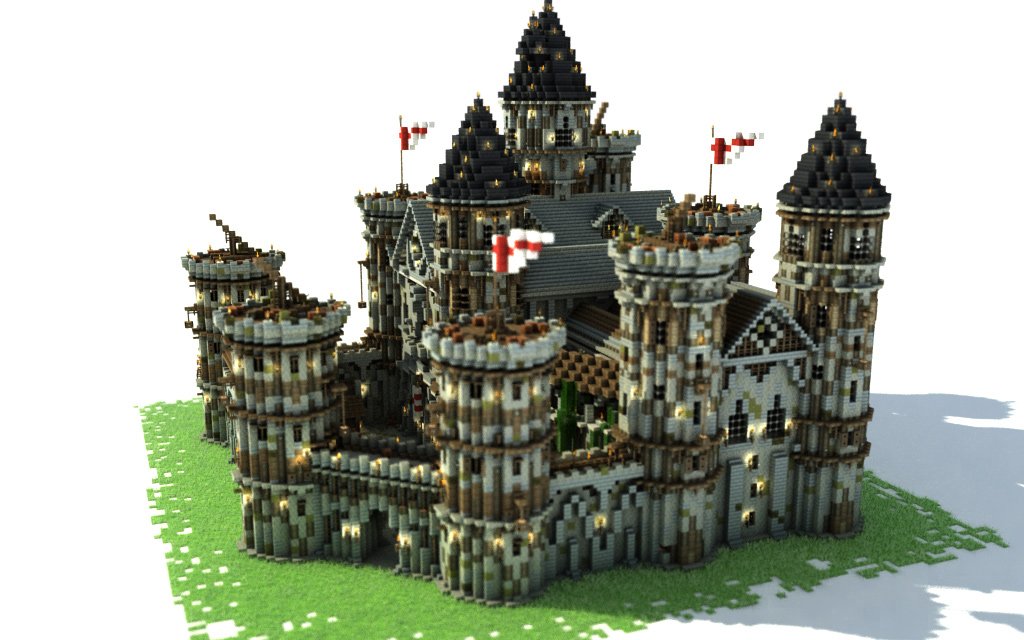
In this tutorial, I am going to try to give you the best possible advice on how to build a medieval-style castle.

 Stage 1: The inspiration
The first stage consists of looking for images of existing castles and of finding the style which you would like to give your castle. It will give you some good ideas of what you want the final product to look like.
It would also be smart ot decide on a medieval texture pack at this point.
For example:

 Stage 2: The plan
When building on a large scale, it is important to draw a top-dpwn view of the castle.
Draw the outlines of the castle, the various towers, the inner courtyard, the main entrance, etc.
Once you think that your plan is complete, reproduce the plan on minecraft in life-size, to a scale you like. You can use some wool of color, for example:
- Red wool: outer walls
- Orange wool: tower
- Blue wool: entrance
Etc....
Concerning outlines, try to think o out of the boxo Try building walls diagonally to avoid making square or rectangular castles.
 Stage 3: Construction of towers
It is at this stage that the construction begins. Before of you start, define various types of towers (different forms, different heights, different thicknesses) to avoid making a monotonous castle.
Also define the materials which you will use (I advise you to use a combination of cobble, stonebrick and raw wood).
The base of your tower has to seem solid, strong, seem more thick that the rest of the tower, build murderesses, do not hesitate to vary materials, to insert some raw wood as " expanding beams ".
Details:
- Buttons: put buttons on the extremities of beams give a very attractive effect of detail
- Lanterns, torches: hesitate to build one or two lanterns (according to your texture pack, the glowstone can have a texture of lantern) or to place torches on a barrier.
- Trapdoors can take the role of shutters and so give more depth to your tower
- Mossy cobblestone: replace certain blocks of cobble stone by the mossy cobblestone (In the same way also for the stone brick) to give an ancient aspect to the structure.
- Half-paving stones allow to give relief to the tower
Arrangement of the summit of the tower:
- If the top of your tower is "opened", you can place catapults or flags there.
- If the summit of your tower is roofed, you can fit in a room, chemistry laboratory, library, etc.

 Stage 4: Construction of bulwarks
As for towers plan various heights according to their location and their role in the structure.
Give of the relief and details to your wall by adding motives, barriers, murderesses, see even parts of the wall destroyed.
The arrangement of bulwarks:
You can build a kind of roof, of posts of rest, etc. Do not skimp on the detail.
For the highest walls which will support the livable part of your castle:
- Build reinforcements in your wall
- Overlay big windows
- Overlay motives with different materials
- Avoid reproducing the same plan of windows on all your main walls and watch at the same time that they are aligned between them to have coherent floors inside the castle.


 Stage 5: Construction of the roof
To avoid a big risk-taking, opt for a triangular roof, nevertheless, watch that the top of the roof does not exceed your towers if it is the case, like on my castle and build three triangular roofs to decrease their height and at the same time give certain relief. If you can, make two very different roofs one of the other one and do not make them of the same material and the same orientation still in a concern of aestheticism.

 Stage 6: Arrangement of the yard
The ground: I advise you use paved ground strewed with gravel
Green space: a tree, flowerbeds of flower give a little color and life to the yard of the castle
A stable: a necessary building made the ground in wood / gravel / straw (according to your texture pack), plan cauldrons with some water in them.
Then try to add a little of life to your yard by leaving least empty space possible: for example:
- Inn of the guards
- Scaffold to repair the damages of a wall.
- Safes / boxes, flags, gallows, etc. o ¦


 Stage 7: Fit out your house
This stage will be the object of another tutorial outside the contest which will be born in a few weeks.
Both key points not to be neglected:
- Give a maximum of dimension and depth to your towers and walls.
- Add as many details as you can.
DL link: http://www.planetminecraft.com/project/medieval-building-pack-angelblockapp/
Visit mc.westeroscraft.com to have a look around. /warp Heaven_lordtest

Thank you!
Before beginning, please excuse me for my approximate English, i am a french builder.
(With an edit for English clarity by DutchGuard)
In this tutorial, I am going to try to give you the best possible advice on how to build a medieval-style castle.

 Stage 1: The inspiration
The first stage consists of looking for images of existing castles and of finding the style which you would like to give your castle. It will give you some good ideas of what you want the final product to look like.
It would also be smart ot decide on a medieval texture pack at this point.
For example:

 Stage 2: The plan
When building on a large scale, it is important to draw a top-dpwn view of the castle.
Draw the outlines of the castle, the various towers, the inner courtyard, the main entrance, etc.
Once you think that your plan is complete, reproduce the plan on minecraft in life-size, to a scale you like. You can use some wool of color, for example:
- Red wool: outer walls
- Orange wool: tower
- Blue wool: entrance
Etc....
Concerning outlines, try to think o out of the boxo Try building walls diagonally to avoid making square or rectangular castles.
 Stage 3: Construction of towers
It is at this stage that the construction begins. Before of you start, define various types of towers (different forms, different heights, different thicknesses) to avoid making a monotonous castle.
Also define the materials which you will use (I advise you to use a combination of cobble, stonebrick and raw wood).
The base of your tower has to seem solid, strong, seem more thick that the rest of the tower, build murderesses, do not hesitate to vary materials, to insert some raw wood as " expanding beams ".
Details:
- Buttons: put buttons on the extremities of beams give a very attractive effect of detail
- Lanterns, torches: hesitate to build one or two lanterns (according to your texture pack, the glowstone can have a texture of lantern) or to place torches on a barrier.
- Trapdoors can take the role of shutters and so give more depth to your tower
- Mossy cobblestone: replace certain blocks of cobble stone by the mossy cobblestone (In the same way also for the stone brick) to give an ancient aspect to the structure.
- Half-paving stones allow to give relief to the tower
Arrangement of the summit of the tower:
- If the top of your tower is "opened", you can place catapults or flags there.
- If the summit of your tower is roofed, you can fit in a room, chemistry laboratory, library, etc.

 Stage 4: Construction of bulwarks
As for towers plan various heights according to their location and their role in the structure.
Give of the relief and details to your wall by adding motives, barriers, murderesses, see even parts of the wall destroyed.
The arrangement of bulwarks:
You can build a kind of roof, of posts of rest, etc. Do not skimp on the detail.
For the highest walls which will support the livable part of your castle:
- Build reinforcements in your wall
- Overlay big windows
- Overlay motives with different materials
- Avoid reproducing the same plan of windows on all your main walls and watch at the same time that they are aligned between them to have coherent floors inside the castle.


 Stage 5: Construction of the roof
To avoid a big risk-taking, opt for a triangular roof, nevertheless, watch that the top of the roof does not exceed your towers if it is the case, like on my castle and build three triangular roofs to decrease their height and at the same time give certain relief. If you can, make two very different roofs one of the other one and do not make them of the same material and the same orientation still in a concern of aestheticism.

 Stage 6: Arrangement of the yard
The ground: I advise you use paved ground strewed with gravel
Green space: a tree, flowerbeds of flower give a little color and life to the yard of the castle
A stable: a necessary building made the ground in wood / gravel / straw (according to your texture pack), plan cauldrons with some water in them.
Then try to add a little of life to your yard by leaving least empty space possible: for example:
- Inn of the guards
- Scaffold to repair the damages of a wall.
- Safes / boxes, flags, gallows, etc. o ¦


 Stage 7: Fit out your house
This stage will be the object of another tutorial outside the contest which will be born in a few weeks.
Both key points not to be neglected:
- Give a maximum of dimension and depth to your towers and walls.
- Add as many details as you can.
DL link: http://www.planetminecraft.com/project/medieval-building-pack-angelblockapp/
Visit mc.westeroscraft.com to have a look around. /warp Heaven_lordtest

Thank you!
| Credit | Heaven_Lord, 3D render: FunFrock and Maruku |
| Tags |
2 Update Logs
Update #2 : by Heaven_Lord 07/19/2012 4:52:50 amJul 19th, 2012
new organization.
LOAD MORE LOGS
tools/tracking
1132860
6
how-to-build-a-medieval-castle-contest


![How to build a medieval castle [Contest] Minecraft Blog](https://static.planetminecraft.com/files/resource_media/screenshot/1230/tutorial_2874050_thumb.jpg)

![How to use WorldEdit [2023]](https://static.planetminecraft.com/files/resource_media/screenshot/small/12390404-planetmcthumbnail-e750_thumb.jpg)
![How to get a custom player head in Minecraft 1.14 [Works on all versions]](https://static.planetminecraft.com/files/resource_media/screenshot/1439/small/screenshot2014-09-122312318177949_thumb.jpg)


Create an account or sign in to comment.
1. what were the materials you used?
2. Can my brother and I attempt to creat this castle on minecraft PS3?
Thanks
Mais bouffant de l'anglais toute la semaine, n'aurais tu point la même en Francais ?! ;)
Merci
edit: Laisses tomber ;) J'ai déjà tout lu ,)
Check out this Video And you will know What i mean
Link: www.youtube.com/watch?v=dkSPzbY3-kQ&list=UU2gV2mQcNVSg71qgi2Hgcfg
http://www.planetminecraft.com/project/the-legend-of-zelda-hero-of-courage-remake-of-ocarina-of-time